A Select Objects OIEP uses the 'Select Objects' option on the 'Choose Data Source' parameter in the Outbound Integration Endpoint Wizard. An output template defines the data to be exported and connects it to the desired format. This feature enables you to use a different output format for each selected object type if required.
At least one output template is required, but common setup is to use a single output template for a Select Objects OIEP since the selected data determines the template. Keep in mind that batching is restricted to a single template, so only use multiple templates when required.
Configuring a select objects output template involves the following steps:
-
Configure the object types
-
Specify the format
-
Configure pre-processor and post-processor, based on availability on your system.
Configure the Object Types
The object type selection determines the STEP data that will be exported.
-
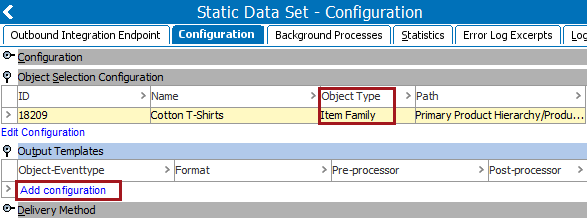
In System Setup, select the relevant OIEP > Configuration tab > Output Templates section > click the Add configuration link to display the 'Conditions for output template' dialog.
-
In the 'Conditions for output template' dialog, select 'All object types' or 'Specify' and choose the object types that correspond at the root level to the objects selected in the wizard OIEP - Select Objects - Choose Data Source step, which is displayed in the Object Selection Configuration section under the Object Type column.
If Collections were selected in the wizard, in the 'Conditions for output template' dialog, add the relevant object types of the objects which are part of the collection.
Note: Selecting an output template object defines only the object types for export but does not define the objects that are included in the actual output message, since the format of the template may dictate that parent, child, or referenced objects are included. Additionally, the advanced settings for format determine if the selected objects, their children, or both should be considered for the export.
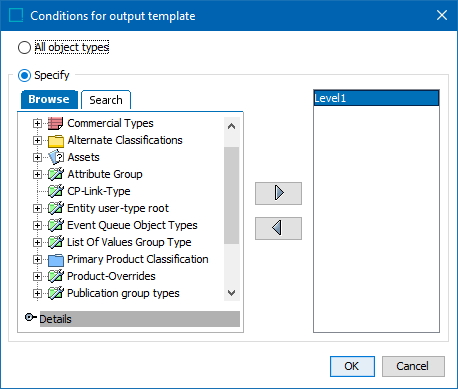
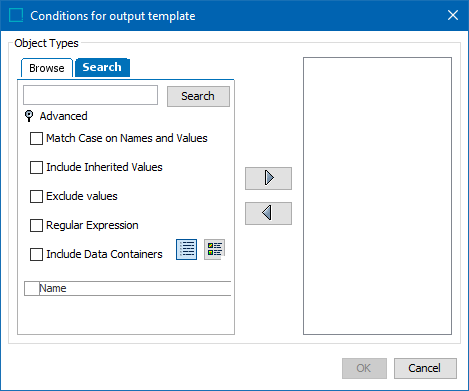
On the Search tab, open the Advanced section to display additional search options.
Click the OK button.
-
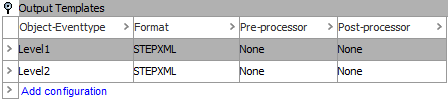
Select Objects endpoints can have only one template per object type. Repeat the previous steps until all required formats are displayed, keeping in mind the limitations of multiple output templates defined in the next section. Event type is not valid for this endpoint.
-
To edit existing Object-Eventtype settings, click into the desired field to display an ellipsis button (
 ). Click the ellipsis button () to display the 'Conditions for output template' dialog discussed above.
Using Multiple OIEPs or Multiple Output Templates
Since delivery method is per endpoint, not per output format, if you need a different output to go to each external system, you must use multiple OIEPs.
Multiple output templates can be created to allow data output based on specific object types. This prevents the same data from being exported across all chosen object types. Multiple output templates also help to reduce data output, which increases performance both for STEP and for downstream systems. In addition, the use of multiple output templates should reduce the need for customizations.
Limitations of Multiple Output Templates
-
Output files are only delivered to one destination, regardless of the number of output templates.
-
Output templates encompassing all object types are only available if all object types are chosen when making the configuration. This prevents excess output from the endpoints.
-
Batching occurs per template type.
-
Different output formats cannot be defined for the same object type. Common setup is to avoid combining different output formats (e.g., STEPXML and CSV) in the same endpoint.
Configure the Format
The format selection determines how the STEP data is formatted (XML or tabular).
-
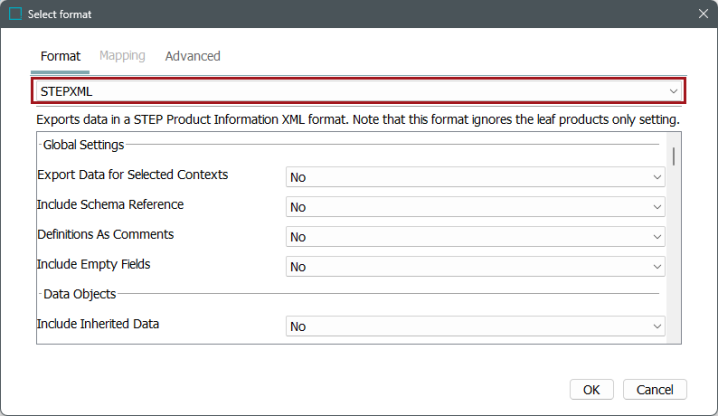
Click into the format column to display the ellipsis button (
). Click the ellipsis button () to display the 'Select format' dialog.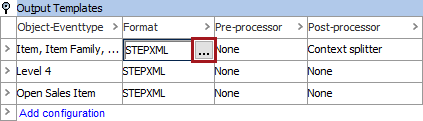
-
In the Select format window, on the Format tab, select the desired format from the dropdown. These are the same options as in the Export Manager, based on your licenses.
Use the following links for additional information:
-
Creating Document Indexes with Alphabetical Index - XML Format
-
Importing Flatplanner Publications in Publication Excel with Flatplanner Format
-
Exporting and Importing Flatplanner Publications with Publication Excel Format
-
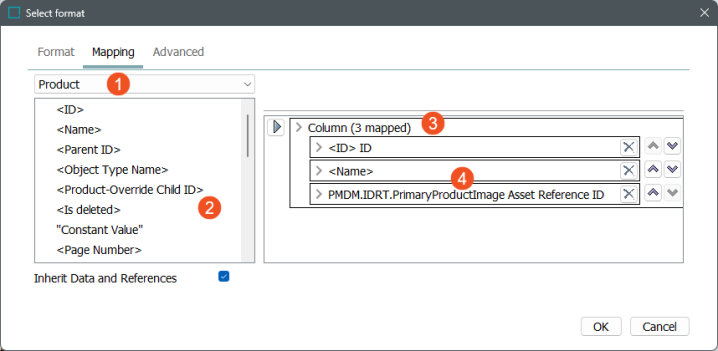
When available, specify how to map data to the export format, including the elements identified in the image below: object super type dropdown, data source, mapping target, and mapping rules.
For more information about the object super type dropdown, refer to the Export Manager - Select Objects topic. For more information about the other elements, refer to the Export Manager - Map Data topic.
Note: The Mapping tab is enabled when the format selected requires mapping. Selected formats, including STEPXML and Advanced STEPXML, are automatically mapped so the Mapping tab is disabled.
-
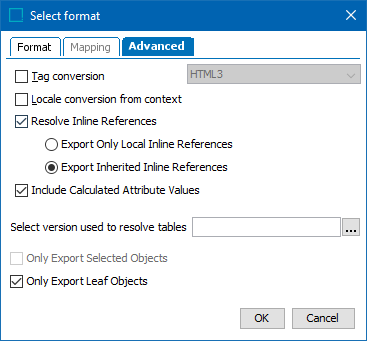
On the Advanced tab, a number of advanced export options can be specified.
-
Tag conversion: Converts tags to match the selected output format. This setting is optional.
If this box is left unchecked, any formatting tags that are included in attribute values will not be converted in the outbound message. For example, if an attribute value contains bold text (which must be made bold with a STEP Style Tag, e.g., <bold>/</bold>), this tag will not be converted to its corresponding HTML output format (e.g., <B>/</B>) in the export. For more information on STEP Tags, refer to the Tags topic in the System Setup documentation.
-
Locale conversion from context: Converts numbers into the numeric format that corresponds to the selected locale. If Smartsheets are used for format, this must remain unchecked. By default, the option is not checked.
-
Resolve Inline References: Resolves inline references when they are exported. This box is checked by default, along with the option 'Export Inherited Inline References.'
If unchecked, inline references will be exported with the inline reference tagging instead of the actual content pulled in by the inline reference. For example, if an attribute called 'Product Number' has an inline reference to pull in the STEP ID of the object (e.g., 12345), the attribute value will not contain 12345. Instead, it will contain tagging like the following:
<ref attrid="" equalsign="=" includeattrname="false" resolveto="objid" separator=";"/>
This setting is valid if the user plans to re-import the file and not overwrite the inline reference with a static value. For more information on inline references, refer to the Inline References in Attribute Values topic in the Getting Started documentation.
-
-
Include Calculated Attribute Values: This option is only enabled (and is checked by default) when calculated attributes are being exported, either on the Select Objects step for STEPXML or via mapping for other formats. When checked, calculated attribute values are resolved upon export.
To output empty calculated attributes, you must also enable the appropriate parameter on the Format step of Export Manager or the Format tab of an OIEP tab. For example, if using the Excel format, enable the 'Export Empty Fields' parameter, for the CSV format, enable the 'Empty fields' parameter, and for the STEPXML format, enable the 'Include Empty Fields' parameter.
If not checked, calculated attribute values are exported with empty values, unless the Force Calculation option has been set on an individual attribute. The Force Calculation option is available when mapping a calculated attribute using the Select Attribute data source and is also available as a transformation. For more information, refer to 'Force Calculation' in the Attributes (and Data Containers) - Data Source Outbound topic and the Outbound Map Data - Transform topic.
The value template is exported for each selected context, including a qualifier ID, which makes it possible to import the same data back into STEP. For information about calculated attribute values, refer to the Calculated Attributes topic in System Setup documentation.
Important: If many complex calculated attribute values (traversing hierarchies and/or references) are used, consider if they should be exported, since it can negatively impact performance. If an export is required, consider scheduling for non-peak times. Simple calculations are not detrimental to an export, regardless of the quantity.
- Select version used to resolve tables: This setting is available for STEPXML if 'Include Tables' is set to Yes and for Advanced STEPXML if the template includes version-dependent content. A publication version should be selected if the tables contain content relevant to a particular publication (such as column or row types that are only valid for certain publication types) or a publication version (such as commercial data). For more information, refer to the Exporting Resolved Tables topic in the Tables documentation.
-
Only Export Selected Objects: Specifies that only objects from the output template are exported. No children are exported. This setting is unchecked by default and is only available if the 'Only Export Leaf Objects' option is unchecked. This setting does not apply to STEPXML or if on the Mapping tab you select Asset, Attribute, List Of Values, Publication Objects, or Unit for formats that require mapping. For illustrations of how this option works, refer to the Classification and Asset Configuration Examples section below.
-
Only Export Leaf Objects: Specifies that only the leaf objects (lowest level of the export object for both events and selected objects) of the selected top hierarchy are included in the export. Selected objects and triggering objects are only included if they have no children. This setting applies to the CSV or Excel format but is not applicable if on the Mapping tab you select Asset, Attribute, List Of Values, Publication Objects, or Unit. For illustrations of how this option works, refer to the Classification and Asset Configuration Examples section below.
Note: Uncheck both ‘Only Export Selected Objects’ and ‘Only Export Leaf Objects’ if all objects (both for triggering events and object selection) and their children should be included in the export.
For more information, refer to the Export Manager - Advanced topic.
Classification and Asset Configuration Examples
When using a format that requires mapping, the following applies to exporting classifications or assets in an OIEP using Choose Data Source = Select Objects:
-
It is not possible to export both classifications and assets in the same CSV file. Instead, create two separate OIEPs - one for classifications and one for assets.
-
In the Object Selection Configuration flipper, if a classification object is selected, and in the Output Templates section, the Format field has Classification selected in the Mapping tab (and relevant data sources are mapped):
-
In the Advanced tab, checking the Only Export Selected Objects option means that only one classification object is exported.
-
In the Advanced tab, checking the Only Export Leaf Objects option means only the children classification objects are exported.
-
In the Advanced tab, checking neither option means both the selected classification object and its children classification objects are exported.
-
-
In the Object Selection Configuration flipper, if a classification object is selected, and in the Output Templates section, the Format field has Asset selected in the Mapping tab (and relevant data sources are mapped), all assets below that classification object are exported.
Important: If a collection contains both classification objects that have assets below them in addition to other asset objects, and the collection is added to the Object Selection Configuration flipper with Asset selected in the Mapping tab for Output Templates section, then all assets within the collection are exported (including the assets below the classification objects).
Configure the Pre-processor and Post-processor
Depending on your system setup, pre-processor and post-processor options may be available.
Pre-processor
Although a business action pre-processor can be set up for a 'select objects' endpoint, it is not recognized and will not cause any changes to the data being processed.
Post-processor
Standard post-processing options should be evaluated if multiple contexts are included in the output. You can configure a post-processor for each of the output templates.
-
Click into the Post-processor column to display the ellipsis button (
). Click the ellipsis button () to display the 'Select Post-processor' dialog.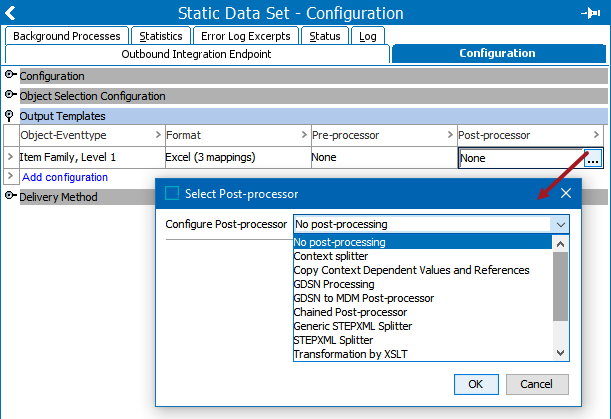
-
In the Configure Post-processor parameter, select from the following options:
-
No post-processing exports files using the standard export functionality.
-
Context splitter generates an export file for each configured context. Each exported file will only contain context specific data. For more information, refer to the OIEP - Post-processor - Context Splitter topic.
When using Excel or CSV format, and multiple contexts are configured for export, you must select Context Splitter, otherwise, a single context will be included in the export.
For the Copy inherited product values parameter, select Yes to copy and save inherited product values to the child product; or select No to use inherited product values in the export, but leave the child product unmodified.
For the Context-specific File Name Template parameter, static text is allowed, and the default separator '##' is placed between $contextID and $filename. Other valid file name delimiter characters include comma (,), period (.), semicolon (;).
Invalid delimiter characters are: less than (<), greater than (>), colon (:), double quote ("), forward slash (/), backslash (\), vertical bar or pipe (|), question mark (?), asterisk (*), and two consecutive periods (..).
The following variables are required for the Context-specific File Name Template parameter:
-
$contextId will be replaced with the ID of the context being exported.
-
$filename will be replaced with the name of the file produced by the export.
-
$extension will be replaced based on the format selected in the Output Templates section.
-
-
Copy Context Dependent Values and References to export context-dependent values and references and add the corresponding ContextID attribute to the value or reference in question. The endpoint generates one file containing values and references for each context specified. For more information, refer to the OIEP - Post-processor - Copy Context Dependent Values and References topic.
For the Copy inherited product values parameter, select Yes to copy and save inherited product values to the child product; or select No to use inherited product values in the export, but leave the child product unmodified.
If you use the Copy Context Dependent Values and References post-processor to add ContextIDs to a cross-context export (exporting data for selected contexts), the downstream system can use the <ContextID> tag to identify specific contexts. Additionally, this facilitates re-importing the exported data into the correct contexts in STEP after processing by a third-party service or application.
-
Chained Post-processor as defined in the OIEP - Post-Processor - Chained Post-processor topic.
-
Generic STEPXML Splitter divides STEPXML messages into multiple STEPXML valid fragments containing one single node per STEPXML file.
-
STEPXML Splitter produces one file per STEP object as defined in the VCSI: STEPXML Splitter Post-processor in OIEP topic in the Configuration Management documentation.
-
Transformation by XSLT transforms data via an XSLT stylesheet before exporting. Under the XSLT-Stylesheet parameter, click the selector button (
 ) and browse or search for the stylesheet to use for the transformation. For more information, refer to OIEP - Post-processor - Transformation by XSLT topic.
 -
Note: This post-processor is only available when running the GDSN to Receiver component.
-