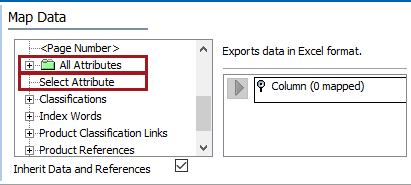
Attributes and data containers can be selected and exported for the objects being exported.
The following options are available to export attributes:
-
All Attributes shows attributes that are relevant for the objects that are selected for export. This includes specification attributes linked to the selected object(s) and description attributes that are valid for the selected object(s).
The All Attributes option allows you to select and map:
-
a single attribute - which is always included in the output
-
an attribute group - which is output following the rules defined below
-
top level All Attributes node - which is output following the rules defined below
These output rules apply when mapping the top level All Attributes node or an attribute group:
-
Non-calculated attributes with a value for at least one object are always included.
Non-calculated attributes without a value for any object in the export are included based on the empty values parameter setting (in CSV: 'Empty fields = Always output'; in Excel: 'Export Empty Fields = Yes').
-
Calculated attributes with a value for at least one object in the export are included if you check the 'Include Calculated Attribute Values' parameter checkbox on the Advanced step or tab.
Calculated attribute without a value for any object in the export are included based on two parameters. 1. The empty values parameter setting (in CSV: 'Empty fields = Always output'; in Excel: 'Export Empty Fields = Yes') and 2. Checking the 'Include Calculated Attribute Values' parameter checkbox on the Advanced step or tab.
The All Attributes option is also used to map data containers. For details, refer to the Mapping Entity Data Containers via All Attributes section below.
-
-
Select Attribute allows you to browse or search for an attribute or attribute group, and also Force Calculation when the attribute is calculated.
The user interface for the mapping step of the Export Manager tool and the outbound integration endpoint tool are not exactly the same. For Export Manager, mapping is described in the Export Manager - Map Data topic. For OIEPs, mapping is handled in the Output Templates section under the Format parameter as described in the OIEP - Event-Based - Output Templates Section topic or the OIEP - Select Objects - Output Templates Section topic.
For more information about the additional wizard steps, refer to the Creating a Data Export topic or the Creating an Outbound Integration Endpoint topic.
After mapping, most output options can be altered using transformations. For more information, refer to the Outbound Map Data - Transform topic.
Mapping Attributes via Select Attribute
Browse or Search can be used to find any attribute.
-
Select the data to be exported for the output tool. For more information, refer to the Data Exchange topic.
-
On the Map Data step, in the left panel, click Select Attribute.
-
In the right panel, click the right arrow (
 ) to display the Select Attribute or Attribute Group dialog.
-
Find the attribute being mapped using one of the following methods:
-
The Browse tab allows finding an item via the hierarchy.
-
The Search tab allows entering part of the name of the attribute to display matches. Click the Search button to display all matches and choose an attribute. Open the Advanced section to use the advanced search options. For more information, refer to the Advanced Search: Advanced Options topic in the Getting Started documentation.
When selecting a calculated attribute, the Force Calculation checkbox is enabled. Checking this box ensures the value of the calculation will be resolved upon export. When unchecked, calculated values can still be generated via the Include Calculated Attribute Values option on the Export Manager - Advanced step.
Note: Calculated attributes can be mapped and resolved even when they are not valid for the objects being exported. However, the elements of the calculation (for example, the value of an attribute) must be valid and have a value in order to display as expected in the final output.
-
-
Select the relevant attribute, and then click Select. If Force Calculation was checked, the attribute transformation dialog is displayed with the Force Calculation option checked.
-
Repeat these steps to add all other required attributes.
-
Apply any transformations, which can change the output without changing the original data. Refer to the Aspect - Transform Outbound topic.
-
Complete any additional mappings and initiate the export.
Mapping Attributes or Attribute Groups via All Attributes
Only attributes that are relevant for the objects that are selected for export are available.
-
Select the data to be exported for the output tool. For more information, refer to the Data Exchange topic.
-
On the Map Data step, in the left panel, expand the All Attributes node and select one or more attributes or attribute groups.
-
In the right panel, click the right arrow button (
) to add the selections. -
Apply any transformations, which can change the output without changing the original data. Refer to the Outbound Map Data - Transform topic.
-
Complete any additional mappings and initiate the export.
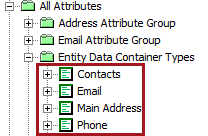
Mapping Entity Data Containers via All Attributes
For exporting entity data containers into CSV or Excel formats (which require mapping), only All Attributes can be used. Using this option, data containers can be mapped directly to the export or included in a higher level selection.
For information on exporting entity and product data containers without mapping, refer to the Data Containers in STEPXML topic.
The following steps define mapping for data containers.
-
Select the data to be exported for the output tool. For more information, refer to the Data Exchange topic.
-
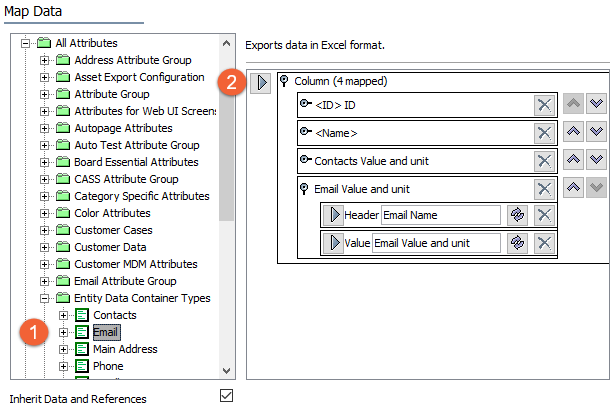
On the Map Data step, in the left panel, click All Attributes and select the desired entity data container type(s).
-
Click the right arrow button (
) in the right panel to add the selected data container type as a group of columns. -
Add additional entity data container types, if needed.
-
Apply any transformations, which can change the output without changing the original data. Refer to the Outbound Map Data - Transform topic.
-
Complete any additional mappings and initiate the export.
For information on handling entity data container transformations during export, refer to the Data Container Separator - Transform Outbound topic.