Maintain menu provides the user to maintain STEP data by inserting, linking, merging, deleting, approving and others. Some options, such as Customer MDM Monitoring and User Anonymizer, are only available if the functionality is activated via a license and/or add-on component. Many options have additional actions and are explained below.
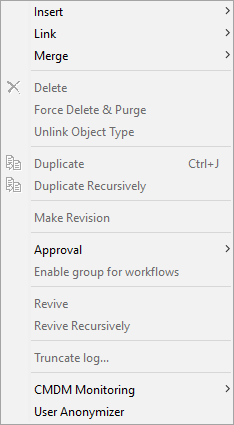
Insert
The 'Insert' action allows the user to create an object based on the currently selected object. The options are disabled based on the selection.
Note: Right-click an appropriate Tree hierarchy node to create products, classifications, entities, publications, and assets. For more information on object creation, refer to the Creating Objects in the Tree Tab topic.
The following options are available in the Insert sub-menu:
-
Product – If the user is within the primary product hierarchy, this option creates a new product beneath the selected hierarchy.
-
Classification – If the user selected a classification hierarchy, this option allows creation of a new classification folder beneath the selected classification with the predefined classification object types.
-
Classification Root – If the user would like to have a classification root to store images or configurations or to link products in the classifications folder, this option creates a classification root with a set of predefined classification root object types that are listed.
-
New Entity Node – If the user selected an entity root, this option creates a new entity object based on one of the predefined entity types.
-
Entity Root – A new 'Entity Root' can be created in the tree hierarchy from predefined set of entity root object types.
-
New Publication... – Allows the user to create a new publication. If the user has already selected a publication hierarchy, this option displays the 'Create Publication' dialog with the default object type selected. The user must provide a name of the publication and 'Page Template,' 'Product Template,' and 'Publication Template' to create a new publication.
Note: The 'Create' button in the ‘Create Publication’ dialog is enabled only if the user has selected a publication template.
-
New Publication Group – Allows the user to create a new publication group within the selected publication group. If a publication group is selected, this option displays the ‘Create Publication Group’ dialog with the predefined set of object type.
-
New Publication Section... – Allows the user to create a 'New Publication Section' from the 'New Section' dialog. Complete the Section Name and select the Page Template from the dropdown list.
-
New Page Template... – Allows the user to create a new page template. After selecting a 'Publication Group,' this option displays the 'Create New Page Template in STEP' wizard.
-
Orphan Attribute – This allows the user to add an attribute as an orphan attribute to a product by searching or browsing from System Setup tab. For information, refer to the Linking Orphan Attributes topic in the System Setup documentation.
-
Asset – Allows the user to create placeholder with ID and name for a new asset on the selected classification folder. The user may choose an asset object type from the Create Asset dialog, then asset content can be added.
-
Attribute – Allows the user to create a new attribute in the selected attribute group in System Setup.
-
Attribute Group – Allows the user to create a new attribute group in System Setup.
-
List of Values – Allows a user to create new list of values under Lists of Values Group / LOVs in System Setup. The user can add ID and Name in the 'Create LOV' dialog.
-
New Dimension – This option creates a new dimension when a user selects the 'Contexts' node in the System Setup. For more information on dimensions, refer to the Dimensions and Dimension Points topic in the System Setup documentation.
-
New Dimension Point – Allows the user to create new dimension point. A user must select a dimension under System Setup > Contexts > Dimension (for example 'Language'). The label of this option changes dynamically based on the selection of dimension, so the option ‘Dimension Point’ is never displayed. For example, if the user has chosen 'Language' as Dimension, this option is labeled 'New Language'.
-
Action Set – This option creates a new setup or user action. A 'Create Action Set' dialog displays with ID and Name to be filled when user selects the option Action Set. Creating a setup or user action is based on which node is selected in System Setup. For more information on action sets, refer to the Maintaining Action Sets topic in the System Setup documentation.
-
New Image Conversion Configuration… – A wizard displays to create new image conversion configuration and save it for reuse in the selected classification folder. For more information on image conversions, refer to the Image Conversion Configuration topic in the Digital Assets documentation.
-
Create Transformation Lookup Table – Allows the user to create a transformation lookup table under the selected classification. For more information, refer to the Transformation Lookup Tables topic in the Resource Materials online help documentation.
-
New Event Queue – The user can create a new event queue in System Setup. For more information, refer to the Creating a New Event Queue topic in the System Setup documentation.
-
New Asset Push Event Queue – The user can create a new asset push event queue in System Setup and it creates a new event queue. The event queue can have any number of asset push configurations running from it. For more on assets push events, refer to the Creating and Maintaining Asset Push Event Queues topic in the Digital Assets documentation.
-
New Asset Push Configuration – A new asset push configuration is created under the selected Asset Push Event Queue. For more on assets push configurations, refer to the Creating and Maintaining Asset Push Configurations topic in the Digital Assets documentation.
-
STEP Workflow – When the user first selects 'Workflows' in 'System Setup', this creates a new workflow under System Setup > Workflows. The STEP Workflow designer window displays. The user can also create a workflow by right-clicking on the 'Workflows' folder. For more information on workflows, refer to the Workflows documentation.
-
Background Process to Monitor Deadlines – When first selecting the System Setup > Workflows node, this option starts a background process for checking STEP Workflow items that have exceeded their deadlines. Refer to the Deadlines and Escalations in Workflows topic in the Workflows documentation.
-
User – Users are created by first selecting System Setup > Users & Groups > Group where the user belongs. When a user selects a Group and selects this option, the 'Enter New User' dialog displays. For more information on users in STEP, refer to the Working with Users topic in the System Setup documentation.
-
Group – Groups are created by first selecting System Setup > Users & Groups > and selecting the necessary node to hold the group. For more information on groups in STEP, refer to the Working with User Groups topic in the System Setup documentation.
-
New Supplier – Supplier users are created in System Setup > Supplier Group. A new supplier can be created by first selecting the supplier group.
-
Create Package – Creates a package by first selecting System Setup > Change Package. After the user has selected the change package option, a 'Create Change Package' dialog displays. Enter an ID and Name of the Package. For more information on packages, refer to the Change Packages topic in the Configuration Management documentation.
-
Create STEP Workflow – When the user first selects 'Workflows' in 'System Setup', this creates a new workflow under System Setup > Workflows. The STEP Workflow designer window displays. The user can also create a workflow by right-clicking on the 'Workflows' folder. For more information on workflows, refer to the Workflows documentation.
-
New Business Condition – Creates a new business condition under Global Business Rules in System Setup. Business Conditions can also be created under Workflows in System Setup. For more information on business conditions, refer to the Business Conditions in the Business Rules documentation.
-
New Business Action – Creates a new business action in System Setup under Global Business Rules. Business action can also be created under Workflows in System Setup. For more information on business actions, refer to the Business Actions in the Business Rules documentation.
-
New Business Function – Creates a new business function in System Setup under Global Business Rules. Business function can also be created under Workflows in System Setup. For more information on business functions, refer to the Business Functions in the Business Rules documentation.
-
New Business Library – Creates a new business library in System Setup under Global Business Rules. Business libraries can also be created under Workflows in System Setup. For more information on business libraries, refer to the Business Libraries in the Business Rules documentation.
-
Setup Group Root... – Creates a new setup group root under System Setup. When the user selects this option, the 'Create Setup Group Root' dialog displays with a set of object types. The user may create a new setup group root based on the object the object type selected.
Link
The 'Link' action provides a list of object or reference types for linkable actions. This menu only shows the relevant options as active if it is available for the selected object.
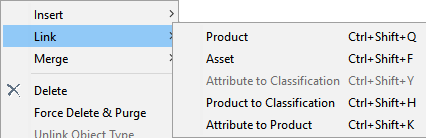
Based on the source object there are different link options available with keyboard shortcuts shown in the above screenshot.
-
When a user selects a product hierarchy and clicks on Link > Product, the product is linked to the selected product via a product reference type dropdown.
-
When a user selects a product hierarchy and clicks on Link > Asset, the asset is linked to the selected product via an asset reference type dropdown.
-
When a user selects an attribute, it can be linked to classifications.
-
When a user selects a classification, it can be linked to products.
-
When a user selects an attribute, it can be linked to products.
For more information on linking your attributes to products, refer to the Creating a Product Attribute Link topic in the System Setup documentation.
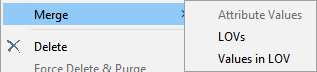
Merge
Depending on the selected object, the user can merge attributes, LOVs, and LOV values. For more information, refer to the Merging Attribute Values topic, the Merging Values in an LOV topic, or the Merging LOV Values in Bulk topic in the System Setup documentation.
Delete
The 'Delete' action sends items to the Tree Recycle Bin. If the selected item for deletion contains child objects, the user receives a warning that these items will also be deleted. For more information, refer to the Recycle Bin for the Tree Tab topic.
Note: The keyboard 'Delete' button does not delete objects in STEP Workbench.
Force Delete and Purge
Selecting an object in the workbench and clicking 'Force Delete and Purge' displays the 'Confirm Force Delete and Purge' dialog. Click the 'Force Delete and Purge' button to permanently delete the object and purge it from the recycle bin without any further opportunity to cancel or revive the object and without generating an event.
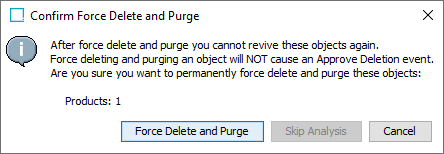
The Force Delete and Purge option is also available on the right-click menu when selecting the Tree Recycle Bin, as defined in the Recycle Bin for the Tree Tab topic. This clears unnecessary data already in the recycle bin quickly, without going through the various 'approve deletion' actions (if required), and errors reported about existing references or events on queues.
Unlink Object Type
When in System Setup, this option allows a user with the appropriate privileges to unlink the selected object type from its parent.
Duplicate
This standard 'duplicate' operation essentially copies and pastes in one click. Users may also right-click while selecting multiple objects and duplicate each of them. A prompt for a new ID is displayed when an auto ID is not set, then automatically provides a different name. The user is also allowed to indicate if duplicate references should be created.
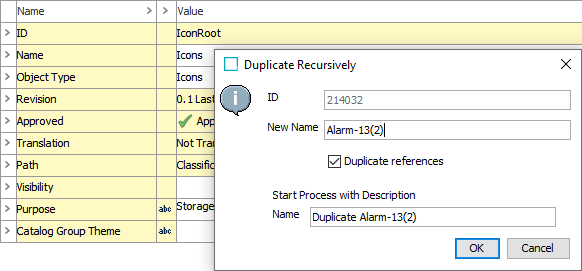
Duplicate Recursively
A hierarchy can be duplicated when the user selects the top node in the hierarchy and clicks 'Duplicate Recursively.' The ID should be editable to duplicate recursively since duplicate IDs for the same object type are not allowed.
In the below example, the ID is auto generated so the duplicate recursively background process ultimately returns an error.
Make Revision
Allows a user to force a revision on a product and provide a comment for explanation.
Approval
The approval options allow objects to be moved to the Approved workspace.
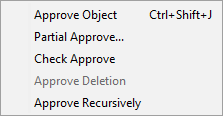
-
Approve Object – Approves an object from the Main workspace to the Approved workspace and changes never been approved (
 ) to either approved (
 ) or partially approved (
 ). Refer to the Approved Symbols and Messages topic for more information.
 -
Partial Approval – Approve selected parts of the unapproved changes on the selected object.
-
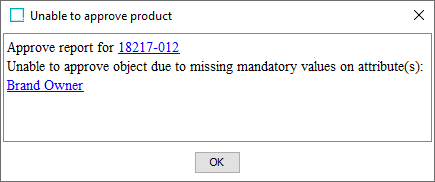
Check Approve – The 'Check Approve' action allows the user to refer to if anything is barring successful approval of an object. In the example below, mandatory values are missing.
-
Approve Deletion – For an approved object to be removed from the Recycle Bin, the object must be Approve Deleted. If a previously approved object is deleted, in the Recycle Bin it displays a red '(in Use)' header:

Performing an Approve Deletion changes the header to 'Not in Use' and allows the object to be deleted.

For more information, refer to the In Use and Not In Use Objects section in the Approval of Objects topic.
-
Approve Recursively – Launches a workflow process that approves the currently selected object and all of its children.
Enable Group for Workflows
This is a disabled legacy option.
Revive
Revives a deleted object, either 'In Use' or 'Not In Use', from the Recycle Bin. For more information, refer to the In Use and Not In Use Objects section in the Approval of Objects topic.
Revive Recursively
Revives a deleted object as well as all of its children, both 'in use' and 'not in use', from the Recycle Bin. For more information, refer to the In Use and Not In Use Objects section in the Approval of Objects topic.
Truncate Log
Once selecting an Event Queue or Asset Push Queue, this option reduces the log to the most recent entries. For more information, refer to the Event Queues topic in the System Setup documentation.
Customer MDM Monitoring
Selecting the 'Start background process for monitoring Customer Data Policies' option under Customer MDM Monitoring manually initiates any of the active data policies in the system. For more information, refer to the Data Policies topic in the Data Governance documentation.
User Anonymizer
This option is available to admin users and is used to anonymize a deleted user within the object change logs, revision logs, and workflow status logs. For more information, refer to the User Anonymizer topic in the System Setup documentation.