Redundant attributes have values that may technically be different, but that are logically tracking the same data and are valid for the same set of objects. An example of why this might occur could be due to data loads that happened from different systems and carry the same value in different patterns. Merging redundant attribute values improves data quality by establishing a distinct set of attribute values. The bulk update 'Merge Attribute Values' operation allows you to copy values from one attribute to another, so that ultimately redundant attribute values can be deleted.
The 'Merge Attribute Values' operation works on two attributes:
-
The source attribute is the redundant attribute that will be deleted after the merge.
-
The target attribute is the preferred attribute and will be retained after the merge.
For example, consider a single object that includes the following two attributes and values to represent a clothing size.
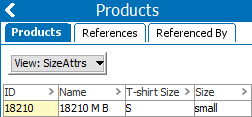
Assume that you want to keep the 'Size' attribute, but want to use the value currently stored in the 'T-shirt Size' attribute. Using the 'Merge Attribute Values' operation with 'T-shirt Size' as the source and 'Size' as the target, the preferred value ('S' for this object) is copied to the preferred attribute ('Size') for this object and for all other identified objects via a background process. Then, after the merge, the redundant attribute ('T-shirt Size') can be deleted manually while retaining all the data it previously held.
For Oracle databases, this action requires single-update mode (SUM), as defined in the Single-Update Mode topic.For Cassandra databases, this action uses Lock-free Schema Change (LFSC) functionality, as defined in the Lock-free Schema Change topic.
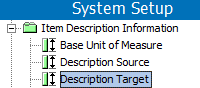
Verify Attributes to be Merged
For a successful merge, before running the bulk update, use the steps below to verify / update the target attribute and the source attribute so that:
-
Both have the same classification links to prevent orphaned target attributes after the merge.
-
Both have the same product links to prevent orphaned target attributes after the merge.
-
Both are valid for the same object types to ensure all source attribute values can be written to the target attribute.
-
Both have the same or compatible Validation Base Types to prevent validation errors during the merge. For example, when an LOV attribute is the source, the values can be written to a target Text attribute, however, with a target LOV attribute, depending on the LOV setup, the allowed values may be restricted.
-
Ensure that the upstream systems that feed the data to STEP are configured to send the data to the target attribute as the source attribute will be deleted.
-
Ensure that if there are any existing import or export configurations using the source attribute, that the configuration modified. This is to avoid errors when trying to run the configuration after the source attribute is deleted form STEP.
- In System Setup, select the Target Attribute.
- On the References tab, if it exists, open the 'Valid in Classifications' section, and click the Source from Attribute link.
Note: If the attribute is not valid for any classifications, verify that the source attribute is also not valid for classifications.
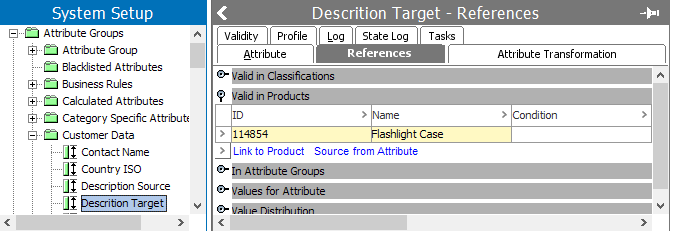
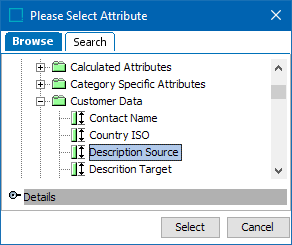
- Use Browse or Search to find the source attribute and click Select. The classification links of the source attribute are copied to the target attribute.
- On the References tab open the 'Valid in Products' section (if it exists), and click the Source from Attribute link.
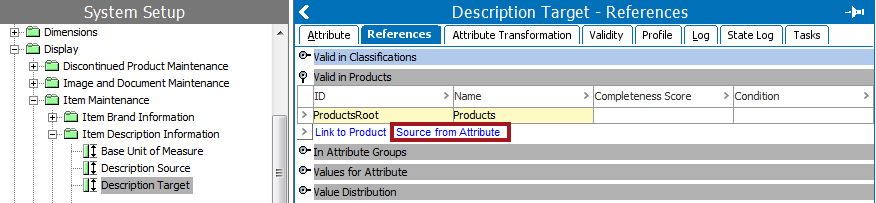
- Use Browse or Search to find the Source Attribute and click Select. The product links of the source attribute are copied to the target attribute.
- On the Validity tab, under the Valid for Product Types section, click the Source from Attribute button.
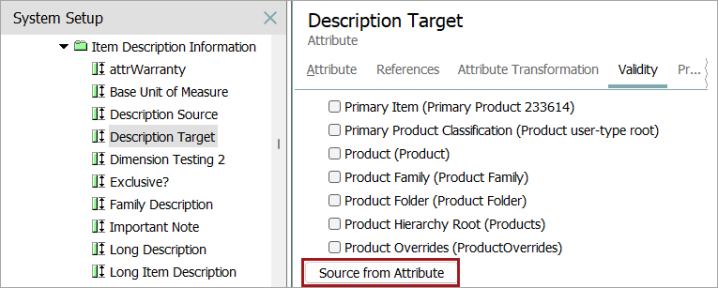
- Use Browse or Search to find the Source Attribute and click Select. The validity of the source attribute is copied to the target attribute.
- In System Setup, on the Attribute tab under the Attribute Validation section, compare the Validation Base Type for the Target Attribute and the Source Attribute.

- If the Validation Base Types are the same and are not LOVs, continue to Merge Values Using Bulk Update.
- If the Validation Base Types are not the same, determine if they are compatible by manually adding an existing source attribute value to the target attribute successfully. If the manual test works, continue to Merge Values Using Bulk Update.
- If the Validation Base Types are not the same and they are not compatible, in the case of an target LOV, setting the 'Allow Users to Add Values' option to 'Yes' allows the new values to be written to the target LOV. Otherwise, refer to Editing Validation Rules topic and change the validation type if possible, then continue to Merge Values Using Bulk Update.
- If the Validation Base Types are not the same, are not compatible, and cannot be changed, validation errors will be displayed in during the Bulk Update process. Values cannot be merged in this scenario.
Merge Values Using Bulk Update
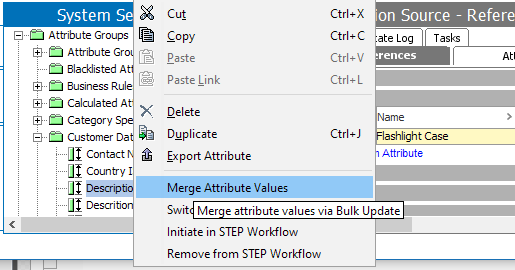
After verifying that the data is ready to be merged, select the Source Attribute, right-click and choose Merge Attribute Values.
The Bulk Update wizard is displayed with the source attribute already selected for the Merge operation. Click the operation to supply the target attribute and display additional parameters available for the merge.

For details about the bulk update parameters, refer to Attribute Values: Merge Attribute Values Operation topic of the Getting Started documentation.