In the Workflow Designer a user can define a deadline for a state via the State Editor Deadline/Escalation tab. This is useful for a number of reasons, one of which might be to notify a supervisor, or task manager, if a deadline is not met for a particular task in a particular state. This may be important to know because if the task is late, it could impact many steps that come after it.
Understanding Deadlines in the Workflow State Editor
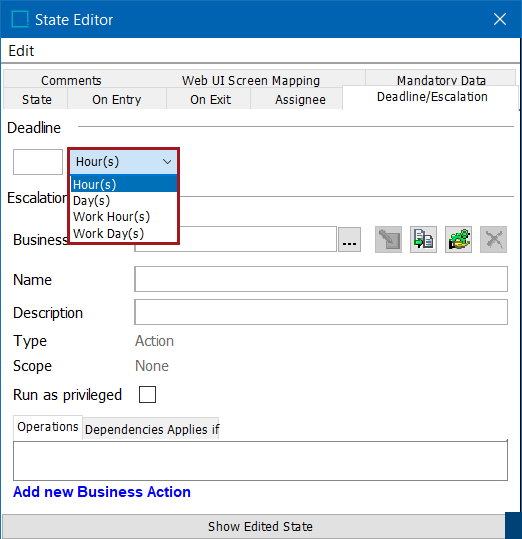
The deadline is set relative to the time an object enters the state. For example, if the deadline is set to '5 Hour(s)', an object entering the state at 6 a.m. will get the deadline set to 11 a.m. The available time periods are: Hour(s), Day(s), Work Hour(s), and Work Day(s). Work hours are hard-coded to be from 8 a.m. to 4 p.m., with work days being Monday to Friday (bank holidays and the like are not taken into consideration).
Setting Up Deadlines for Workflows
- In System Setup, navigate to the desired workflow, right-click on it, and select Edit STEP Workflow.
- Right-click on the desired state and select Edit State.
- In the State Editor dialog, select the Deadline/Escalation tab.
- Select a business action to be executed if the deadline is met and the background process for monitoring deadlines is run, then Save and Close the workflow.
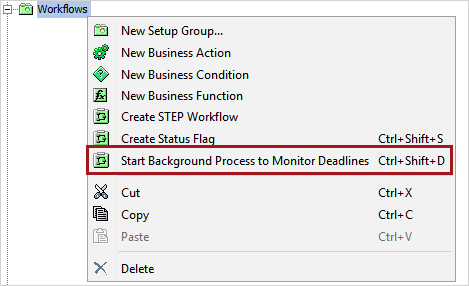
- Run the monitoring background process: right-click the Workflows folder in System Setup and click 'Start Background Process to Monitor Deadlines.'
-
On the 'Deadline monitoring' dialog, set the frequency to monitor deadlines.
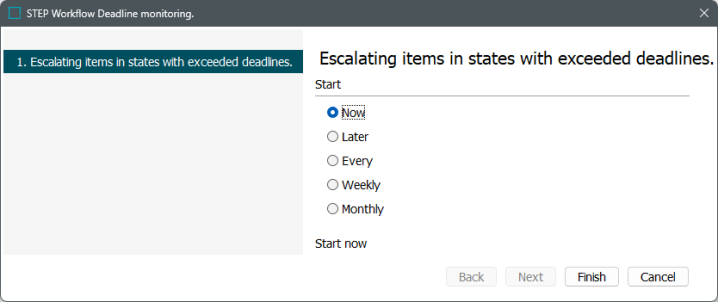
This background process (BGP), which can be scheduled to run at specific intervals, can be started from any Setup Group in System Setup that can hold workflow objects and applies to all workflows.
-
Navigate to the BG Processes tab to review the results of the montoring in the StateflowDeadline node.
Note: Once the deadline has elapsed, the escalation rules will run every time the BGP set in the previous image looks for passed deadlines. For example, with a four-hour deadline and an 'Escalating Items' BGP set to start every 30 minutes, the escalation rules run with four hours have elapsed, and then again every 30 minutes until the object in this escalated status is moved to a new state.
Business Actions for the Workflow On Entry Tab
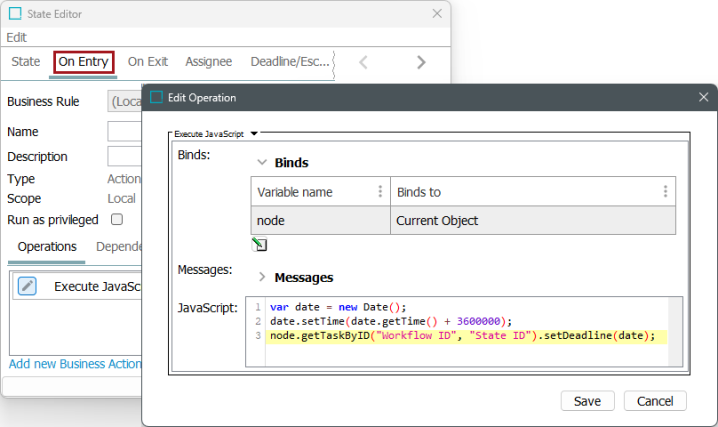
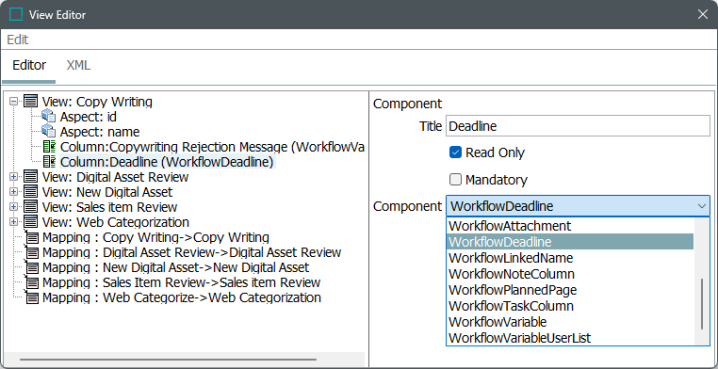
As described in the Views and Mappings for Workflows topic, deadlines can be viewed and manipulated in views via the 'WorkflowDeadline' Component. In the public API, methods for getting and setting deadlines are available via the Task interface. Below is an example of how a deadline can be set to an hour from now in a business action in the On Entry tab.
var date = new Date();
date.setTime(date.getTime() + 3600000);
node.getTaskByID("Workflow ID", "State ID").setDeadline(date);
As the deadline is set via the Task interface, the above will only work from the state with ID 'State ID'. An example can be found in the image below:
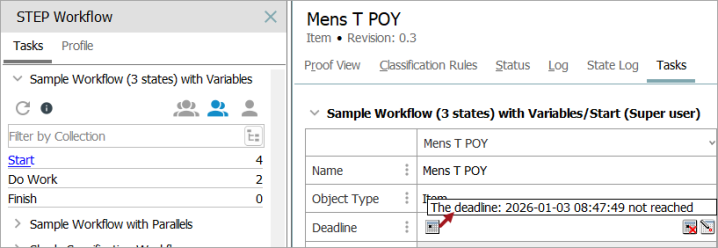
When viewed in STEP Workflow, if a deadline is not yet met it looks like the image below:
To remove a deadline from a business rule, set the deadline to null, as shown below:
node.getTaskByID("Workflow ID", "State ID").setDeadline(null);
Editing Deadlines through Workflow Views and Mappings
Deadlines can also be set by editing the workbench views and mapping for a given workflow. To do so:
- Open the desired workflow designer and go to Edit > Edit Workflow Views and Mappings.
- On the applicable view, right-click the view and select Add Column.
- In the Component dropdown, select WorkflowDeadline.
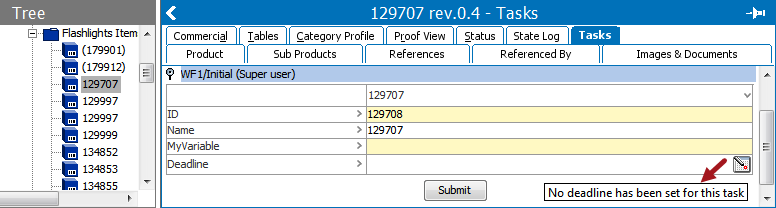
Once selected, the deadline can be set manually in the object itself via the object's Task tab, or in the STEP Workflows navigator tab.
Note: State Editor Deadline/Escalation tab allows a user to set the deadline for all the products in a particular state within the workflow, but the deadline set using the workbench views and mappings will apply for a particular product in a particular state in a workflow.