Asset push configurations provide a set of parameters that determine which format to convert assets to, which workspace to extract assets from, which asset folder structure in STEP to monitor for changes, which file formats to convert (e.g., convert TIF, EPS, and JPG images in STEP but not BMP, PNG, or GIFs), and where to place the images on the local file system. Though they are primarily used for converting assets to different formats, some configurations will not have any conversion specified as the asset merely needs to be pushed as-is to the file system.
Any number of asset push configurations can exist within an asset push event queue, but only one is required. A separate configuration must be created for each conversion format desired. Typically, multiple configurations running off of the same event queue will not share a common conversion format unless a push is needed from both the Main and Approved workspaces, the same assets need to be placed in multiple locations on the local file system for accessibility reasons, or assets from different STEP classifications need to be separated on the file system for organizational purposes.
Prerequisites
Prior to creating any asset push configuration, an event queue must first have been configured. For more information on asset push event queues, refer to the Creating and Maintaining Asset Push Event Queues topic.
Additionally, if image conversion is required as part of the asset push, the image conversion configuration must be completed prior to the asset push configuration, so that the conversion can be selected as part of the configuration. Refer to the Image Conversion Configuration topic for more information.
Configuration
- In System Setup, right-click an Asset Push Event Queue and then choose New Asset Push Configuration. Each Configuration consists of ten parameters.
- Enter an ID and a Name for the asset push configuration, and then click Create.
Important: Do not use spaces in this ID. Also, it is strongly suggested that the ID and the Name of a Configuration be kept the same, or at very least closely the same, e.g., ID of 'HighResLondon,' Name of 'High Res London').
A new asset push configuration node is created in System Setup and the Asset Push Configuration tab opens.
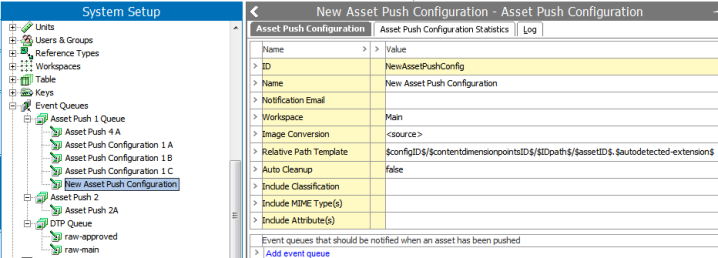
- (Optional) Click the Notification Email field, and enter a valid email address. If populated, this will result in an email being sent to the specified address in the event that a queued, valid asset fails to be converted and/or extracted. Multiple addresses may be entered, with a semicolon separator between valid addresses.
For information on configuring email from STEP, refer to the Email from STEP topic in the Resource Materials online help documentation.
- Click the Workspace field, and select the workspace from where the assets are to be pushed. If Approved is selected, asset push is triggered by asset approval. For example, Web or Electronic initiatives. If Main is selected, assets are pushed when they are loaded, edited, and / or replaced. No approval is required to trigger the push. For example, print initiatives.
Note: Assets will not be re-pushed when approved.
- If the assets need their format, size, or image color settings converted when pushed to the target system, click Image Conversion Configuration, and select the relevant conversion configuration from the list. Upon creation of Asset Push Configuration, <source> is set as default value on Image Conversion. The <source> option will produce no conversions.
The list contains all of the conversions that are available in the system. Configurations that have (conversion) appended to their names are custom conversions and can be changed and/or edited. Those without (conversion) appended are standard conversions and cannot be changed and/or edited.
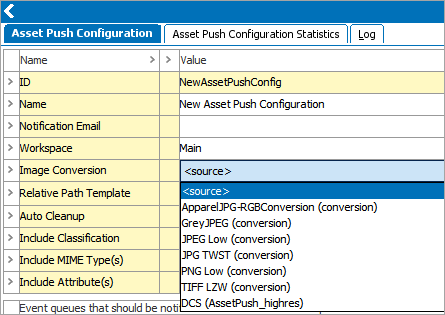
If <Source> is selected, no conversion takes place.
Refer to the Image Conversion Configuration topic for more information.
- In the Relative Path Template field, specify how to organize the generated file structure. Typically the folder structure is based on the asset's ID, which cannot be changed and ensures the external structure is stable and free from accidental duplication.
To specify the structure, a string of macros and/or static text must be entered into this field.
Note: That this field accepts predefined STEP “macro” tags.
Refer to the Relative Path Template topic for more information on the available macros.
- In the Auto Cleanup field, the user must specify whether they want to keep or remove pushed assets from the target system. Selecting True removes previously pushed assets from the target system in the following situations:
- The asset has been renamed and pushed again
- The asset push configuration has been changed, and the asset has been pushed again
- The asset has been deleted from STEP and the deletion has been approved
If False is selected, which is the default option set, STEP will not automatically cleanup the file system.
Note: It is recommended to set Auto Cleanup to 'true' so that manual intervention is not required in maintenance of the file system.
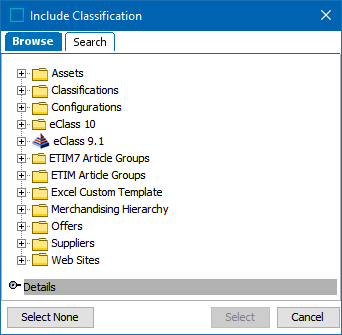
- Click Include Classification, and then click the ellipsis button (
 ). The Include Classification dialog appears. Select which classification node(s) asset push will monitor for changes, and then click OK.
Note: This field should not be left blank as that forces the system to monitor all classification folders, of which only a subset are actually valid for assets. At a minimum, the root classification folder for assets should be specified, which causes the system to monitor all child folders in the asset hierarchy.
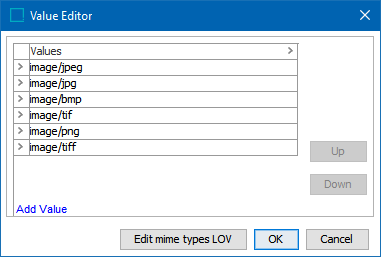
- Double-click the Include MIME type(s) field to filter which assets are included in the push via their MIME type. In the Add Value Editor, click Add Value to add the relevant MIME types, and then click OK.
It is recommended that this field be filled, otherwise the asset push configuration will convert all MIME types (e.g., .wav, .xls, .exe), which is typically not required. Since the '/*' entry functions as a wildcard, using 'image/*' selects all images but not other MIME types. For example, encapsulated postscript (eps) is an application type, not an image type, and would need to be added separately by adding either 'application/*' or 'application/postscript' as well.
For more information about MIME types, refer to the MIME Types topic of the System Setup documentation.
Note: The UserID that is used by the asset push side car must have the 'View metadata for asset (property value)' user action. For more information, refer to the User Actions and Error Descriptions topic in the System Setup documentation.
- (Optional) Double-click the Include Attribute(s) field to specify if the asset push configuration is restricted to assets with specific attribute values. This setting allows users to add some basic intelligence to the conversion without requiring any system extensions. Populating this field means that only assets that have the specified value in the indicated attribute will be pushed.
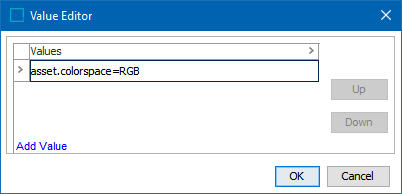
In the Add Value Editor, click Add Value to add the relevant attribute values, then click OK.
Valid inputs require the following format: [Attribute ID]=[Attribute value]. Populating the field with multiple attributes acts in an 'AND' fashion (asset must meet both conditions to be pushed).
Note: Comparative symbols such as greater than (>), less than (<), or their equal to equivalents (<=, >=) symbols will not work when entering a value, such as capturing all images that have a greater than or equal to resolution value 300dpi.
Each STEP asset has a series of metadata attributes that are automatically set upon import of the asset. Users may also create additional metadata attributes and define how they are to be set as part of the import configuration. Note that any assets with user-created metadata attributes must be pushed from the Approved workspace for the Include Attribute(s) setting to operate according to the value. If the asset only uses pre-existing system metadata attributes it can be pushed from either the Main or Approved workspaces.
Refer to System Metadata Attributes below for a list of all metadata attributes that are automatically set upon import of the asset.
Note: When using this functionality, it is important to ensure that the selected attribute(s) are both valid on the asset types being handled by the push, and that the assets will have value(s) for the attribute(s).
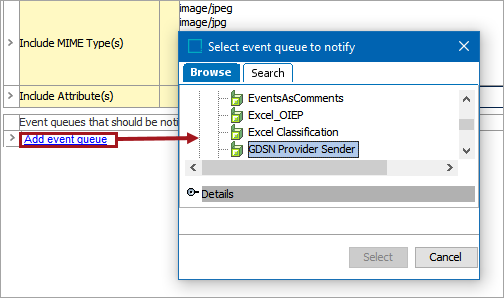
- (Optional) Click Add event queue and select an integration endpoint from the pop-up window. Populating this setting means that the listed queues will be notified when an asset has been pushed, and an event will be created on the queue if applicable.
Note that asset push sends only the actual asset files to a downstream system. Oftentimes it is useful to also provide an XML or other file type that contains the asset metadata, including the Relative Path of the asset so that users can easily find it on the downstream system.
Outbound endpoints that send asset metadata are often triggered at approval, which is typically the same trigger used for the asset push. This means that the Relative Path for any asset is not yet populated at the time of the outbound metadata file trigger. When the asset Relative Path needs to be included in the outbound metadata file, it is then necessary to notify the outbound queue following the push (using this setting). This triggers an event on the outbound file queue so that the metadata is sent (again) and includes the Relative Path.
- When a new configuration is created, or an existing configuration is updated, it may be necessary to restart the Asset Push Sidecar.
System Metadata Attributes
The following asset metadata attributes exist as defaults on the system and are populated automatically for any asset that contains the relevant information:
- asset.class
- asset.colors
- asset.colorspace
- asset.compression
- asset.creator
- asset.depth
- asset.dsc-conformance
- asset.extension
- asset.filename
- asset.format
- asset.format-version
- asset.height
- asset.mime-type
- asset.pages
- asset.pixel-height
- asset.pixel-width
- asset.preview
- asset.preview-format
- asset.profile
- asset.samples
- asset.size
- asset.uploaded
- asset.width
- asset.xdpi
- asset.ydpi
Use Cases
- Users can set the assets to be pushed to a file system(s) with or without format conversion.
- Users should use <source> when you want to export the asset as-is. This applies to PDFs, movie clips, Word doc files, etc.
- Users can configure the MIME types, workspace, and asset folder structure in STEP to be monitored for changes on assets.
- Users can push an asset from both the main and approved workspaces with the same conversion format, and can place both configurations beneath the same asset push event queue.
- Users can restrict the asset push configuration to push assets with specific attributes.
- Users can create one configuration for each conversion needed, and have them placed beneath a single Asset push event queue.
- Users can set the asset push configuration to notify any specific event queue.
- Users can configure the notification email to be sent in the event that a queued asset fails to be converted and/or extracted.
- Users can select between standard and custom Image conversion configurations.
- Users can define how to organize the generated file structure using a string of macros in the Relative path template.
- Users can specify whether to keep or remove pushed assets from the target system.