The Search Screen allows users to search STEP data via a user- friendly, intuitive interface powered by the Elasticsearch search engine, based on criteria defined within the Elasticsearch configuration. This screen is designed for users without intimate knowledge of the data model in mind.
Additional information can be found in the following topics:
-
For illustrations of results while searching, refer to the Search Screen Search Result Examples topic.
-
For details on using the search options, refer to the Search Screen Details topic.
-
For details on what data is available in the Search Screen, refer to the Searchable Object Types in Elasticsearch topic in the System Setup documentation.
-
For information on related components for use by data stewards, refer to the Data Enrichment Components topic.
Prerequisites
- Configuring this screen requires Web UI Designer basic concepts and appropriate privileges. For more information, refer to the Designer Access topic.
- Install and configure the Elasticsearch search engine as defined in the Elasticsearch Setup topic in the System Setup documentation.
Note: If required in the sharedconfig.properties file on the STEP application server, the case-sensitive Elasticsearch.IncludeSearchScreen property allows you to define the Web UIs that include a faceted search icon on the Global Navigation Panel. By default, when the ui-search component is installed, all Web UIs include two search buttons ( ) on the Global Navigation Panel. The faceted search button is at the top and the standard search button is next (refer to the Global Navigation Panel topic for details). To specify which Web UIs include the faceted search button, add a comma-separated list of those Web UI IDs to the property. Do not include spaces between the IDs, as shown below:
Elasticsearch.IncludeSearchScreen=CustomerWebUI,BuySideSellSide_Supplier,GDSNReceiver
In this example, only the Web UIs listed will include both the faceted search button and the standard search button. The Web UIs not specified in the property include only the standard search button.
For SaaS systems, properties are set within the Self-Service UI by going to the Configuration Properties tab for your environment. Some changes may require you to restart the server and/or user interface (i.e., the workbench) before they take effect. If the properties you need are not shown, submit an issue within the Stibo Systems Service Portal to complete the configuration.
Configuration
-
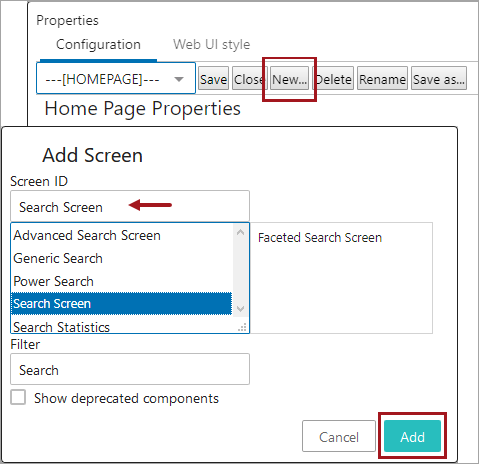
In the Designer, create a new screen by selecting New. In the 'Add Screen' dialog, type 'Search' in the Filter parameter to limit the list displayed. In the Screen ID parameter create a name, select the Search Screen option, and click the Add button. In the example below, the Screen ID is named 'Search Screen' and will be selected later.
-
Choose a method for how the user would like to access the new Search Screen within the Web UI.
-
Verify or set privileges for users who will access the Search Screen:
-
User action privileges and/or User Group Permissions are required as defined in the Searchable Object Types in Elasticsearch topic in the System Setup documentation.
-
The Search Screen is accessible for users with the privileges outlined in the Web UI Getting Started topic.
-
For more information on using the Search Screen, refer to the Search Screen Details topic.
Navigation Methods
The following methods allow the Elasticsearch Search Screen to be accessed from Web UI.
Links Widget Method
The Links Widget Method allows the search screen to be accessed via a Links Widget from the Web UI Home Page.
-
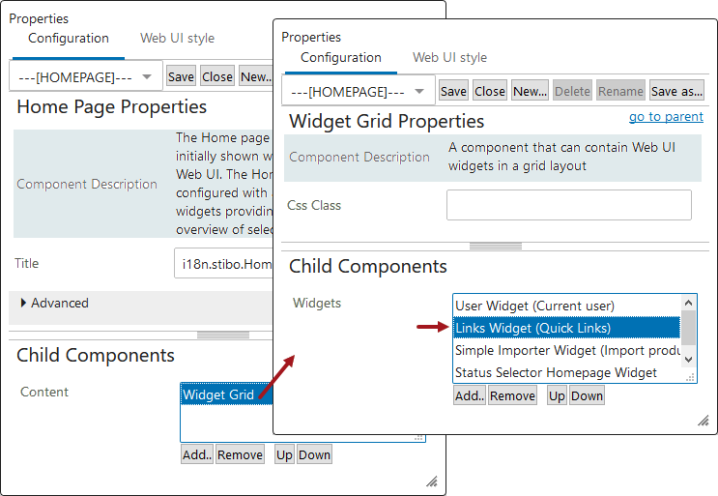
Navigate to the Home Page configuration screen, in the Child Components section, add a Widget Grid or double-click the Widget Grid that is displayed. For more information, refer to the Adding Widgets to a Homepage topic.
-
On the Widget Grid configuration screen, in the Child Components section Widgets field, add a Links Widget or double-click the Links Widget that is displayed. For more information, refer to the Homepage Widgets topic.
-
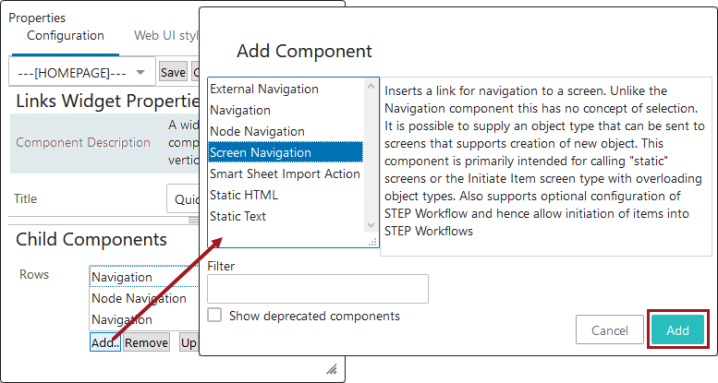
On the Links Widget configuration screen, in the Child Components section Rows field, click the Add button to display the Add Component dialog. Select the 'Screen Navigation' component and click the Add button.
-
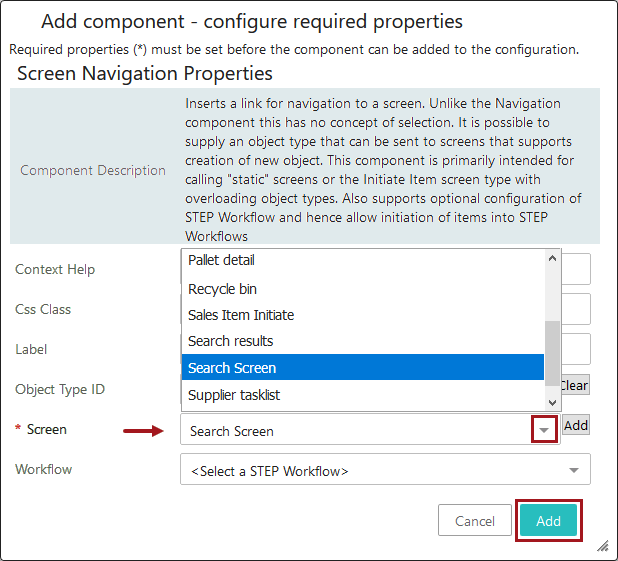
On the Screen Navigation configuration screen (shown in the image below), in the Screen parameter, select the Search Screen created earlier in this process. Make edits to the additional parameters as desired. Click the Add button.
-
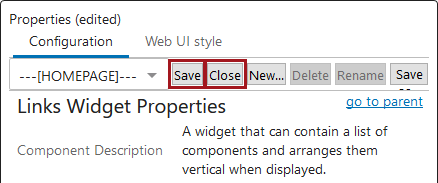
Click Save to confirm all selections and click Close to leave the designer.
-
On the homepage, verify the new Search Screen option displayed in the Links widget.

Global Navigation Panel Method
The Global Navigation Panel Method allows the Search Screen to be accessed via a Global Navigation Panel from the Web UI. Update your Global Navigation Panel settings to define the search functionality per Web UI as defined in the Global Navigation Panel topic.
-
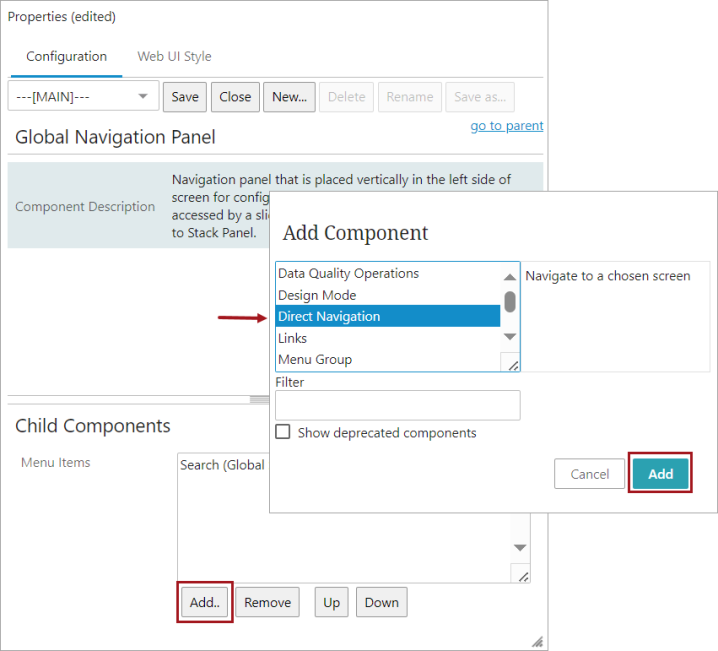
In the Designer, navigate to the 'MAIN' menu and double click on Global Navigation Panel option in the Left field.

-
On the Global Navigation Panel configuration screen, in the Child Components Menu Items field click the Add button to display the Add Component dialog. Select the Direct Navigation component and click the Add button.
-
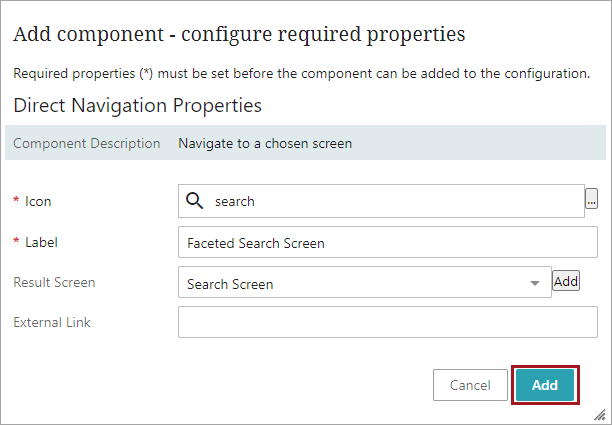
On the Direct Navigation configuration screen, configure the parameters and click the Add button.
Configuration options include:
-
Icon - Select an icon from the 'Choose Icon' dialog. This icon will display to the left of the label in the navigation panel.
-
Label - Enter the name of the display label of the screen as it will appear in the navigation panel. For example, 'Faceted Search Screen'.
-
Result Screen - Select the search screen created in the configuration step 1.
-
-
Click Save to confirm all selections and click Close to leave the designer.
-
On the homepage, verify that the Faceted Search Screen search option navigates to the Faceted Search Screen.