The Basket is used to temporarily hold a group of objects for the current user. Objects selected from search results are added via the Actions menu (defined in the Search Screen Actions topic) before being published or moved into a collection. Objects can also be added to a basket directly via the 'Add to Basket' action button on a Node List or Node Details screen.
Prerequisites
-
If the Basket functionality is not already enabled for your system or is enabled and you want to disable it, contact Stibo Systems Support. Refer to the first 'Important' callout below.
Once activated, the basket button (
 ) and a count of the items in the basket displays automatically on the Global Navigation Panel when new Web UIs are created and when the Global Navigation Panel is added to a Web UI. Refer to the Global Navigation Panel topic in the Web User Interfaces documentation.
-
If the Web UIs displaying the basket should be restricted, review the properties available for configuration in the SaaS Self-Service UI (Configuration Properties) for the PrimaryNavigation.IncludeBasket property. If the property is available, set PrimaryNavigation.IncludeBasket to include a list of the Web UI IDs that should display the basket, each separated by a semicolon. For example, to indicate that two Web UIs with the IDs 'Asset_Maintenance' and 'Product_Maintenance' should display the basket functionality, add the following:
PrimaryNavigation.IncludeBasket=Asset_Maintenance;Product_Maintenance
Note: For on-prem systems, you can add / set the property in the sharedconfig.properties file.
Important: If the basket functionality should not display in any Web UI, contact Stibo Systems Support to remove the 'ui-basket' component from the server; for users working with on-prem systems, remove the component from on-site servers via standard methods. Alternatively, if the PrimaryNavigation.IncludeBasket property is available in the Self-Service UI, configure it with a non-existent Web UI ID for the value. On-prem users can configure the property in the sharedconfig.properties file.
-
To display the 'Publish' button for the basket, the Product Data Exchange Syndication commercial license needs to be enabled.
For information on related components for use by data stewards, refer to the Data Enrichment Components topic in the Web User Interfaces documentation.
Basket Dialog
Objects are added to the basket using the 'Add to Basket' action. To display the basket dialog, click the basket button in the Global Navigation Panel.
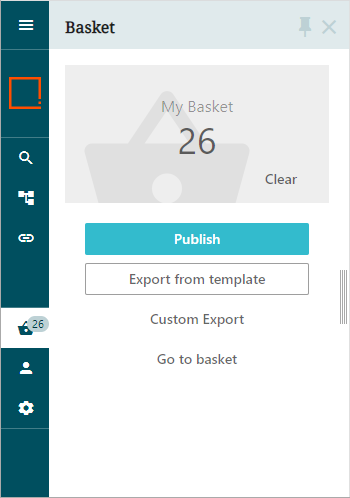
The number of objects in the basket is displayed on the basket button and at the top of the basket dialog. The Clear button removes all objects from the basket.
The actions available for the contents of the basket are defined in the sections below.
Publish
Important: To display the 'Publish' button for the Basket, the Product Data Exchange Syndication commercial license needs to be enabled.
The 'Publish' option starts a wizard that enables you to send the basket contents to a selected PDX (Product Data Exchange) channel. For more on PDX, refer to the Product Data Exchange topic in the Data Integration documentation.
Note: For products to be successfully published to a channel via the Basket, they must already exist in PDX as master data first. For instructions on how to publish to PDX, refer to the Setting Up the PDX OIEP topic in the Product Data Exchange section of the Data Integration documentation.
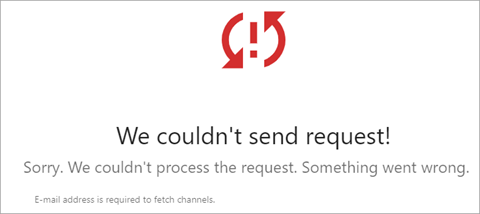
For access to channels, the user must have an email address in STEP that matches their email address in PDX. This is required to correctly filter channels displayed in the Publish wizard. To add an email address, refer to the Working with Users topic in the System Setup documentation.
If a user has no email address in STEP, this error is displayed:
If a user has an email address in STEP that does not exist in PDX, this error is displayed:

For information on using a sufficiency business condition and two business actions to identify products that meet your data standards and then only publishing those sufficient products to PDX, refer to the Publishing Only Sufficient Products to PDX topic.
To publish data to PDX channels:
- Add objects to the basket, and on the basket dialog click the Publish button to display the Publish dialog.
Note: Click the Cancel button on any wizard step to discontinue the publishing process.
On the Select Channel step, channels and sub channels are displayed in a nested structure.
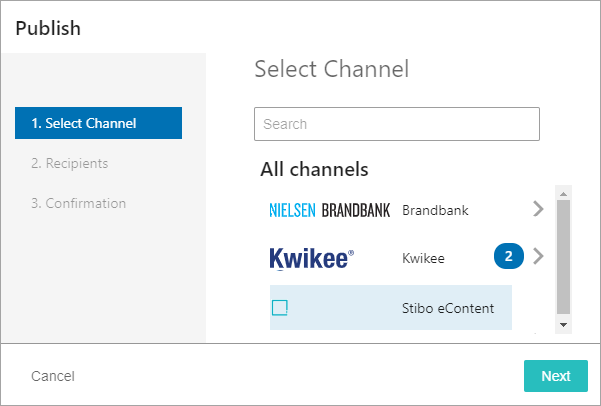
- Search for and select one or more channels from the list and click the Next button.
- Click the right arrow button (
 ) to open the nested structure of sub channels available for each primary channel.
 - Select an individual channel or, after displaying the nested sub channels, use the All or None selection links (
 ) to update the selections. Selecting a channel is reflected by the count (
 ) displayed on the 'All channels' page.
 - While on a sub channel, click the left arrow button (
 ) to go back through the nested channel structure, ultimately returning to the 'All channels' page.
- When the selected channels are managed by vendors, the optional Recipients step is displayed, supply the required data and click the Next button or click the Back button to return to the previous step.
- On the Confirmation step, review the publishing action that will be performed. Click the Publish button if you approve of the action or click the Back button to modify previous steps.
Note: The basket contents are emptied when the publish action is completed.
- Verify the results of the publishing action:
- Success indicates that all products have been accepted for submission to the channel.
- Submitted with errors indicates that only some products have been accepted for submission to the channel and others failed on a validation level.
- Communication error indicates that there is a problem with the environment setup or that the user is missing an email address in STEP.
Note: For channels managed by a vendor, when at least one product was accepted for submission to the channel, a link is displayed. Click the link to download an Excel file with submission status information.
Export From Template
The 'Export from template' option exports the basket contents using a template previously defined in the workbench. For more information, refer to the 'Export Action' section in the Action Buttons topic within the Web User Interfaces documentation.
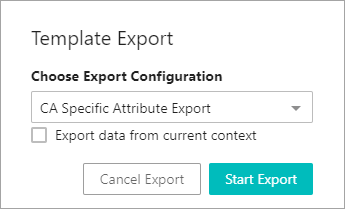
- On the basket dialog, click the Export from template button to display the Template Export dialog.
- On the Choose Export Configuration parameter, from the dropdown, select an export configuration. All saved export configurations are displayed. For more information, refer to the Maintaining a Saved Export Configuration topic.
- On the 'Export data from current context' checkbox, use the following information to determine if the checkbox should be checked.
- By default, STEPXML and Advanced STEPXML configurations export data from the current Web UI context.
- By default, non-STEPXML configurations export data from the context saved in the export configuration. To overwrite the configuration context and export data from the current Web UI context, check the 'Export data from current context' parameter.
- Click the Start Export button to start the export background process or click the Cancel Export button to terminate the export process.
The user can track the progress of the export by clicking on and opening the 'Recent background processes' panel, 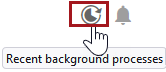 , in the upper right corner of Web UI, or if configured, the Background Process List Screens. For more information on configuring the Background Process List Screen, refer to the Background Process List Screen section of the Using a Web UI documentation.
To assign a new file name in Web UI, once the file name is displayed as a background process with status 'Succeeded,' right-click the file name link and choose Save Link As option to provide the desired file name.
Custom Export
The 'Custom Export' option allows you to display the Custom Export dialog and create an export of the basket contents. No configuration is required for the Custom Export when used from the basket, but because it can also be used elsewhere in the Web UI, configuration is defined in the Custom Export Action topic.
Go To Basket
The 'Go to basket' option displays the basket contents in a Basket Screen using a Node List view where additional actions can be performed as allowed.
To configure properly:
-
Open the designer, click New..., and select Basket Screen.
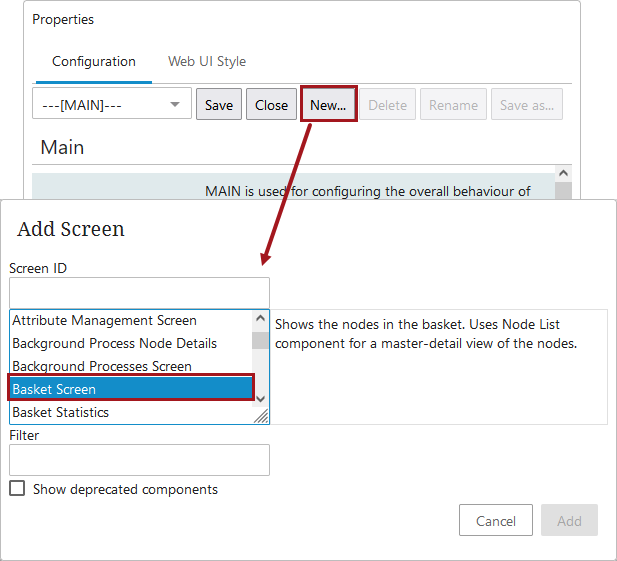
-
Enter in a Screen ID, and click Add.
-
On the Basket Screen, fill in the Title parameter, and under child components, select Node List from the dropdown.
-
Click go to component next to the Node List dropdown and fill out the Node List as needed.
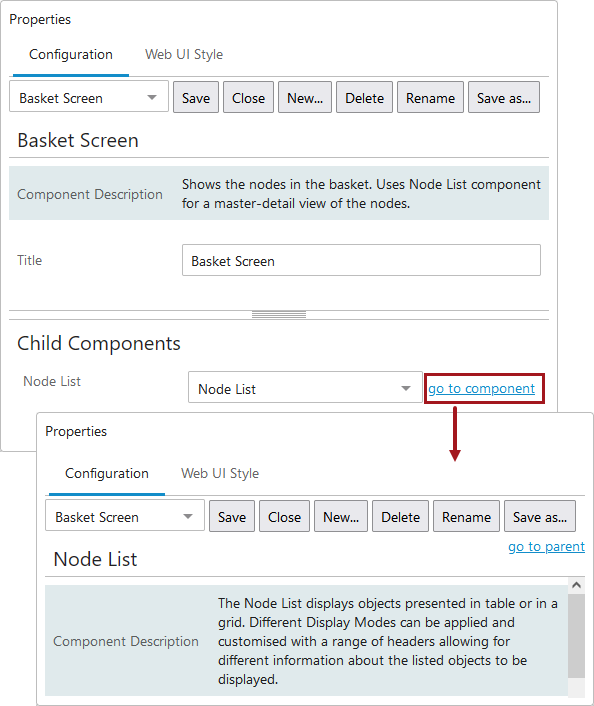
For more information on how to configure a Node List, refer to the Node List Component topic in the Web User Interfaces documentation.
-
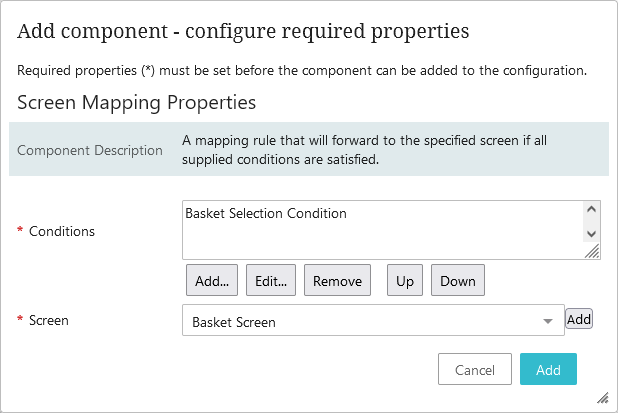
Next, go to --[MAIN]-- in the designer, and go to the Mappings parameter. Click, Add.
-
Select the Basket Selection Condition. In the Screen parameter dropdown, choose the Basket Screen you created in the previous steps. Click, Add. Save and close the designer.