With the Custom Export Action, users can export any selection of products, entities, and classifications from Node Lists and Tasks Lists. Users can export the contents of these tables without having to build a time-intensive mapping to create the export.
Note: Users may export one node type at a time. Supported export formats are Excel and CSV.
Important: Data container attributes cannot be exported with the Export Current View Action.
To begin using the Custom Export Action functionality, the action must be applied to toolbars on relevant screens.
Important: Search Screen (Faceted Search) is not supported with this action. However, a custom export can be done from the Basket, and details regarding that functionality can be found in the Basket Component and Basket Screen topic.
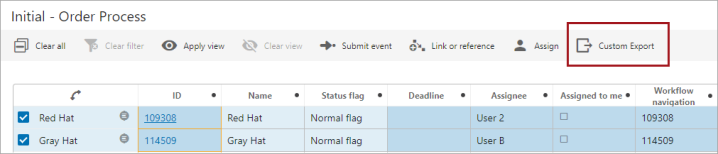
Adding a Custom Export Action to the toolbar
In the designer, a toolbar action called 'Custom Export Action' can be added to a toolbar on a Node List or Task List screen:

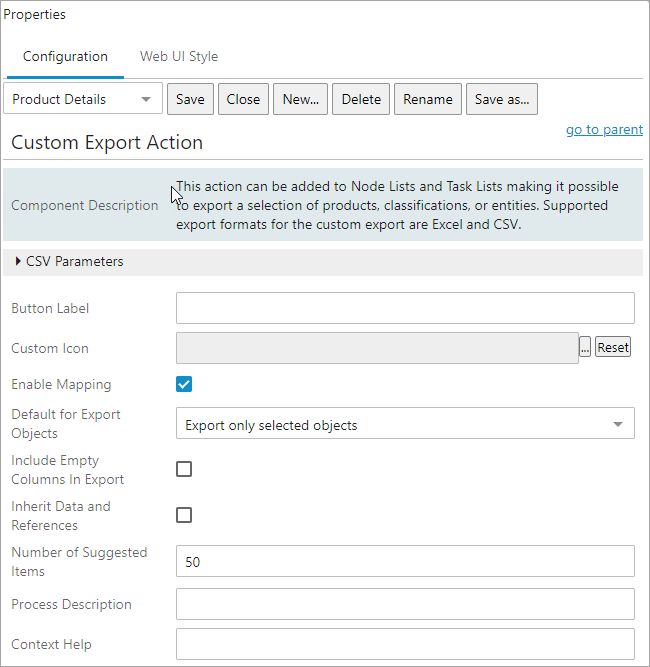
Configuring the Custom Export Action Properties
It is possible to change the default settings (shown in the screenshots that follow) within the Custom Export Action Properties.
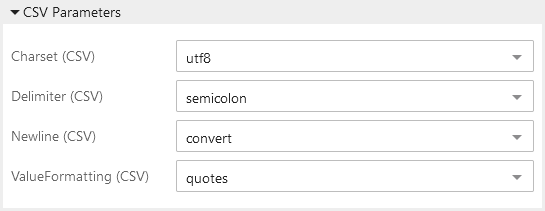
Expand the CSV Parameters flipper to make parameter selections applicable to CSV exports.
-
Charset (CSV): Choose the character set that should be used from the dropdown list.
-
Delimiter (CSV): Choose a delimiter from the dropdown list. The end user can overwrite this default setting when doing an actual export.
-
Newline (CSV): Select whether you want to keep carriage return (new line) or convert to a space instead. The latter is recommended, so changing the default setting is not recommended. You may experience issues with the data integrity if you keep the carriage returns.
-
ValueFormatting (CSV): Select to export all values in quotes or without quotes.
Standard parameters are as follows:
-
Button Label: Entered text is displayed on the button. When no text is entered, the default 'Custom Export' is displayed. This is only valid if the 'Include Label' parameter on the parent Node List properties is checked.
-
Custom Icon: An icon can be selected from those that exist in the workbench. Adding a custom icon overrides the default icon displayed in the user interface. The recommended size of the icons in pixels is 20 (high) x 35 (wide). The recommended color of an icon is jewel-toned, deep colors that fade well when the action is in a disabled state. Click Reset to restore the default icon.
-
Enable Mapping: Selected by default. When enabled, users have access to configure their own export, including to save and reuse configurations. If unchecked, users do not have access to configure mapping of the export and can only export the data that is onscreen and supported for export (with no option to save and reuse configurations).
-
Default for Export Objects: User can select options which will display as the default in the 'Export Objects' dropdown. When creating a new custom export, the 'Export only selected objects' option will show by default unless another option is selected.
-
Include Empty Columns in Export: If checked, the export includes all attribute columns when attribute groups are mapped, even when no value exists for any of the objects for one or more of the attributes in the group. By default, the parameter is disabled since exporting empty fields can increase the time for the background process to complete. All attributes mapped individually are included in the export regardless of this setting.
-
If checked, the export includes all attribute columns when attribute groups are mapped, even when no value exists for any of the objects for one or more of the attributes in the group. Export time is increased when using this feature. All attributes mapped individually are included in the export regardless of this setting.
-
Inherit Data and References: If selected, the Export Manager extracts values for products that have inherited values from products at a higher level in the hierarchy. When disabled / not checked, the export with not include any inherited data or references on the exported object(s).
-
Number of Suggested Attributes: Sets the maximum number of attribute suggestions shown during export mapping.
-
Process Description: Text entered (including HTML tags) will be used for the name of the background process (BGP). Refer to the Background Process Messaging and Identification section of the Background Process List Screen topic for more information on this parameter.
-
Context Help: Text displayed when hovering over the object.
Using the Custom Export Action
Custom Export Action supports both a simple export of supported table data, as well as more complex configurations using the Custom Export configuration window. All exportable headers displaying in the table, whether through configuration of the table or through configuration on an applied user configurable view, display in the Custom Export configuration window by default. Users can add or remove these headers to create the desired export.
Note: Some data types that can be configured to display in Web UI tables, like assignee, reference metadata for reference types that allow multiple references, approval status, etc., are not supported for export.
The Custom Export icon will display as disabled (grayed out) until there is data that can be exported. Once enabled, the action can be selected.
If the selection consists of more than one node type, you are asked to decide which node type to export:
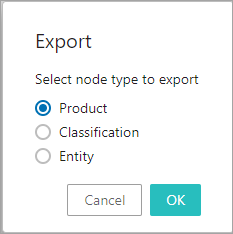
If the selection is limited to less than one hundred objects, this choice is only presented when objects of different node types are present in the selection.
Custom Export Dialog
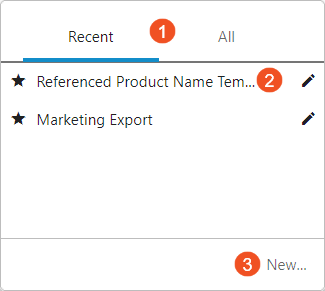
The numbered items in this dialog are defined below:
-
Recent and All - Click the Recent tab or the All tab to display a list of saved custom export
-
Saved custom exports - Click the row of a saved export (such as 'Marketing Export' shown above) to display the 'Edit export' dialog (shown below). This allows you to review the export settings and start the export. Right-click the edit button (
 ) to display Edit, Delete, Rename, and Share options. If shared, the export configurations can be reused by all members of the designated user groups.
 -
New... - Click the New... button to display the 'Custom Export' dialog (shown below) and to define a new custom export.
The Close button closes the dialog without initiating an export.
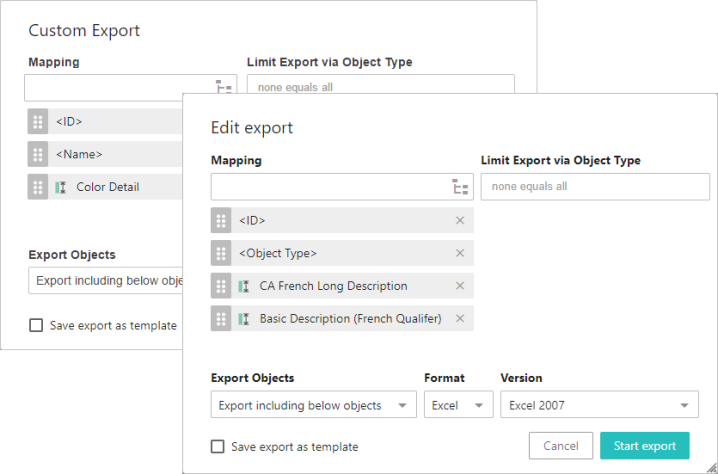
Configuring a Custom Export
The 'Custom Export' and the 'Edit export' dialogs include the same parameters to define the export data.
-
For the Mapping parameter, use the typeahead field to search for attributes by name, or click the node picker button (
 ) to display the Select column dialog (shown below) to select the type of item for mapping from the available options. Use the dropdown to set the item and display additional options based on selection. Refer to the Example section below for more information.
 Once added, the new mapping can be reordered by clicking and holding the sort button (
 ), dragging to the desired place in the list, and then releasing the button. The screenshot below shows the kinds of headers users can include in their custom imports. Below the screenshot is a list of the available column types.
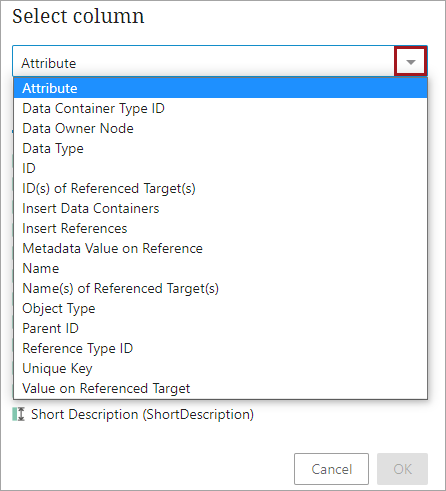
-
Attribute - When selected, users are prompted to select the desired attribute from those configured on the system. The selected attribute's value displays in a column named after the attribute. This is the default column type.
-
Data Container Type ID - The 'Data Container Type ID' option allows output of the ID of the data container type for rows representing a data container object. This option is primarily relevant to export data containers of different types or to be able to import the exported file again.
-
Data Owner Node - When using the 'Insert References / Data Containers' functionality, by convention, all non-NODE rows following a NODE row, represent data owned by the NODE. The 'Data Owner Node' option allows you to make the relationship between the NODE and non-NODE rows more explicit. For each row representing a data container object, a reference object, or a classification product link object, the owner node ID can be included in the 'Data Owner Node' column.
-
Data Type - The 'Data Type' data source exports static text values of 'NODE', 'DATA_CONTAINER', or 'REFERENCE' to identify the reference or data container information on the row.
-
ID - Displays the ID of the listed objects in a column with the header 'ID.'
-
ID(s) of Reference Target(s) - Displays the ID of a target object referenced by the source object. For instance, if Acme SmartPhone is the object listed in the table, and Acme SmartPhone references Acme Headphones, the ID of Acme Headphones will display in this column.
-
Insert Data Containers - The 'Insert Data Containers' data source can export data container values and reference target IDs and names, that are owned by the exported object in a separate row. This option is available in the CSV and Excel formats and is effective when exporting product or entity objects, both of which can own data containers.
-
Metadata Value on Reference - Displays a value of an attribute on the reference that links the listed source object to the reference target object. For instance, if the reference connecting Acme SmartPhone to Acme Headphones has on it a metadata attribute related to Bluetooth compatibility, then the value of this metadata attribute will display in this column. Users have the option to also include the Reference Type name to display alongside the metadata value to help users differentiate between similar values across multiple Metadata Value on Reference columns. This can be done by checking the 'Include reference type in header' setting when configuring this header.
-
Name - Displays the 'Name' value of the selected objects in a column with the header 'Name.'
-
Name(s) of Referenced Target(s) - Displays the name of a target object referenced by the source object. For instance, if Acme SmartPhone is the source object listed in the table, and Acme SmartPhone references Acme Headphones as the target object, the name 'Acme Headphones' will display in this column.
-
Object Type - Displays the object type of the listed object in a column with the header 'Object Type.'
-
Parent ID - Displays the Parent ID of the listed objects in a column with the header 'Parent ID.'
-
Reference Type ID - The 'Reference Type ID' option allows output of the ID of the reference or classification product link type for rows representing a reference or classification product link object. This option is primarily relevant to export references and links of different types to be able to import the exported file again.
-
Unique Key - If a unique key is configured for the listed object, the unique key will display in a column with the header 'Unique Key.'
-
Value on Referenced Target - Displays a value of an attribute on the referenced target object. For instance, if the source product is Acme SmartPhone and it references a target object called Acme Headphones, and the requested data is the value of the 'Color' attribute on Acme Headphones, then a color value like 'Metallic Gray' would display in this column. Users have the option to also include the Reference Type name to display alongside the referenced target value to help users differentiate between similar values across multiple Value on Referenced Target columns. This can be done by checking the 'Include reference type in header' setting when configuring this header.
-
-
For Limit Export via Object Type, the exported objects can be limited further by choosing specific object types to be exported. Click the parameter to display a list of all the object types in System Setup. If nothing is added to this parameter, the export is not limited by object type.
-
For Export Objects, the user can choose which objects to export:
-
Export including below objects
-
Export only leaf objects
-
Export only selected objects
-
-
For Format, select an export format: Excel or CSV. If CSV is selected, the user can choose which delimiter to use (if the default configured in the Custom Export Action designer is not applicable for the given job).
-
For Version, choose an Excel version to be used. It is recommended that the newest supportable version of Excel is used. The default is Excel 2007.
-
For Save export as template, check the box to name the export, retain the settings, and display it for selection on future custom exports.
Important: The Maintain type hierarchy (node types), a setup action for Object Types, must be granted in order for a user to have access to the 'Save export as template' action in Web UI. Refer to the Setup Actions and Error Descriptions topic in the System Setup documentation for more information.
-
Click Start Export to begin the background process or Cancel to leave the dialog without saving.
The exported file is automatically named. For example, 'excel-2020-07-24_11.12.27.xlsx' where 'excel' indicates the file type (Excel and CSV are the only options for this action), '2020-07-24_11.12.27' is the timestamp of the background process as YYYY-MM-DD_HH.mm.ss. To assign a new file name, once the file name is displayed in the Background Process Node Details Screen as a background process with status 'Succeeded,' right-click the file name link and choose Save Link As option to provide the desired file name.
The file name is also used as the process description and can be viewed in the Web UI in the 'Recent background processes' side panel. For more information, refer to the Recent Background Processes Side Panel topic and the Background Process List Screen topic in the Web User Interfaces documentation. For more information on the BG Processes tab in the workbench, refer to the BG Processes Tab topic in the Getting Started documentation.
Example
For example, when the attribute option is selected, three tabs are displayed to help you find the required attribute. Suggestions are given based on a sample of the objects in the beginning of the selection. Under the 'All' tab you can browse through all the attributes in the system. Finally, you can search for a given attribute under the 'Search' tab.
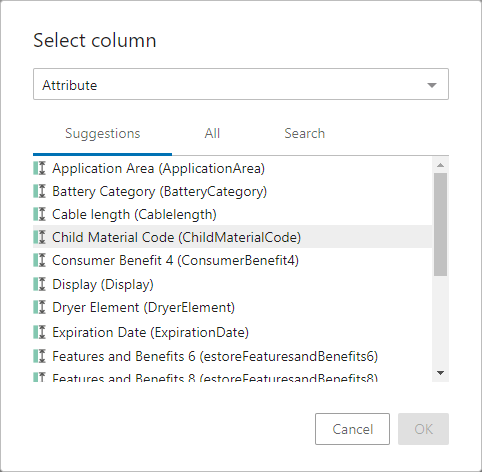
If you select ID, Name, or Object Type, no additional information is required. Click OK to return to the previous dialog.
The supported sort columns:
-
ID Header
-
Title Header
-
Name Header
-
Object Type Header
-
Unique Key Header
-
Attribute Value Header
-
Attribute Group Value Header
-
Reference Header
-
Workflow Variable Header
-
Workflow Deadline Header
-
Workflow Status Header
The Workflow Variable Header, Workflow Deadline Header and Workflow Status Header are not supported in the Excel generated using Export Actions and their sort order will not be honored while exporting the excel.
The sort can only be applied to selected objects in the node list. If a user chooses "Export Including below object" or "Export only leaf objects" and those objects are not in the node list, the sorting cannot be applied.