Objects can be easily edited within the Tree tab, and general principles for editing are the same, regardless of the type of object. The available tabs will vary based on the object type selected, as well as other considerations such as data model and licenses. Some tabs are common across the various object super types, while others appear only on specific object types or subsets of object types. Additionally, some editors appear on more than one super type, but have differing functionality based on the type of object that has been selected.
This topic covers the editing functionality available across the various editors, and provides links to additional information for working with specific object types.
Note: All actions are controlled via privileges. Some users may not have access to create or delete objects, or may only have options to edit specific object types, hierarchies, or attribute values. The information below focuses strictly on the means for carrying out the various actions, and assumes that all required privileges are available to do so. More information on privileges is available in the Privilege Rules topic in the System Setup documentation here.
When an object is selected, the main portion of the screen displays a corresponding editor. The main editor for the object is the first tab, which is Classification in the below example.
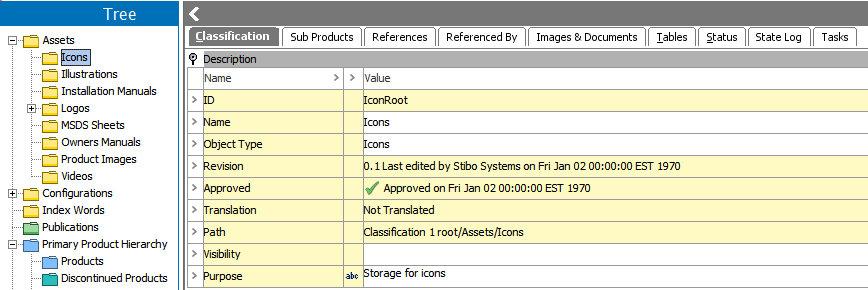
All objects will have an ID, Name, Object Type, Revision, and Path field. Objects that are subject to approval (known as 'workspace revisable') will also have an Approved field.
-
ID cannot be changed once an object has been created, so the field appears yellow, meaning it is not editable. For details, refer to the Creating Objects in the Tree Tab in this documentation here.
-
Revision and Approved data is auto-populated by the system, so these fields are also not editable.
-
Conversely, object Name and Object Type can be edited (assuming the user has privileges to do so), so those fields appear white.
Note: Any number of attributes may be added to objects under the Description flipper. However, not all data shown in the Description section is an editable attribute. Fields such as ID, Revision, Approved, Translation, and Path are aspects of the object (not attributes), and are not editable. Name and Object Type are also aspects of the object, though these may be edited.
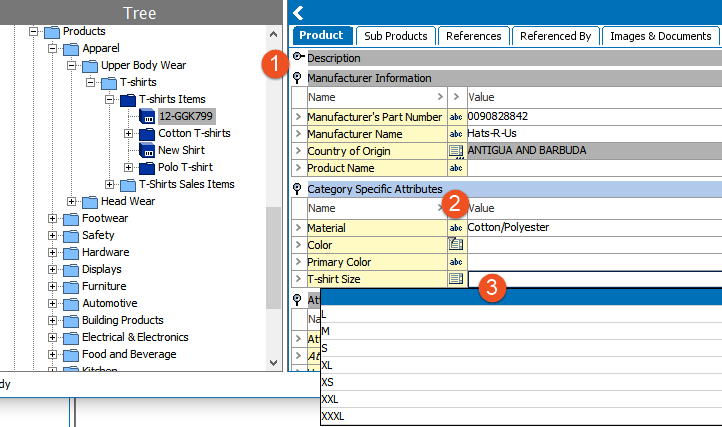
Some object types only support Description attributes, meaning all object data is accessed under the Description flipper. For object types that support Specification attributes, data is organized by attribute group, and clicking the magnification icon (indicated by a 1 in the screenshot below) will collapse or expand each group, allowing users to focus on the relevant data. All attributes have a validation base type applied that determines the allowable data that can be entered, and is indicated by the icon to the right of the attribute name below (2). Detailed information on attribute validations is available in the Validation Rules topic in the System Setup guide here.
To edit data, click in any editable field. Text attributes can be edited by typing directly into the field, while LOV attributes will provide a dropdown from which users can select a value, as shown below (3).
Pressing the tab key shifts the focus to the next cell and Shift+Tab shifts the focus to the previous cell. Alt + F2 opens the Rich Text Editor, allowing the user to access styling options. For a complete list of shortcuts, refer to the STEP Workbench Keyboard Shortcuts topic within this guide here. The data fields available for editing will depend entirely on the data model and will vary for each implementation.
Note: Data edited in the workbench is auto-saved, with the change / save being applied as soon as the user exits any field. Therefore, no explicit save action is ever required by the user.
If an object is being edited that is workspace revisable (e.g., subject to approval), editing the object will change the approval status (if the object had been previously approved). Refer to the Approval of Objects topic within this guide (here) for more information on approvals.
Multi-Editors
Objects can be multi-selected for editing using Ctrl + click, or by Shift + Down / Up arrow keys. Additionally, objects of the products and classification super types have a Sub Products tab that can be used for multi-editing. Functionality for editing objects is comparable, regardless of how the multi-editor interface is accessed.
Right-clicking in any row header will expose the Rotate Table option which can be used to access the preferred orientation of the data (Pressing F11 will also rotate the table if any cell in the table is the active selection.). Editing in this manner allows for easy copy / paste of values between objects using Ctrl + C and Ctrl + V.
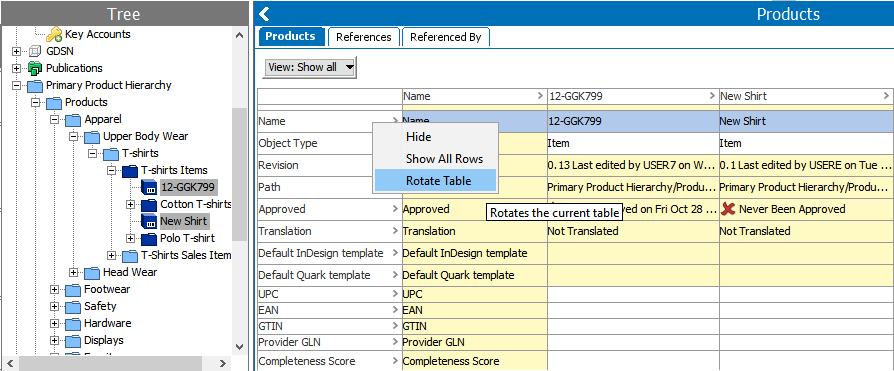
Right-clicking in any data cell will expose the Hide Equal and Mark Different options, which are especially useful when working across multiple objects as they will hide all equal values, or highlight all different values, respectively.

Additional options for viewing data are available using the View menu located in the upper left corner of the multi-editors.
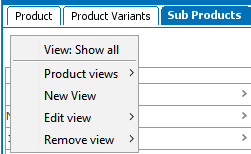
The default view option is to Show all which displays all data on the object, similar to what would be available in a single-object editor. Additional options can be configured using the New View option. Clicking this opens a dialog for users to enter a name of the view. Clicking OK in that dialog opens an Edit Filter dialog where the user can select the attributes to be included in the view.
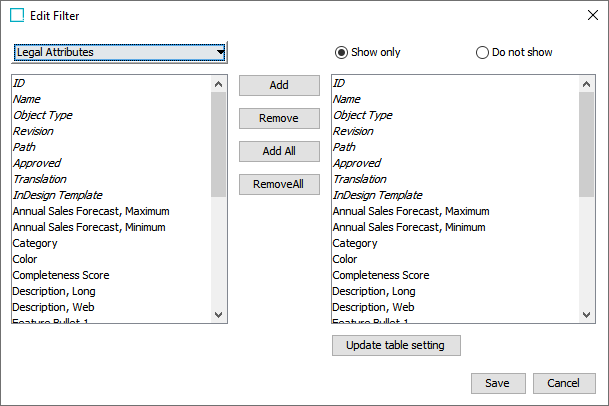
The dialog defaults to having only "legal" attributes shown, meaning those attributes that are valid for the object, as well as standard aspects of the object such as ID and Name. Note that object aspects are italicized, while attributes (which are always specification attributes) are shown in standard text. By default, all available attributes and aspects are shown in both the left and right panels. The dropdown in the upper left corner also has options to expose standard attribute search / browse functionality, though typically the Legal Attributes selection is used as this prevents a user from defining an invalid view. The 'Show only' and 'Do not show' radio buttons are applicable to the right panel, where the data for the view is defined. The Add button is used when an attribute or aspect has been selected in the left panel and should be added to the view (the right panel). The Remove button is used when an attribute or aspect has been selected in the right panel that should be removed the view. The Add All and Remove All buttons are used to add or remove all attributes and aspects from the view. Clicking Save stores the new view.
Once one or more views have been created, they are available for selection from the View menu under Product views.

An existing view can be edited using the Edit view option, and a view that is no longer needed can be removed with the Remove view option.
Note: Views are user-specific and machine-specific, so a view created by one user will always be available for that user when using the machine on which they created the view, but will not be available for any other user or for the same user working from a different machine. Workbench views are stored in an XML file on the user's local machine at C:\Users\[user]\STEPUserViews[UserID].xml. If the file is deleted, the configured views will no longer be available.
Right-Click Editing Options
Additional editing options are available by right-clicking within the various editors. These include standard cut / copy / paste options, as well as more exotic options which are briefly described below.
Note: Not all options are available and/or enabled at all times. Some options are available only for particular attribute validation types, and others are available only on specific editors and/or object types. Menus also change based on whether the right-click takes place on the column or row header, or within the active editable value field, as well as when a single object / column / row has been selected vs. when multiples are selected.
- Character Tag: Used as a quick option to add tags to attribute values without having to enter the Rich Text Editor. Character tags that have been defined for the system will be available as sub-options to the Character Tag selection. For more information, refer to the Tags topic in the System Setup here.
- Edit: Used to open the Rich Text Editor for attribute values, allowing users to apply styles, formatting, spell check, special characters, etc.
- Filter: Used to filter the displayed data under any flipper, by values, and is exposed by clicking the column header. This can be especially useful when working with attribute groups with a large number of attributes in them as it allows users to filter based on empty / populated, greater than / less than, etc.
- Footnote (Insert / Edit): Used to add an additional piece of information (e.g., a footnote) to an attribute value. Footnotes are added / edited within the Rich Text Editor so using these options will open that dialog. Note that footnotes are only supported for use in conjunction with STEP tables. Using footnotes within attribute values that will output in something other than a table will not yield the expected results. For more information on footnotes, refer to the Tags topic in the System Setup here.
- Hide: Used to hide a particular row or column from view, and a hidden row or column is exposed by clicking on the row indicator or column header.
- Hyperlink (Insert / Edit, Follow, End): Used for adding hyperlinks to attribute values. Highlight text within the attribute value and select the insert option to provide a hyperlink to be assigned to the selected text. After inserting, and with the cursor at the end of the hyperlinked text, use the end option. This ends the hyperlink so that subsequent text does not become part of it. Use the edit option to edit a previously inserted hyperlink. Select the follow option while the cursor is within the hyperlinked text to follow the hyperlink. For more information, refer to the Tags topic in the System Setup here.
- Inline Reference (Insert / Edit, Copy as): Used to add inline references to attribute values. Inline references are used to re-use values present within another attribute, object Name, or ID. This avoids duplication of data by maintaining the data only once, and re-using it from that source as needed. For example, a description attribute may need to dynamically include the object Name, e.g., '[Name] is a great product!'. Detailed information on working with inline references is available in the Inline References in Attribute Values topic within this guide here.
- Insert Special Character: Used as a quick option to add special characters to attribute values without having to enter the Rich Text Editor. Opens an editor allowing for selection of the most recently used special characters, with an option to access a full Unicode character menu. For more information, refer to the Tags topic in the System Setup here.
- Override: Used to manually populate a local value to override a calculated (derived) value. This option is only enabled on calculated attributes. For more information, refer to the Calculated Attributes topic in the System Setup here.
- Recalculate: Used for on-demand display of calculated attribute values in the editor if they have previously been disabled via the 'Disable calculated values' option in the View menu. For more information, refer to the Calculated Attributes topic in the System Setup here.
- Rotate Table: Used to rotate the data display. As a right-click option, it is only enabled from row / column headers when multiple objects are selected. For a single object, it can be used to rotate the data under a flipper only via keyboard shortcut (Alt + F11).
- Show All (Rows / Columns): Enabled after the Hide action has been taken, and exposes all hidden rows / columns.
- Sort: Used to sort data based on attribute value rather than attribute name or display sequence. This option is exposed when a column header is selected, and requires a sort selection (Ascending, Descending, or None).
- Style: Used as a quick option to add styling to attribute values (e.g., bold or italics) without having to enter the Rich Text Editor. Styles that have been defined for the system will be available as sub-options to the Style selection. For more information, refer to the Tags topic in the System Setup here.
Additional Information
In addition to the main editors for objects, several other tabs / editors are available for editing objects, such as References, Referenced By, etc. However, the available editors and functions within them vary based on the selected object. Therefore, they are described in the context of the type of object being edited, in the subsequent sections of this guide:
- Assets (here)
- Classifications (here)
- Collections (here)
- Entities (here)
- Products (here)
- Recycle Bin for the Tree Tab (here)
- Publications: The publication hierarchy and its associated objects are detailed in the Publication Hierarchy section of the Publisher (Adobe InDesign Integration) documentation here.