Regardless of the particular object type or hierarchy that you are working with, the general principles of creating objects in the workbench are the same, and are described below. Tree icons are set during object type creation according to preference and may be different in your system.
Note: All actions are controlled via privileges. Some users may not have access to create or delete objects, or may only have options to edit specific object types, hierarchies, or attribute values. The information below focuses strictly on the means for carrying out the various actions, and assumes that all required privileges are available to do so. More information on privileges is available in the Privilege Rules topic in the System Setup documentation here.
Objects can be manually created in the Tree via right-clicking or using the Maintain menu.
Create a new object via right-click
-
Select a parent under which the new object should be created. Note that if the new object should be created as a root node on the Tree tab, the Maintain menu must be used (refer below).
-
Right-click on the parent and select the appropriate 'New...' option. The options will vary based on the selected parent. For example, note the differences between the available options on a classification and an entity, as shown below.

-
Selecting the right-click option will open a Create dialog, appropriate for the selected object super type (e.g., Create Assets for assets and Create Entity for entities). The options available in the dialog are based on the data model defined in System Setup. For example, the Object Type selection will vary based on the allowable object types under the selected parent, and ID will only be available for population if the object type being created does not have autogenerated IDs applied.
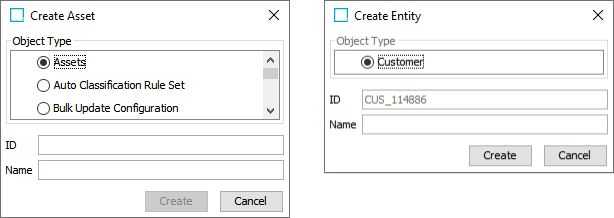
Note: The following restrictions apply to the ID for all objects:
-
Maximum 40 characters.
-
Only the standard ASCII printable characters in the range of 32-126 are allowed.
-
-
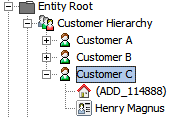
When an object type has been selected and an ID applied, the Create button will be enabled. Clicking Create completes the creation of the new object, which is then accessible in the Tree. If a Name is not supplied, the object will display in the Tree by the ID in parentheses. If a Name is supplied upon creation, the object will display in the Tree using the Name entry. For example, two new objects have been added under Customer C in the screenshot below. The first did not have a Name supplied, while the second did.
Create a new object via the Maintain menu
From the menu in the upper left corner of the workbench, select Maintain > Insert and choose the appropriate option. Note that it is required to use this method when adding a new root node to Tree. Additionally, note that the available options differ based on the active selection when the menu is accessed. For example, the below shows the available insert options when a classification has been selected, whereas the publication-related options would be enabled if a publication object had been selected instead.

Many of the available options will only be enabled when an appropriate selection has been made on the System Setup tab. For example, an attribute group must be selected for the Attribute or Attribute Group options to be enabled.