When a commercial pricing list is saved as a single Excel sheet or CSV file but is valid for multiple publications, the following steps define how to import pricing changes via an inbound integration endpoint (IIEP) to update the mapped publications. For an example of this type of IIEP, refer to the Importing Commercial Data via IIEP topic here.
For information on importing commercial data manually, refer to the Importing Commercial Data Manually topic here. For information on importing commercial data in the Web UI, refer to Working with Commercial Data in the Publishing Web UI in the Web User Interfaces documentation here.
Prerequisites
The following prerequisites ensure successful completion of the Configuration steps:
- Identify the Commercial Data objects that need to be updated via files that will be processed by the IIEP.
- Identify the hotfolder location for import files.
- Verify an import file that includes the product ID in addition to the commercial data that should be modified. This file will be used as the IIEP Sample File.
Configuration
The following steps define how to configure an IIEP for importing commercial data to update multiple objects.
For additional information on IIEP options not defined in this topic, refer to the Creating an Inbound Integration Endpoint topic in the Data Exchange documentation here. Unless otherwise noted, the referenced topics below are in the Data Exchange documentation.
- On the System Setup tab, create a new inbound integration endpoint to display the Inbound Integration Endpoint Wizard.
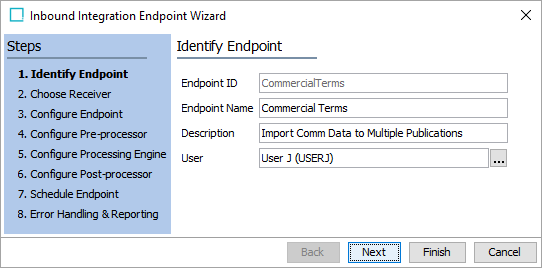
- On the Identify Endpoint step, add an ID, Name, and User. The Description parameter is not required but can be added to for Click the Next button. Refer to the IIEP - Identify Endpoint topic here.
- Make necessary selections on each of the following steps and click the Next button to proceed:
- Set Configure Receiver to Hotfolder Receiver. Refer to the IIEP - Choose Receiver topic here.
- Set Configure Endpoint to STEP Importer. Refer to the IIEP - Configure Endpoint topic here.
- Leave Configure Pre-processor set to defaults. Refer to the IIEP - Configure Pre-processor topic here.
- On the Configure Processing Engine step, complete the steps below. Refer to the IIEP - Configure STEP Importer Processing Engine topic here.
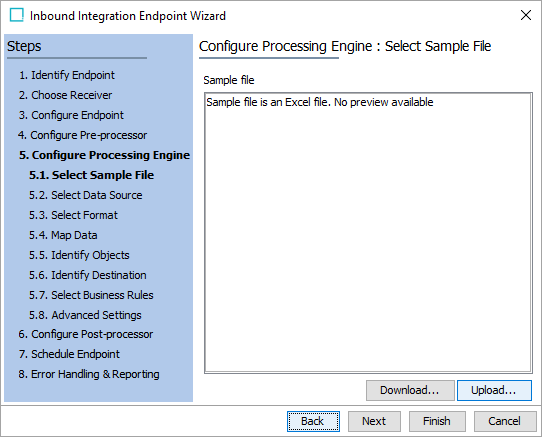
- On the Select Sample File step, click the Upload button and choose the sample import file identified in the Prerequisites section above. Click the Next button.
Note: The next steps will be repeated for each commercial data terms list object type to be updated.
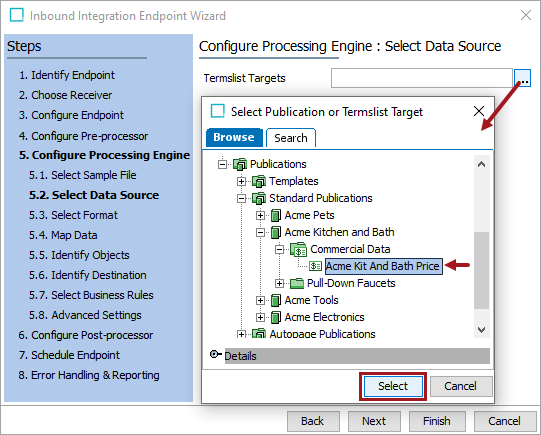
- On the Select Data Source step, for the Termslist Targets parameter, click the ellipsis button (
 ) and select a commercial data price list object.
Click the Select button to display the price list as the target data source and click the Next button.
- On the Select Format step, select the format of the uploaded file. Update the other parameters as needed. Click the Next button. Refer to the Excel Format topic (here) or the CSV Format topic (here).
- On the Map Data step, select a Source column and click the Map button.
Note: ID should only be mapped on the first pass. Other columns that contain data to be updated should be mapped once for each of the selected terms list targets.
On the 'Map {source column name} to' dialog, select the Commercial Data radio button as shown in the image below.
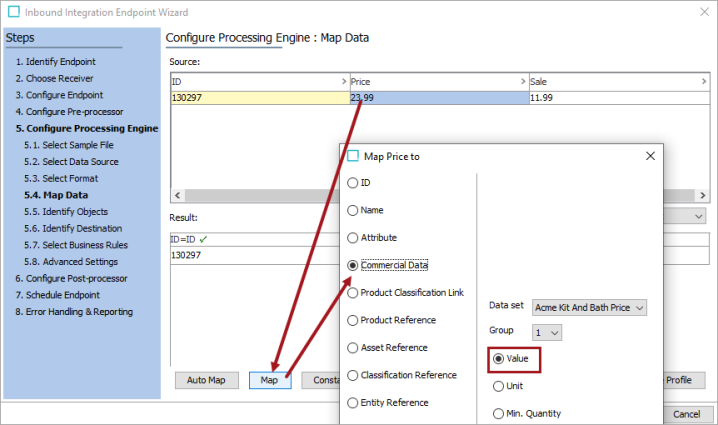
Below the 'Data set' parameter dropdown, choose the radio button for the type of data being imported and click the OK button to close the 'Map {source column name} to' dialog.
- If additional data should be mapped for the current Termslist Target, repeat this step.
- If all data for the current Termslist Target is mapped, click the Next button.
Additional instructions are included in the Mapping the Same Column Multiple Times section of the Inbound Map Data - Map topic (here) and in the Mapping Commercial Data in the 'Map Data' Step section of the Defining Import Settings for Commercial Data topic (here).
- On the Identify Objects step, verify the Result section. Refer to the Import Manager - Identify Objects topic here.
- If additional Termslist Targets need to be mapped, click the Back button repeatedly to return to the Select Data Source step. Repeat the Select Data Source steps outlined above for the next target.
- If all Termslist Targets have been mapped, click the Next button.
- Make selections on each of the following steps and click the Next button to proceed:
- On the Identify Destination step, check the Reject New checkbox since new products should not be created via commercial list updates. Refer to the Import Manager - Identify Destination topic here.
- Set the Select Business Rules step as necessary. Refer to the Import Manager - Select Business Rules topic here.
- Set the Advanced Setting step as necessary. Refer to the Import Manager - Advanced Settings topic here.
- Set the Schedule Endpoint step as necessary. Refer to the IIEP - Schedule Endpoint topic here.
- Set the Error Handling & Reporting step as necessary. Refer to the IIEP - Error Handling & Reporting topic here.
- Click the Finish button.
- With the import file in the hotfolder, enable and invoke the IIEP to process the data. Refer to the Running an Inbound Integration Endpoint topic here.