Commercial data terms are imported into commercial lists using standard Import Manager functionality. However, unlike standard imports, the import configurations created for commercial data may only be created and saved on publication objects. As such, the import process for commercial data must be initiated from publication objects and not from the STEP Workbench menu (i.e., File > Import > Data).
After creating the commercial list object for your publication, the next steps are to create a sample import file, in Excel or CSV format, then define the import settings for importing actual commercial data. The columns in the sample file will be used to map fields in the Import Manager wizard, which will allow the system to later ingest a sheet that contains actual data.
Sample Excel Commercial Data Load Files
The following subsections show examples of commercial data sample import files, one containing price break and quantity information; one containing price break, quantity, unit, start date, and end date information; and the other only containing values information.
Price Example
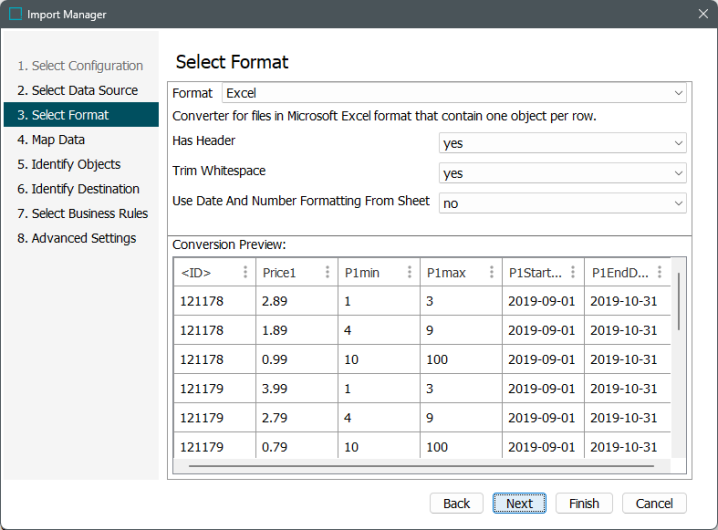
This example sheet is an Excel file that contains 10 columns and 8 products. Each product has three prices with price breaks that change based on the quantity of the product being sold.
For example, using the first product row shown in the below screenshot (ID = 121171), the price breaks are as follows:
| Break No. | Quantity | Price |
|---|---|---|
|
1 |
1 - 3 |
2.79 |
|
2 |
4 - 9 |
1.79 |
|
3 |
10 - 100 |
0.89 |
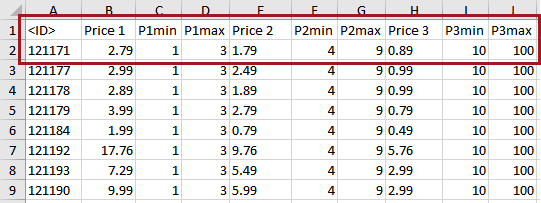
Note: Minimum and Maximum values are required to import prices; Unit, Start Date, and End Date are optional. You must set a minimum and maximum value (even if they are fake values) for each prices. For example, to load three price breaks, load nine columns of data: the price, the minimum, and the maximum for each price.
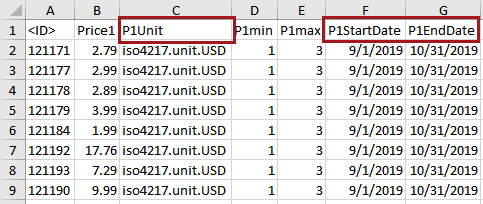
Prices with Units and Dates
To also import Unit, Start Date, and End Date values, which are optional, a corresponding column for each value must also be present on the sheet. In the below example—which shows columns for 'Price1' only—there is a 'P1Unit,' 'P1StartDate,' and 'P1EndDate' column. Each subsequent price (Price2, Price 3, and others) will also have its own unit, start date, and end date columns.
Note: When importing units, the STEP ID of the unit must be used and not the symbol. In the below example, iso4217.unit.USD is the STEP ID for U.S. dollar ($).
Non-price Example
This example sheet contains 7 columns and 3 products. Though values are present for minimum (P1min) and maximum (P1max) quantities, only the 'Package' and 'Per Case Qty' values are intended to display. I.e., Instead of price values in the commercial list, the values will be 'Tube' and '10' (using the first product row as an example). These values will be mapped to 'Price 1' and 'Price 2' value fields when configuring the import configuration.
The quantity values themselves (P1min and P1max, P2min and P2max) are fake values that only serve to satisfy the commercial list load entry requirements. However, they still need to be appropriate numbers. E.g., the value in P2min cannot be the same or less than P1max, and P2max must be greater than P2min, etc.

Creating an Import Configuration for Commercial Data
The following steps for creating a commercial data import configuration use a sheet that contains columns for all available commercial terms elements: value, unit, quantities, and dates. These steps assume that you have already created a sample file.
Commercial Data can also be imported via IIEP as defined in the Importing Commercial Data via IIEP topic here.
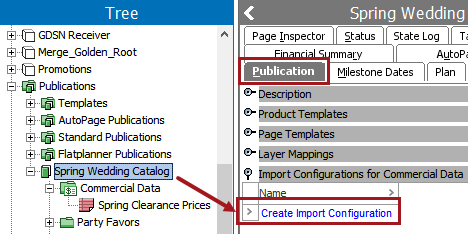
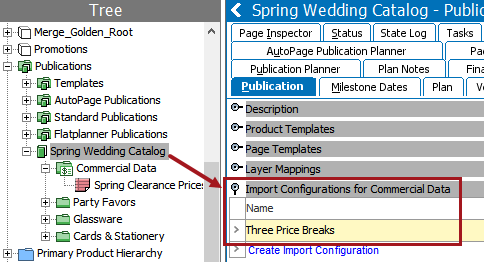
- In the Tree, navigate to and select the relevant publication in the publication hierarchy.
- On the Publication tab, expand the 'Import Configurations for Commercial Data' area, then click Create Import Configuration.
- The Import Manager wizard displays.
Note: All steps of the Import Manager wizard, and the options available for each step, are described in detail in the Creating a Data Import section of the Data Exchange documentation here. The information in this topic only contains detailed descriptions of the steps that are of particular importance to commercial data.
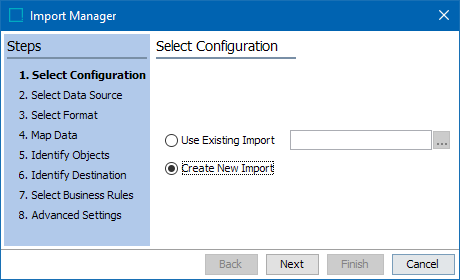
- On the Select Configuration screen, specify whether you want to create a new import configuration or use an existing one. Since these instructions are for how to create a new import configuration, select Create New Import.
- On the Select Data Source step screen, select File. The data source will always be File for commercial data import configurations.
- While still on the Select Data Source screen, click the ellipsis button (
 ) next to the Filename field and choose the sample upload file, then click Next.
 - On the Select Format screen, the format will be prepopulated with either Excel or CSV, depending on the format of your sample sheet.
- Make any additional configurations ('Has Header,' 'Trim whitespace,' 'Use date and number formatting from sheet'), then click Next.
Note: It is strongly recommended to keep the default selection of no for Use date and number formatting from sheet, especially if importing date values. This ensures that date values are standardized into an ISO format. Refer to the Excel Format section of the Import Manager documentation here for more information.
Mapping Commercial Data in the 'Map Data' Step
In the Map Data step, a number of mappings must be specified manually. The 'Auto Map' feature will not work for commercial data mappings, though it can be used to map the ID or Name columns. ID is required.
- To start the mappings, click a source column, then click Map. The Map Column to dialog displays.
- Select the column to map, then click Map. The Map to dialog displays.
- In this example, the first column has already been mapped to ID; the first price column, 'Price1,' has been selected; and the Commercial Data radio button has been selected in the Map to dialog.
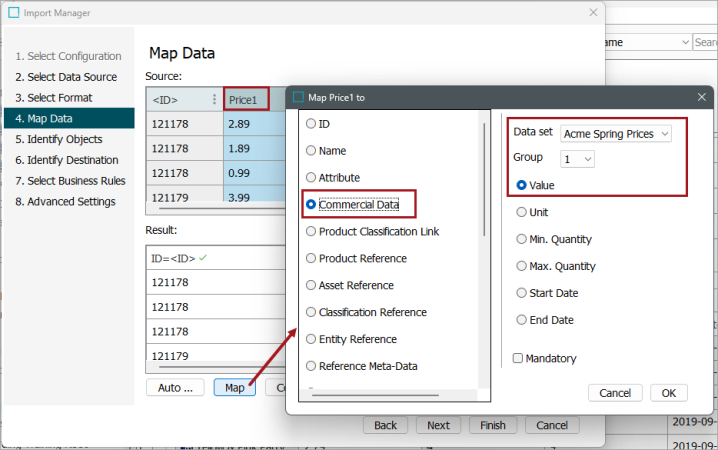
- From the Data Set dropdown list, select the commercial list to which the data should be mapped. If more than one commercial list has been created for your publication, they will appear in the list in alphabetical order.
Note: Values for multiple commercial data lists may be populated from a single Excel sheet by selecting different lists for different mappings as defined in the Importing Commercial Data via IIEP Configuration topic here.
- From the Group list, select the preferred quantity break.
- Choose one of the following options to determine which field of the commercial list that the data from the Excel sheet should be mapped to:
- Select Value to map the column to the value field.
- Select Unit to map the column to the unit field and have the unit display along with the term value.
- Select Min. Quantity to map the column to minimum quantity in the selected group or price break.
- Select Max. Quantity to map the column to maximum quantity in the selected group or price break.
- Select Start Date to map the column to the start date when the price becomes valid.
- Select End Date to map the column to the end date of the selected group or price break.
- Check the Mandatory box if you want rows without a term value to be skipped on import so none of the information that may be related to a product without a specified term value will be imported. Click OK.
- Follow the previous steps until all columns of the sheet are mapped. For example, in this sheet, after mapping the 'Price1' column to Commercial Data > Group: 1 > Value, the remaining columns will be mapped as follows:
- The 'P1min' column will be mapped to Commercial Data > Group: 1 > Min. Quantity
- The 'P1max' column will be mapped to Commercial Data > Group: 1 > Max Quantity
- The 'P1Unit' column will be mapped to Commercial Data > Group: 1 > Unit
- The 'P1StartDate' column will be mapped to Commercial Data > Group: 1 > Start Date
- The 'P1EndDate' column will be mapped to Commercial Data > Group: 1 > End Date
- The 'Price2' column will be mapped to Commercial Data > Group: 2 > Value, and so forth.
The remainder of the columns will follow the same pattern. Click Next when finished.
Completing the Import Configuration
- On the Identify Objects screen, if the products in the source file are not identified as existing products in the system, the 'Match Result' will be 'New.' Click Next.
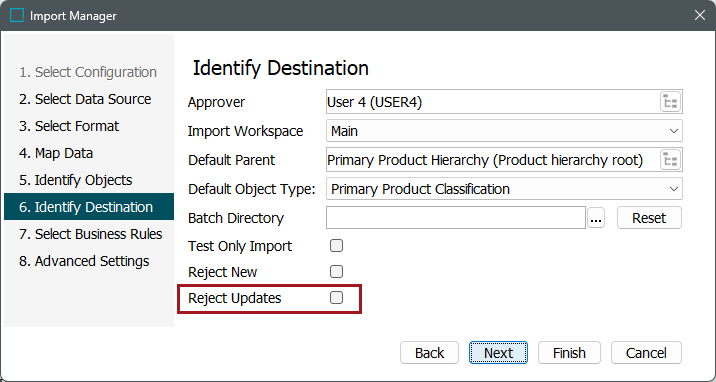
- On the Identify Destination screen, several options are available, which are detailed at length in the Import Manager - Identify Destination topic in the Import Manager documentation here. For the purposes of commercial data imports:
- Reject Updates should be left unchecked, since a setting on the Advanced Settings screen of the wizard will control how commercial lists are updated.
- On the Select Business Rules screen, business rules can be specified to run upon import if required for your business needs. For more details, refer to the Import Manager - Select Business Rules topic in the Import Manager documentation here. Click Next.
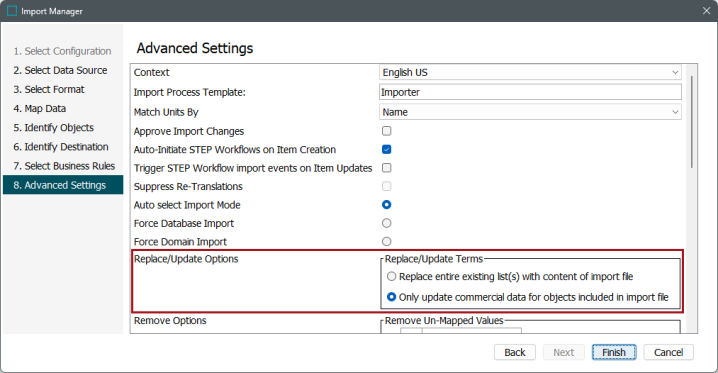
- On the Advanced Settings screen, any options can be selected based on your business needs, but the only options relevant to commercial data appear in the Replace/Update Options area.
-
To delete all existing content of the commercial list(s) and replace it with the content of the new file, select 'Replace entire existing list(s) with content of import file'.
-
To keep the existing content of the commercial list(s) and only replace the commercial data of the product IDs included in the new file, select 'Only update commercial data for objects included in import file'.
For more information on all options available on the Advanced Settings screen, refer to the Import Manager - Advanced Settings topic in the Data Exchange documentation here.
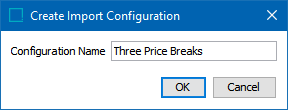
- Click Finish to complete the wizard. The Create Import Configuration dialog displays.
- In the Configuration Name field, enter a name for the import configuration (e.g., 'Three Price Breaks'), then click OK.
- When you have completed the import configuration process, the configuration is saved to your publication and accessible from the Publication tab.
- Commercial data can now be imported. Refer to the next section of this topic, Importing Commercial Data (here), for details.
Editing a Commercial Data Import Configuration
To make changes to an existing commercial data import configuration, do the following.
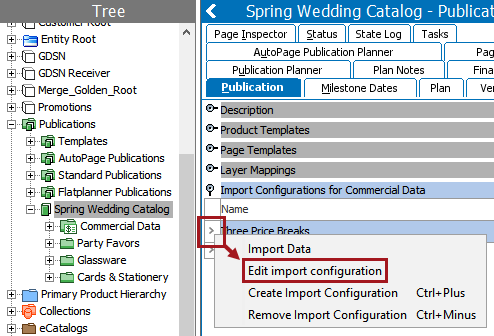
- In the Tree, navigate to, and select, the publication that contains the configuration you want to edit.
- On the Publication tab, right-click on the small arrow to the left of the configuration that you want to edit, then choose Edit Import Configuration.
- The Import Manager wizard displays, starting on the Select Data Source screen.
- Make the desired edits following the same steps listed above for creating a new configuration.
- To delete the configuration, follow steps 1 and 2 above, but select Remove Import Configuration.
Removing a Commercial Data Import Configuration
To remove a commercial data import configuration, follow the same initial steps listed in the previous subsection, but select Remove Import Configuration instead of 'Edit import configuration.'