This functionality is used by a Match and Merge solution. For more information, refer to the topic Match and Merge and the topic Configuring Match and Merge.
Note: As defined below, the Golden Record Clerical Review Task List must be configured as a result screen for a Status Selector Homepage widget and configured with a Node List and a Display Mode. This display mode should be configured with a specific set of table headers relevant to Golden Records.
When using a Golden Record Clerical Review Task List screen, consider the following:
-
Records do not appear in Clerical Review during import; records display only after a matching event processor has run on all the records.
-
Although you can apply a single clerical review workflow to multiple matching algorithms, it is not recommended.
-
It is recommended to use a separate user group for this task.
Copy / Paste Table Values
Use the following steps to work with the data outside of the Web UI task list table:
-
Highlight the text from single or multiple cells to copy. All text in the cell is copied, including the hidden text indicated by an ellipsis (...).
-
Paste into an Excel (or CSV) file and use the 'Match Destination Formatting' paste option to remove rule lines displayed in the Web UI.
-
Use additional Excel formatting options to display the text as desired.

Note: Values cannot be copied / pasted from the Advanced Merge screen.
Prerequisites
It is expected that anyone configuring the Golden Record Clerical Review Task List component is familiar with the Web UI Designer, as basic concepts for working with the designer are not covered in this section. In addition, the user must have appropriate privileges to access the designer. Additional information can be found in the topic Designer Access of the Web User Interfaces documentation.
Note: If you split your data model into multiple entity types (i.e., individual customers versus organization customers), you must configure a separate Clerical Review Task List for each entity type.
This topic includes details on Configuration, Using Action Buttons, Filtering Task List, and MLMR Support Guidelines.
Configuration
The Golden Record Clerical Review Task List can be configured to present the most relevant headers to the reviewer. Additionally, you can configure attribute group display options, action buttons, and the screen title to display either default text or customized content with relevant information.
Use the following steps to add and configure the screen.
-
Open the designer and click New....
-
Select 'Golden Record Clerical Review Task List', enter a Screen ID, and click Add.
-
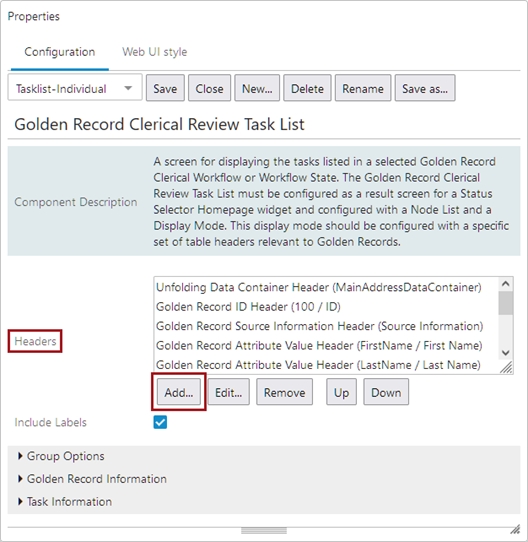
For the Headers parameter, click Add... and select one of the listed header components. Once a selection is made and required configurations are complete, click the Add button.
-
Golden Record Attribute Value Group Header - Displays the values of the specified group's attributes on the golden records. Attributes added to a selected Attribute Group will automatically be included and displayed. Once selected, additional configuration is required:
-
Attribute Group - Specify the attribute group values to display.
-
Blacklist Attribute Group - Specify the attribute groups not to display, even if they also appear in the Attribute Group specified above.
-
Dimensions - Specify height / width of the of the header cell.
-
Included Nested Groups - When checked, attributes from nested parameter groups should be included.
-
Label - Specify a label for the header.
-
Read Only - When checked, the values listed under this header cannot be edited.
-
Show LOV IDs - When checked, relevant LOVs display their IDs next to the corresponding values.
-
Table Sorting - Select a method of sorting the values in the header.
-
Enable Locale Formatting - When checked, 'ISO Date' and 'ISO Date and Time' values are formatted according to locale.
-
Context Help - Enter help text to display for the component.
-
Display Context help - When checked, display context help text for attributes.
-
-
Golden Record Attribute Value Header - Displays the values of the specified attribute on the golden records. Once selected, specify an Attribute, Label, and Preferred Column Width in the configuration dialog. If potential duplicate group references are set up for the matching algorithm, this header allows filtering on records, not tasks. Records filtering means that a task is displayed when at least one record in the task meets all filter criteria. For example, filtering on both a 'first name' and a 'last name' returns all tasks where both the selected first and last names are included.
Note: To enable filtering, the Potential Duplicate Group Reference Type must be configured in the Merge Golden Record component model. For more information, refer to the topic Configuring the Matching - Merge Golden Record Component Model.
-
Golden Record Data Container Attribute Value Header - Displays the values for the specified data container attribute on the golden records. Once selected, specify a Data Container, Attribute, Label, and Preferred Column Width in Pixels in the configuration dialog.
Note: The data container display attribute must be valid on the data container. Using a calculated attribute that is not valid as an attribute within the data container can cause the system to display the data container ID by default.
-
Golden Record ID Header - Displays the IDs of the golden records in the table. Once selected, double-click the component and specify a Label and Preferred Column Width in the configuration dialog.
Important: The Golden Record ID Header has been superseded by the Golden Record Information header, described in the steps below.
-
Golden Record Name Header - Displays the names of the golden records in the table. Once selected, double click the component and specify a Label and Preferred Column Width in the configuration dialog.
-
Golden Record Reference Type Header - Displays the object the golden record references via the specified reference type. Once selected, specify a Reference Type, Label, and Preferred Column Width in the configuration dialog.
-
Golden Record Source Information Header - Displays source system and record information for the golden records. Once selected, double click the component and specify a Label and Preferred Column Width in the configuration dialog.
-
Unfolding Data Container Header - Displays data container information that unfolds into its own columns to show all data container elements when you click the plus (
 ) button on the header. Once selected, locate and select the desired data container and specify a Label and Preferred Column Width in the configuration dialog. Additionally, the width of individual element columns is configurable. For more information, refer to the Configuring Column Width section below.
Important: For maximum efficiency in reviewing content, you must configure the Dynamic Table Layout component. To optimize the view for object comparisons, uncheck the 'Allow Wrap Of Header Title' and 'Allow Wrap of Cell Content' parameters. This applies to both the Golden Record Clerical Review Task List and Advanced Merge Dialog. For more information, refer to the topic Dynamic Table Layout of the Web User Interfaces documentation.
-
-
For the Include Labels parameter, when checked, all toolbar actions on the screen display a label below the icon.
-
For the Group Options flipper, set the following options:
-
Groups Initially Open - When checked, the attribute groups are opened by default.
-
Show Empty Group Headers - When checked, the headers are visible if the group is empty.
-
Show Group Headers - When checked, a header for attribute groups are visible.
-
-
For the Golden Record Information flipper, set the following options:
-
Created Date - Select to display the date and time of creation.
-
Last Update Date - Select to display the date and time of the last update.
-
Record Summary Column Width - Specify the width of the unfoldable Golden Record column.
-
ID - Select to display the STEP IDs of the potential duplicates.
-
ID Column Width - Specify the width of the ID column.
-
Match Score - Select to display the match score of the linked golden record towards a workflow node. The workflow node is the top golden record and does not display a match score (as it cannot be matched with itself) and instead displays a '--'. If a potential duplicate is indirectly included (e.g., it matches with one of the linked golden records but not the workflow node), it displays a 'N/A'.
-
-
For the Task Information flipper, set the following options:
-
Assignee - Select to display the assignee for a task.
-
Assignee Column Width - Specify the width of the assignee column.
-
High Priority - Select to display priority flags.
-
Match Recommendation - Select to display the merge / reject recommendations given via Machine Learning Match Recommendations.
-
Task Summary Column Width - Specify the width of the Task column.
-
Created Date - Select to display the date and time of creation.
Note: Users can filter based on ID, match score, assignee, match recommendation, and created date. For more information, refer to the Filtering Task List section below.
-
-
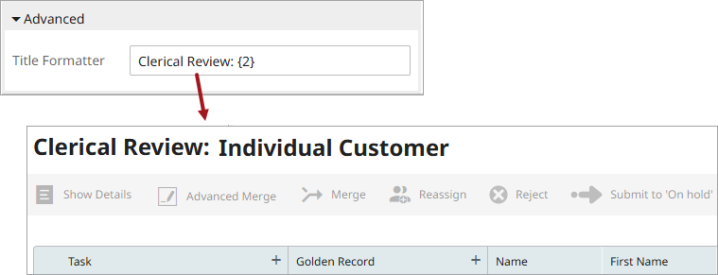
For the Advanced flipper, set the Title formatter parameter to display the default screen title or use placeholders. These placeholders can be used alone or with static text to insert workflow information into the title. You can use them individually or in combination to reflect dynamic workflow details.
The following placeholders are available:
-
{0} = Workflow ID
-
{1} = Workflow state title
-
{2} = Workflow title
-
{3} = Status flags
As an example, in the first image below, the Title Formatter is set to ‘i18n.stibo.ClericalReviewTaskList’, which displays the default English title ‘Golden Record Clerical Review Task List’.

In the second image, the Title Formatter is customized to ‘Clerical Review: {2}’. This displays the static text prefix ‘Clerical Review:’ followed by the workflow state title, in this example ‘Individual Customer’.
-
-
For the Child Components section, click Add... and select the actions to add to the toolbar. The Submit, Reject, and Reassign buttons assigned in this step are inherited to the Advanced Merge dialog.
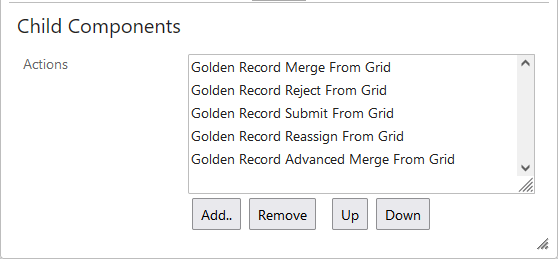
Note: Once an action is added, double click it to complete the required configuration.
-
Click Save.
-
Assign the Golden Record Clerical Review Task List to a Status Selector Homepage widget or a workflow Status Selector child component on the Global Navigation Panel. For more information on configuring and using this widget, refer to the topic Status Selector Homepage Widget of the Web User Interfaces documentation.
Column width configuration
Users can configure the columns on a Golden Record Clerical Review Task List to have their own default widths which will apply each time the page loads. Most columns widths are configurable by selecting the component in Design Mode and filling out the 'Preferred Column Width' component.

However, Unfoldable Data Container columns require additional configuration, as they can contain several attribute and reference columns. To configure the individual attribute and reference columns, use the following steps:
-
In the Design Mode, select the Unfoldable Data Container component that you wish to edit.
-
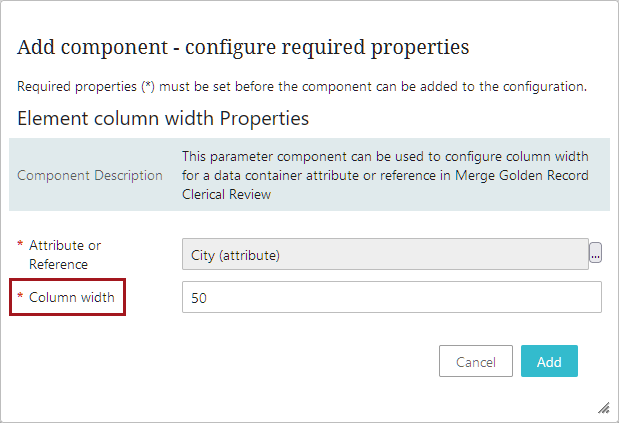
Navigate to the 'Attributes and Reference Column Widths' parameter and click Add.
-
Select an attribute or reference used in that data container, specify the column width, and click Add.
-
Repeat steps 2 and 3 for each attribute or reference column within the data container.
-
Save and close Design Mode.
Using Action Buttons
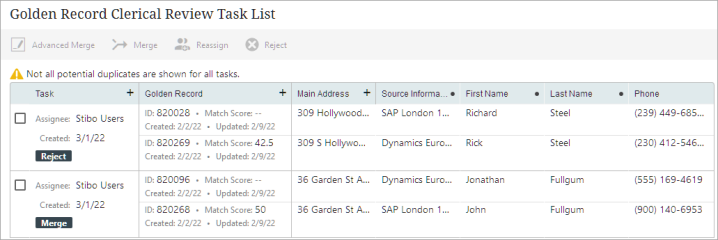
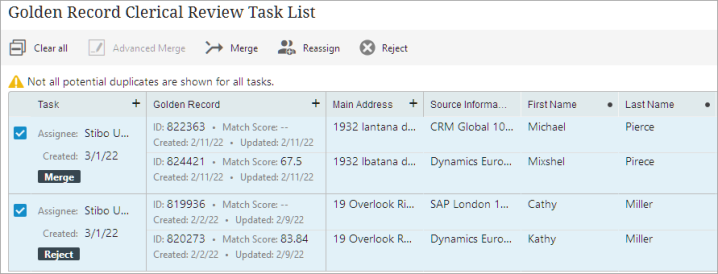
The Golden Record Clerical Review Task List allows a user to evaluate the potential duplicate tasks assigned to them and perform actions on them, including rejecting or merging the records.
Note: If 10 or more tasks are selected, or when using the Select all button, all actions run as bulk updates in a background process (BGP). Keep in mind that because it is running in the background, the Task List does not automatically update and will not update until the BGP is done. For Merge, Reject, and Submit actions, this means that the tasks will not be removed from the view until the BGP is finished and the task list is manually refreshed.
Follow these steps to manage the task list.
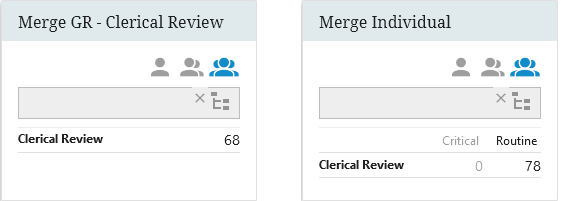
- In Web UI, navigate to Golden Record Clerical Review Task List via a relevant Status Selector Homepage widget or workflow Status Selector. In these images, the Merge Individual status selector is configured for a 'Critical' high priority status flag.
-
Select the desired tasks using one of the following:
-
Select an individual task via the checkbox. If multiple tasks are selected, all actions except the Advanced merge action are available.
-
Click Select all to select every task; if you have applied a filter, this will only select the tasks that apply to that filter.
Note: The Potential Duplicate Group Reference Type must be configured in the component model and all tasks must be republished for the ‘Select all’ button to be enabled.
-
Click Clear all to remove all selections on the screen.
-
If priority flags are configured, select the filter action to show only high priority tasks. The high priority filter does not recognize the default workflow flag as defined on the workflow. Tasks without high priority flag are not handled as having the workflow default. For information on displaying this filter, refer to the 'High Priority Status Flag Global Representation Type' section of the topic Main Properties of the Web User Interfaces documentation.
Important: If only one flag is configured, STEP considers it the default and assigns it to all items in a workflow. It does not display in a Web UI, and you are unable to filter by that flag. To circumvent this, configure a default flag in the workbench in addition to the specified flag. For more information, refer to the topic Configuring Status Flags in Workflows in the Workflows documentation.
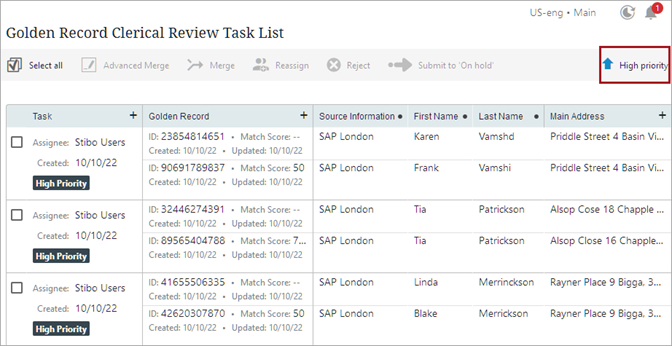
Note: The filter icon only displays when High Priority tasks exist for the current user based on assignees.
For information on configuring a status flag, refer to the topic Creating a Merge Golden Record Clerical Review Workflow.
- Click an action button to perform the action on the golden records of the selected task(s):
- Reject - marks as 'Confirmed Non Duplicates' and removes from the workflow. For information on the 'Confirmed Non Duplicates' reference type, refer to the topic Configuring the Matching - Merge Golden Record Component Model.
- Reassign - assigns to another user or group from the 'Select assignee' dialog.
- Submit - moves to another state in the workflow. Requires that the case sensitive 'Event ID' parameter is configured.
Note: This case sensitive Event ID must correspond with the ID of the relevant event on a transition in the workflow.
- Merge - merges each task selected into a single surviving golden record. The values that get promoted to the surviving golden record are determined by the survivorship rules specified on the corresponding matching algorithm. The non-surviving golden records in the task are set to deactivated and will not be matched again.
For information on survivorship rules, refer to the topic Golden Records Survivorship Rules.
For information on deactivation, refer to the topic Configuring the Matching - Merge Golden Record Component Model.
- Advanced Merge - allows manual inspection and after viewing the relevant details of each golden record and performing actions such as: rejecting specific golden records as duplicates, reassigning the task to another user, submitting the task to another state in the workflow, or merging the selected records. Values on Advanced Merge cannot be copied and pasted.
For more information on configuring and using the advanced merge dialog, refer to the topic Golden Record Advanced Merge Dialog.
Filtering Task List
The Golden Record Clerical Review Task List allows users to filter on any column with a circle ( ) button.
Follow these steps to filter a task list:
-
Click the circle (
 ) button next to a filterable column. If the desired selection is within an unfoldable column or data container, unfold them by clicking the plus () button and choose the column. After clicking, a dialog appears.
-
Select the parameter to filter by.
-
Enter a value or text to filter by. Click Apply filter.
-
To clear a filter, click the filter (
 ) button and click Clear filter.
MLMR Support Guidelines
The quality of recommendations provided by Machine Learning Match Recommendations (MLMR) in the Clerical Review Task List are dependent on the 'merge' and 'reject' decisions made by the user charged with training the matching agent. To improve the quality of the recommendations, Stibo Systems provides customers with a dedicated team prepared to engage in a collaborative process with customers to help improve the customer's understanding of the recommendations, and to improve the quality of those recommendations.
If the matching agent recommendations you receive results in questions for you or your team, in the Stibo Systems Service Portal, create a ticket with the Issue Type 'Customer Request.' Find below a list of the fields required when creating a support issue for the MLMR and descriptions of how to provide the requested content.
Note: Before you create a support issue, verify the relevant data to match on is mapped to the matching agent.
Summary: Add a short description of the issue you are experiencing in this field. Preface your summary content with ‘MLMR' so it is clear to the support team that the issue relates to the matching agent recommendations. The format will look like this: 'MLMR - <description of the issue>’.
Description: In this field, copy the data points listed below and paste it into the 'Description' field in the issue. Then add the requested information for each data point:
Description of problem:
Total number of recommendations:
Number of wrong recommendations identified:
Description of wrong recommendations: Describe what is wrong with the recommendations from the matching agent.
System Name / URL:
Training Process BGP ID:
Training Process BGP Started timestamp:
Training Process Execution Report:
<paste text>
Recommendation Process BGP ID:
Recommendation Process BGP Started timestamp:
Recommendation Process Execution Report:
<paste text>
Issue Category: ML Matching Agent
Business Domain: CMDM