This functionality is used by a Match and Merge solution. For more information, refer to the topic Match and Merge and the topic Configuring Match and Merge.
The Golden Record Advanced Merge dialog is accessed from the Golden Record Clerical Review Task List screen. Advanced Merge allows users to view the relevant details of each golden record in the selected task and perform a number of actions such as: rejecting specific golden records as duplicates, reassigning the task to another user, submitting the task to the next state in the workflow, or merging the selected records. The values available are determined by the value headers configured. For information on the Golden Record Clerical Review Task List screen, refer to the topic Golden Record Clerical Review Task List.
Important: Advanced Merge only merges the first 20 records in a task. Once those 20 are merged, all other potential duplicate records are removed from the task list without being merged or rejected. When the merge event processor runs next, it identifies the remaining potential duplicates and re-enters them into the Golden Record Clerical Review Task List as a new task. For more information on the merge event processor, refer to the topic Configuring the Merge Event Processor.
This topic includes details on Configuration, Header Configuration, and Using the View and Buttons.
Note: The Reassign task, Submit, and Reject included records action buttons in the Advanced Merge dialog are inherited from the parent screen configuration, Golden Record Clerical Review Task List.
Prerequisites
It is expected that anyone configuring the Golden Record Advanced Merge Dialog is familiar with the Web UI Designer, as basic concepts for working with the designer are not covered in this section. In addition, the user must have appropriate privileges to access the designer. Additional information can be found in the topic Designer Access of the Web User Interfaces documentation.
Configuration
Use the following steps to add and configure the screen.
Important: For maximum efficiency in reviewing content, configuring the Dynamic Table Layout component is required. To optimize the view for object comparisons, when configuring this component uncheck the 'Allow Wrap Of Header Title' and 'Allow Wrap of Cell Content' parameters. This applies to both the Golden Record Clerical Review Task List and Advanced Merge Dialog. For more information, refer to the topic Dynamic Table Layout of the Web User Interfaces documentation.
-
In the designer, open a relevant Golden Record Clerical Review Task List screen.
-
Under the Child Components section, add a Golden Record Advanced Merge From Grid action.
-
Double click the Golden Record Advanced Merge From Grid action to display the configuration of the child component.
-
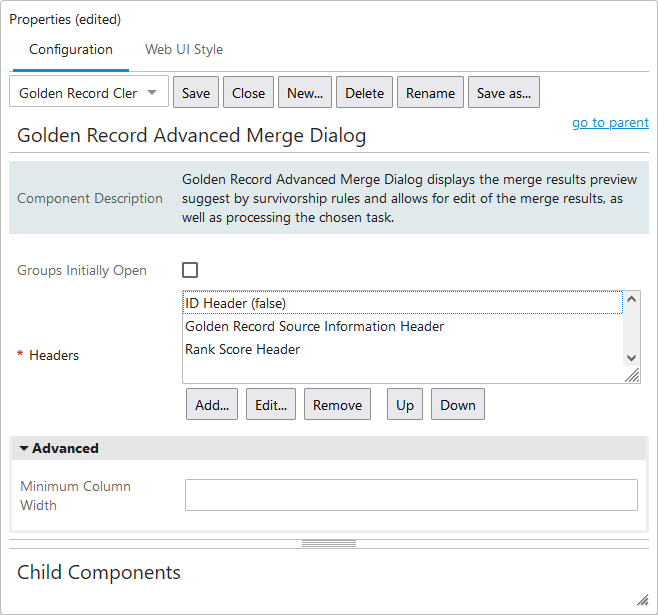
For the Component parameter, select Golden Record Advanced Merge Dialog and click the 'go to component' link.
-
For the Groups Initially Open parameter, when checked, attribute groups are already open when the dialog displays.
- For the Headers parameter (mandatory), click Add... and select a header to add to the dialog, and click the Add button on the Add Component dialog. An additional configuration dialog is displayed if required. For information on configuring the recommended headers, refer to the Headers section below.
Recommended headers for this dialog are: Name, Attribute Value, Attribute Value Group, and Advanced Merge Reference Header.
Additionally, by default, the following headers are pre-configured on newly created Advanced Merge Dialog components: ID, Golden Record Source Information, and Rank Score.
Note: When available, set the 'Enable Links' parameter to 'false' since it is ignored if set to 'true'. Read-only parameters are also ignored.
- For the Minimum Column Width parameter, enter the preferred width of the columns in pixels.
Header Configuration
The following section includes details about configuring the headers available on the Golden Record Advanced Merge Dialog.
ID Header
The 'ID Header' displays the IDs of objects in the table. Configuration options include:
-
Dimensions - Specify height / width of the of the header cell.
-
Enable Link - Check the box if the values under this header should act as links.
-
Label - Enter a label for the header.
-
Table Sorting - Select a method of sorting the values in the header.
-
Context Help - Enter help text for the component to display. Only works if the 'Enable Link' box is checked.
ID values cannot be edited in the corresponding Merge Preview field.
Name Header
The 'Name Header' displays the names of objects in the table. Configuration options include:
-
Dimensions - Specify height / width of the of the header cell.
-
Label - Enter a label for the header.
-
Table Sorting - Select a method of sorting the values in the header.
Name values can be edited in the corresponding Merge Preview field.
Golden Record Source Information Header
The 'Golden Record Source Information Header' displays source system and record information for objects in the table. Configuration options include:
-
Label - Enter a label for the header.
-
Preferred Column Width - Enter the width of the column in pixels.
Golden Record Source Information values cannot be edited in the corresponding Merge Preview field.
Rank Score Header
The 'Rank Score Header' displays the 'match score' of golden records as they compare to the surviving golden record. Configuration options include:
-
Dimensions - Specify height / width of the of the header cell.
-
Label - Enter a label for the header.
-
Table Sorting - Select a method of sorting the values in the header.
Attribute Value Header
The 'Attribute Value Header' displays the attribute values of objects in the table. Configuration options include:
-
Attribute - Click the ellipsis button (
 ) and browse or search for the relevant attribute to display values for.
 -
Dimensions - Specify height / width of the of the header cell.
-
Label - Enter a label for the header.
-
Mandatory - Specify whether or not an attribute value are considered mandatory. If so, the header will appear italicized and with an asterisk (*) in the table.
-
Read Only - When checked, values under this header cannot be edited.
-
Table Sorting - Select a method of sorting the values in the header.
-
Enable Locale Formatting - When checked, 'ISO Date' and 'ISO Date and Time' values are formatted according to locale.
-
Show Invalid Inherited Values - When checked, the table displays inherited values even if the attribute is not valid for the object.
-
Show LOV IDs - When checked, relevant LOVs display their IDs next to the corresponding values.
-
No Wrap - When checked, values do not wrap within the cells. This setting is overridden by the Dynamic Table Layout Settings. For more information, refer to the topic Main Properties in the Web User Interfaces documentation.
-
Context Help - Enter help text to display.
-
Display Context help - When checked, display context help text for attributes.
-
Attribute values can be maintained in the corresponding Merge Preview field.
-
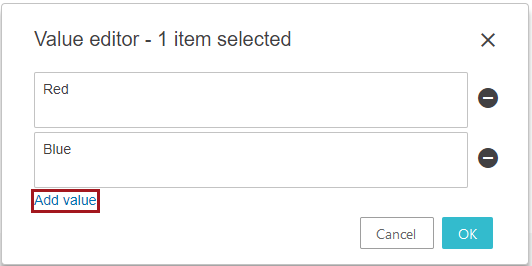
For a multi-valued attribute, double click the corresponding Merge Preview cell and click the Add value link in the 'Value editor' dialog.
Attribute Value Group Header
The 'Attribute Value Group Header' displays a group of attributes' values for objects in the table. Configuration options include:
-
Attribute Group - Click the ellipsis button (
) and browse or search for the relevant attribute group to display values for. -
Blacklist Attribute Group - Specify which attribute groups not to display attributes, even if they also appear in the attribute group specified above.
-
Dimensions - Specify height / width of the header cell.
-
Included Nested Groups - When checked, attributes from nested parameter groups are included.
-
Label - Specify a label for the header.
-
Mandatory - Specify whether or not an attribute value are considered mandatory. If so, the header will appear italicized and with an asterisk (*) in the table.
-
Read Only - When checked, values under this header cannot be edited.
-
Show LOV IDs - When checked, relevant LOVs display their IDs next to the corresponding values.
-
Table Sorting - Select a method of sorting the values in the header.
-
Enable Locale Formatting - When checked, 'ISO Date' and 'ISO Date and Time' values are formatted according to locale.
-
No Wrap - When checked, values do not wrap within the cells. This setting is overridden by the Dynamic Table Layout Settings. For more information, refer to the topic Main Properties in the Web User Interfaces documentation.
Note: This parameter is automatically set upon saving the component as the Golden Record Advanced Merge is designed to compare data, and thus should not wrap text.
-
Context Help - Enter help text for the component to display.
-
Display Context help - When checked, display context help text for attributes.
-
Attribute values can be maintained in the corresponding Merge Preview field.
-
For a multi-valued attribute, double click the corresponding Merge Preview cell and click the Add value link in the 'Value editor' dialog.
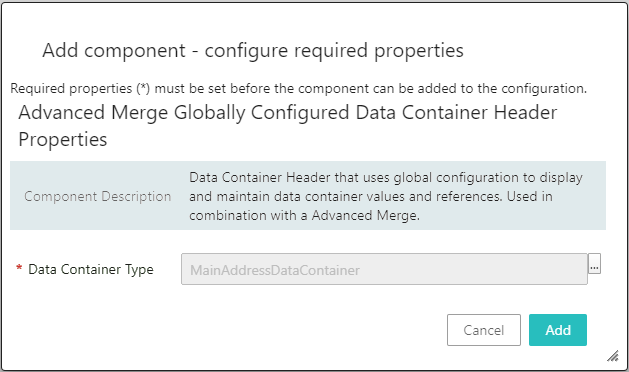
Advanced Merge Globally Configured Data Container Header
The 'Advanced Merge Globally Configured Data Container Header' displays data container values.
Note: Avoid using the Data Container Attribute Value Group Header and the Data Container Attribute Value Header.
Once added, specify the data container type to display data. Under the Data Container Type parameter, click the ellipsis button () and browse or search for the relevant data container type to display attributes and references from.
To configure which attribute values / references display in this component and under what conditions they are displayed, refer to the topic Global Data Container Representations of the Web User Interfaces documentation.
Data containers can be manually selected from various golden records to build a complete set of Data Containers in the Merge Preview.
-
To add / maintain data containers from the Advanced Merge dialog, double click the corresponding cell under Merge Preview.
-
The editor dialog has the same functionality as the Globally Configured Data Container component. For more information on creating / maintaining data containers using the Globally Configured Data Container component, refer to the topic Data Containers in Web UI of the Web User Interfaces documentation.
Advanced Merge Reference Header
The 'Advanced Merge Reference Header' displays the references to target objects in the table. Configuration options include:
-
Label - Specify a label for the header.
-
Reference Type - Click the ellipsis button (
) and browse or search for the relevant reference type to display.
References to target objects can be edited and manually selected from various golden records to build a complete set of references to target objects in the Merge Preview. If the reference type is multi-valued, multiple references can be added via the Merge Preview.
-
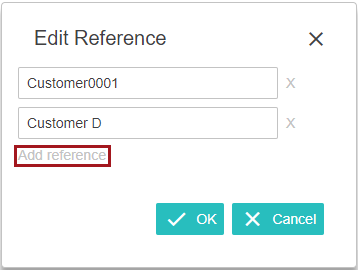
To add a value for a reference type, double click the corresponding Merge Preview cell and click the Add reference link in the 'Edit Reference' dialog.
-
In the node selection dialog, search for entities you want to reference via entity ID or Source Record ID.
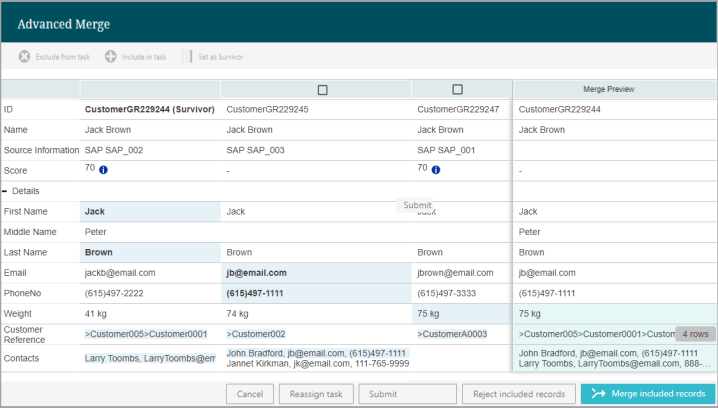
Using the View and Buttons
When merging, individual records on the task can be excluded / included from the merge and the automatically assigned surviving record can be changed by the user. Specific values from each record can be selected for promotion to the surviving record. Attribute values can also be entered in the Merge Preview column. The end result is displayed in the Merge Preview on the right side of the dialog.
The dialog is separated into these sections: toolbar at the top, golden records, merge preview, and a toolbar at the bottom.
- The top toolbar allows users to take actions on the selected records.
-
Click the Exclude from task button to exclude the selected records from the merge. The values of the record are disabled to signify the record's exclusion.
-
Click the Include in task button to include the selected records in the merge. This option is only available for records that have been excluded.
-
Click the Set as Survivor button to designate the selected record as the surviving record. The ID of the surviving record is marked to signify its status.

- The golden record view in the center of the dialog lists all mapped headers.
-
Individual values selected for promotion to the surviving record are highlighted in blue.
-
Values promoted based on survivorship rules appear in bold.

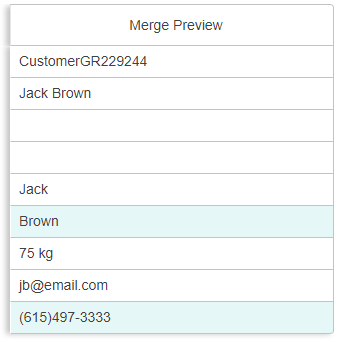
- The Merge Preview column displays all of the values that will survive after the merge.
-
Values that have been manually selected for promotion to the surviving record are highlighted in blue.
-
Attribute, data container, and reference to target object values added manually are highlighted in green.
- The bottom toolbar allows users to perform the following actions:
-
Cancel the dialog.
-
Reassign task to another user.
-
Submit the task to the next state in the workflow.
-
Reject included records as the duplicates and close the task. The Exclude / Include buttons can be used to reject matches on a per-record basis.
-
Merge included records into one surviving record. All records are automatically included in the merge unless they have been manually excluded via the Exclude from task action button.
