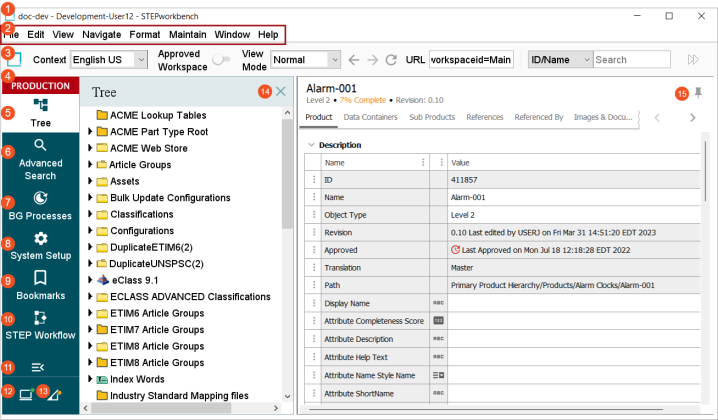
The screenshot below shows a basic view of the STEP Workbench. Though system customizations and variable access permissions may result in a slightly different view, the basic elements in this view of the workbench's Main Window will be present for most users. The key elements of the workbench UI are numbered and defined below.
Important: A one-time installation of the STEP Workbench Launcher needs to be done on each client workstation before opening the workbench. STEP Workbench users do not need Java installed separately on their computers. After installation, the workbench will launch via conventional means. For details and directions, click on the Workbench Launchers link, accessible on the Start Page.
Note: The STEP Workbench is a Java client. STEP's backend is AdoptOpenJDK.
-
The Title Bar includes system information including the name of the system accessed and the user's ID.
-
The Menu Bar contains a collection of various tools for users to perform actions in the workbench. For more information, refer to the Menu Items topic.
-
The Toolbar contains actions that help with the view and navigation of the workbench. For more information, refer to the Toolbar topic.
-
The Environment badge displays the environment's purpose using color coding and text. The available environment badges include development, test, acceptance, production, retired, training, sandbox, preproduction, permanent sandbox, and release preview sandbox. When the bar is collapsed, hover over the badge text to display the full name of the environment.

The badge name and color can be changed via the SaaS Self-Service UI.
Note: For SaaS systems, properties are set within the Self-Service UI by going to the Configuration Properties tab for your environment. Some changes may require you to restart the server and/or user interface (i.e., the workbench) before they take effect. If the properties you need are not shown, submit an issue within the Stibo Systems Service Portal to complete the configuration.
-
The Tree tab navigates users to the object tree in the workbench. For more information, refer to the Tree Tab topic.
-
The Advanced Search tab provides access to the advanced search functionality of the workbench where users can filter results, save these results as a collection, export these results for external use, or perform bulk updates on these results. For more information, refer to the Advanced Search Tab topic.
-
The BG Processes tab contains all the background processes occurring in the STEP instance. For more information, refer to the BG Processes Tab topic.
-
The System Setup tab contains all the administrative actions to set up the workbench to maintain data. For more information, refer to the System Setup Tab topic.
-
The Bookmarks tab contains all the bookmarks that are saved by the user. For more information, refer to the Bookmarks Tab topic.
-
The STEP Workflow tab contains all the workflows currently associated with STEP. For more information, refer to the STEP Workflow Tab topic.
-
The collapse bar button (
 ) removes the text from the left navigation bar; the expand bar button (
 ) adds text to the options.
 -
STEP connection status displays the status of STEP's connection to the internet. When the connection is strong and STEP is ready to run normally, the status will read 'Ready.' Other statuses that may appear are:
-
Reading - STEP is requesting information from the database.
-
Lost Connection to - STEP has lost connection to the server.
-
Reconnected to - STEP has reconnected to the server after a lost connection. May alternate with the 'Lost Connection' to status if the connection to the internet is lost for a significant period.
-
-
Connection strength illustrates the connection strength between the user and the server, also known as the 'Network Latency.' Hover the cursor over the graph to display how fast data is traveling between the server and the user as measured in milliseconds.
-
The close button (
 ) hides the hierarchy for the selected navigation bar option, which allows more space for the Object Editor. Select a navigation bar option to display the hierarchy again. For more information, refer to the Object Editor topic.
 -
The Object Editor pushpin default is unpinned (
 ) but allows users to pin (
 ) the right-hand side of the window. When pinned, a user can navigate to other items in the Tree or System Setup while the information on the right side of the screen remains unchanged. This can be used to add objects to the Flatplanner basket and to add objects to a change package. For more information, refer to the Adding Objects Manually to Baskets topic in the Publisher (Adobe InDesign Integration) documentation and the Editing a Change Package topic in the Configuration Management documentation.