This topic will guide users through the process of creating the screens required to import, process, and export customer lists in the Web UI.
Prerequisites
Before the Web UI configurations can be done, the workbench configurations are required. Refer to the Configuring List Processing in the Workbench topic.
It is expected that anyone configuring the List Processing component is familiar with the Web UI designer as basic concepts for working with the designer are not covered in this section. In addition, the user must have appropriate privileges to access the designer. Additional information can be found in the Designer Access section of the Web User Interfaces documentation.
Configuration
In the Web UI, these configurations are required to use List Processing, each of which is described in the sections below:
-
A Node List screen that holds the lists for processing
-
A Node Details screen that shows the list processing information by including the required Processing List Tab Page and an optional metadata tab
-
A mapping from the object type to the Node Details screen
-
A Data Profile screen that gives access to the customized list object data profile information
-
A mapping from the processing screen to list profile findings
Once mapped, users may use list processing and profile findings in the Web UI. For more information, refer to the Processing Lists topic.
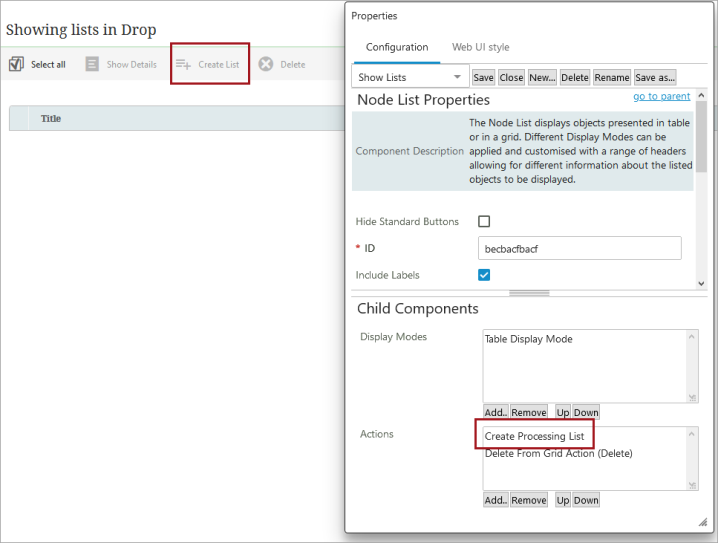
Create a Node List Screen with a 'Create Processing List' action button
To import and create lists in the system, a 'Create Processing List' action button must be added to the valid Node List. In this example, the Show Lists screen includes the button named 'Create List' was added. For information on adding action buttons to a Web UI screen, refer to the Action Button Configuration on a Node List topic in the Web User Interfaces documentation.
Create a Processing Screen
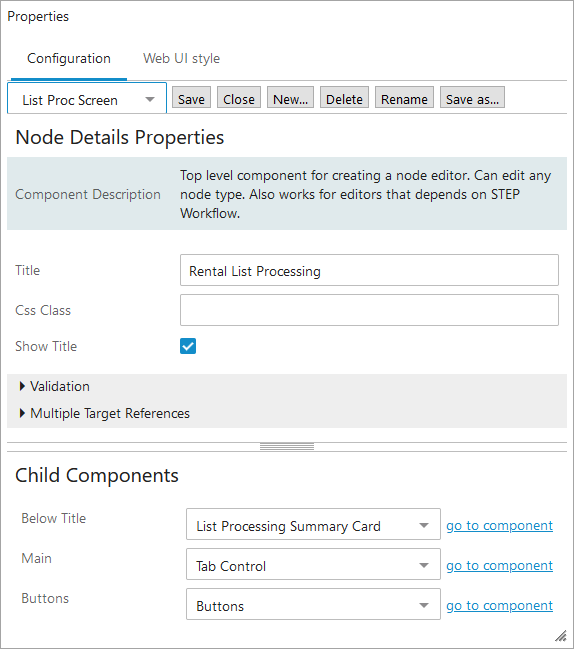
In design mode, click 'New' to create a new 'Node Details' screen, give it an ID (such as 'List Proc Screen') then click the 'Add' button.
The configured screen shown below shows the Child Components for list processing. Refer to the Node Details Screen topic for details about the other configuration possible on this screen.
-
Below Title 'List Processing Summary Card' - automatically includes the Title defined, the name and ID of the list object, the list object type, the number of records, the created date and time, and a Profile Findings button set to filter on object type. No additional configuration is available.
-
Main 'Tab Control' - click the 'go to component' link and add the following child components:
-
'Processing List Tab Page' - add a custom title or use the default 'List Processing' title.
-
'Tab Page' - if desired, for example, add a Node Editor with an Attribute Value Group component to allow metadata manipulation. For more information, refer to the Attribute Value Group Component topic in the Web User Interfaces documentation.
-
Buttons 'Buttons' - add a Save, Delete, and Reset action button as appropriate for list entity attributes.
Map Object Type to the Processing Screen
Complete the following mapping to ensure that the List Processing Screen is shows contents of a particular list object type. On [--MAIN--] in the designer, select 'Add' under the field for the 'Mappings' parameter. On the Screen Mapping dialog, configure the new mapping as follows:
-
Conditions: add the Object Type set in the component model. Refer to the List Processing Component Model topic.
-
Screen: add the List Processing Screen (named 'List Proc Screen') that was created in this topic.

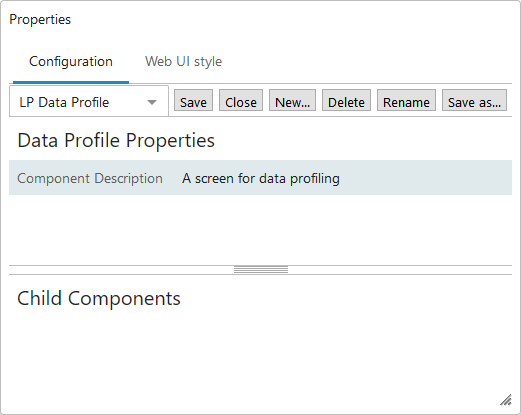
Create a Data Profile Screen
In design mode, click 'New' to create a new 'Node Details' screen, give it an ID (such as 'LP Data Profile') then click the 'Add' button. Once created, the screen requires no further configuration. Click 'Save' to make the screen available for mapping.
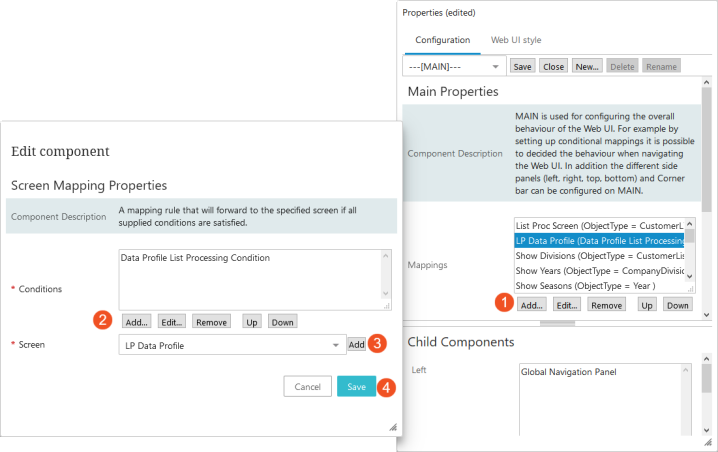
Map Profile Findings from the Processing Screen
Complete the following mapping to ensure that the Profile Findings link displays a Data Profile Screen that is customized for list object types. This mapping is in addition to mapping for a standard Data Profile Screen (for object types other than lists), as defined in the Data Profile Screen topic in the Web User Interfaces documentation.
On [--MAIN--] in the designer, select 'Add' under the field for the 'Mappings' parameter. On the Screen Mapping dialog, configure the new mapping as follows:
-
Conditions: add the Data Profile List Processing Condition.
-
Screen: add the Data Profile screen.