Before a Smartsheet can be downloaded and edited, a Smartsheet data export or template configuration must be created in the Export Manager. Once created, the configuration(s) can be assigned to the relevant template widgets and export actions in the Supplier Web UI, or it can be selected when exporting a Smartsheet.
Important: Objects should not be exported to Excel Smartsheets from the workbench. Smartsheet templates exported from the workbench will not be able to correct supplier linking of products created during import and will also provide different browsing capabilities. A maintenance Smartsheet exported from the workbench will not contain any information about workflow and state, so it will not be able to supply information about workflow mandatory columns. In addition, any business rules regarding the current workflow will be unavailable during import. It will also supply a different set of possible targets when maintaining product cross-references.
To create a configuration, open the Export Manager and use the following sections to create an Excel Smartsheet data file or an Excel Smartsheet template. The following sections only describe the settings that are specific to Smartsheets. For detailed information about each of the steps in the Export Manager, Refer to the Export Manager topic.
Important: While Smartsheets are designed to be used from the Supplier Web UI, they can also be used by non-supplier users. However, future Smartsheet enhancements will most likely depend on the Supplier Web UI.
Select Objects
Within the Export Manager, on the Select Objects step:
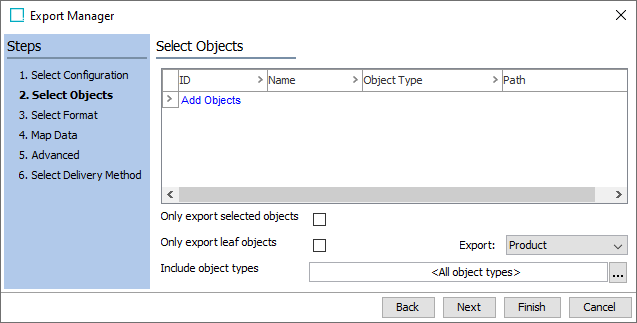
For both data export and template configurations, apply the following settings:
- If the export configuration is saved and used from the Supplier Web UI, the actual products selected in this step are irrelevant. The products will be replaced with the products / categories selected in the Web UI.
- Do not change the Export and Include object types default settings.
- For Smartsheet multilevel data exports, check Only export selected products and leave Only export leaf objects unchecked.
- For Smartsheet template export specifically, note the following:
- It is recommended to enable Only export selected products so that the Export Manager does not have to examine the child products of the selected template product.
- The selected objects are not exported in Smartsheet templates. However, the first product in the list or selection will be the parent of the top-level products created when the edited template is imported.
- Enabling Only export leaf objects is not recommend since the import may fail, or new products may be created in the wrong place when the resulting template is later used via the saved configuration.
- Click the Next button to display the next step.
Select Format
On this step, select Excel Smartsheet as the file export format. Complete the parameters displayed as follows:

- In the mandatory Excel version parameter, use the dropdown to select Excel 2007. Using an older version of Excel could cause problems with the files, including errors upon import. It is best to always choose the newest, supported version of Excel.
- In the mandatory Smartsheet type parameter, select one of the following options from the dropdown:
- Select Multiple level. Hierarchical structure flattened to sheet if you want to work with multi-level Smartsheets. This is used to initiate and maintain products of different object types and at different hierarchy locations in STEP.
- Select Multiple object types. Different product types intermixed if you want to work with multi-object type Smartsheets. This handles multiple object types simultaneously, without them needing to be hierarchically related. This functionality works best when there is a large overlap between the set of attributes that are valid for each of the object types.
For more information on Smartsheet types, refer to the Using a Smartsheet topic.
- In the mandatory Smartsheet usage parameter, select one of the following options from the dropdown:
- Select Data export (for maintaining product data) to export data for products already in the STEP database.
- Select Template export (for onboarding new products) to export an empty Smartsheet with formatted columns that can be used to initiate new products.
Note: Template exports cannot export reference values but reference types can be exported. It will not contain any data for the object type.
- In the mandatory Object Types parameter, select one or more object types to be included in the export from the dropdown.
- For multi-level Smartsheets, specify the object type of the products for each level in the multi-level export. The object type must be valid for each level. The top level must be allowed under the root product selected in the Select Object step of the wizard. A maximum of five (5) entries are allowed.
- For multi-object type Smartsheets, specify the object type(s) to export. There is no limit on how many entries are allowed.
- In the mandatory Use Cross-Context Export parameter, use the dropdown to determine if language dependent attributes should be exported in the language of the selected context.
Set to Yes to specify which contexts should be included in the export. A column is created in the Smartsheet for each selected context on all language-dependent attributes. Remember to select the export context specified in the Advanced step of the wizard in the cross-context list. If the export context is not selected, there is a risk of exporting data in an incorrect context.
To add a context, click the Select Context link under the dropdown and choose the context(s) from the window that appears.
Important: References and links cannot be exported to a Smartsheet using this feature.
- In the potentially mandatory Smartsheet import configuration, select an existing import configuration to apply to the Smartsheet. The import configuration may run business rules and other actions on the products upon import. This field is only mandatory if an import configuration has not been set on the 'SmartSheetImportAction' in the Supplier Web UI.
For more information of setting up the import configuration, refer to the Smartsheet Import Configurations topic.
- In the optional Mandatory metadata attribute parameter, click the ellipsis button (
 ) and select an attribute to mark columns as mandatory in the Smartsheet. This attribute must be a Description attribute and have the validation base type Integer or Numeric. Once created, the attribute must be added as metadata to all relevant attributes or attribute links. For any attribute that should be made mandatory in the Smartsheet, a non-zero integer must be populated in the metadata attribute.
This parameter can be used in conjunction with the following parameter that respects standard mandatory settings.
For more information, refer to the Mandatory Attributes and References in Smartsheets topic.
- In the optional Use attribute/reference mandatory setting parameter, select Yes to mark columns as mandatory in the Smartsheet based on standard mandatory settings. Leave the option set to No if mandatory attributes and references should be identified via other options, like via mandatory definition in a workflow (most common way).
This parameter can be used in conjunction with the previous parameter that uses a metadata attribute for setting mandatory status or derived from workflows or the 'map data' step of the export wizard.
For more information, refer to the Mandatory Attributes and References in Smartsheets topic.
- In the optional Sort LOV by ID metadata attribute parameter, click the ellipsis button () and select a metadata attribute to sort attribute columns that use LOVs by value ID. This attribute must be a Description attribute and have the validation base type Integer or Numeric. Once created, this attribute must be added as metadata to all relevant attributes. For any LOV that should have its values sorted by ID, a non-zero integer must be populated in the metadata attribute.
This configuration changes the order in dropdown lists and pop-up LOV selectors in the Smartsheet column(s).
The metadata value is ignored if the attribute is not LOV based or if the LOV does not use value ID. This makes it possible to have the same values for two different columns sorted both by value and value ID.
For more information, refer to the Adding IDs to Existing Values in LOV topic of the System Setup documentation.
- In the optional Hide LOV-ID metadata attribute parameter, click the ellipsis button () and select a metadata attribute to exclude external IDs from individual LOV-based Smartsheet columns. This is useful if you only want to display the value of the LOVs rather than their value IDs. This attribute must be a Description attribute and have the validation base type Integer or Numeric. Once created, this attribute must be added as metadata to all relevant attributes. For any LOV that should not display value IDs, a non-zero integer must be populated in the metadata attribute.
- In the mandatory Placeholder asset object type parameter, use the dropdown and select the object type of the assets that are created and referenced during import. This must be specified to enable asset placeholders. The available options are system dependent.
Note: Placeholder assets make it possible for the created assets to have a determinable ID so other processes are able to import and maintain actual asset content.
If [do not create asset placeholders] is selected, the asset placeholder system is disabled and normal asset references are maintained in the Smartsheet.
- In the optional Placeholder asset ID prefix parameter, enter a prefix for the ID placeholder assets created upon import. This ensures that asset IDs are unique across all suppliers during export from the workbench. The prefix will be changed during Web UI export.
- In the optional Placeholder asset ID separator parameter, enter a separator to be inserted in the final ID between the prefix and the file name.
For example, if a member of the user group 'Vendor ltd.' enters the asset file name 'Blue Running Shoe.png', the ID of the final placeholder asset is 'Vendor ltd.:Blue Running Shoe.png', with ':' being the separator. This ID is, with high probability, unique between vendors. If the ID contains invalid characters or exceeds the 40 characters limit, the name will fail validation.
- In the optional Placeholder asset parent classification parameter, click the ellipsis button () and specify where placeholder assets are created when the Smartsheet is re-imported. This parameter may be useful if the imported Smartsheet was exported from STEP Workbench (and is therefore not associated with a Supplier group). If this parameter is filled in and the Smartsheet is exported / imported from the Web UI, then this parameter is overwritten and the asset placeholder will go below the correct Supplier Asset folder in the Supplier Hierarchy.
- In the mandatory Smartsheet auto-size mode parameter, use the dropdown to determine whether to resize the exported Smartsheets by column-header width or by cell-content width using word wrap, or not to resize at all.
- In the optional Supplier selector column header parameter, enter a name for the supplier selector column.
Note: This parameter, as well as the 'Supplier select help text' and 'Supplier select column index' below, are only available when creating a Template export and when 'Enable all-view for users that are a member of multiple suppliers' is set to 'Y' in system properties (Users & Groups node).
Unless this parameter is set, the supplier selector column is called 'Supplier' by default.
- In the optional Supplier selector help text parameter, enter what the tooltip says when the cursor is placed over the supplier selector column header in the exported sheet.
- In the optional Supplier selector column index parameter, determine which column the supplier selector occupies. If the parameter is not set, then the column will be placed as far to the left as possible. If this parameter is set, all columns mapped in the Map Data step will be bumped to the right of whichever column is specified. Valid values are between 2 and 999.
- For the mandatory Allow Auto-Filter in Workbook parameter, determine whether or not rows can be filtered in the Smartsheet via the dropdown.
- For the mandatory Allow Duplicate / Delete row in a Workbook parameter, determine whether or not entire rows can be duplicated and deleted in the Smartsheet via the dropdown.
- For the Add working column parameter, select 'Yes' to add a working column to the Smartsheet. The working column allows users to enter Excel formulas, which are restricted from other data cells in the Smartsheet. A common Excel function used within the working column is VLOOKUP.
Data that is generated in cells within the working column can be copied and pasted into other cells in the Smartsheet by using the Values option within the Excel 'Paste Special' feature.
Note: If a standard paste operation is performed to paste values generated by the formulas in the working column, or if an option other than 'Values' is selected when using 'Paste Special,' the cells will be skipped on import and no values will be imported.
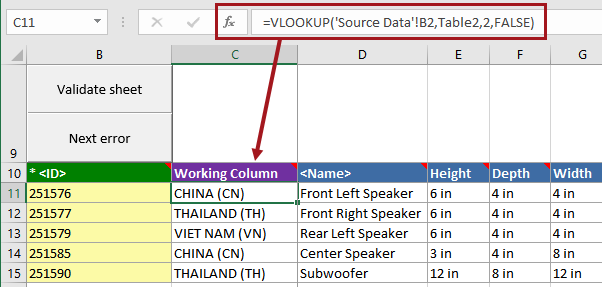
The working column will appear in the second column of the exported Smartsheet (column C). It will be frozen, and any values it contains will be ignored during both product validation and data imports.
Note: If the Supplier selector column index parameter is set to 2, the working column will still appear in the second column of the Smartsheet. The Supplier column will instead be bumped to the third column (column D).
- For the Enable open format parameter, select 'Yes' to export an open format Smartsheet.
In open format Smartsheets, almost all cells are unlocked ('open'), providing users with the option to employ Excel formulas, number formatting (e.g., General, Currency, Date), text formatting (e.g., bold, italic), text wrapping, and cell color (background shading). For full details on this functionality, refer to the Open Format Smartsheet topic.
- For the Classification roots for inherited attributes parameter, the Export Manager determines the valid attributes for new products in the product category if a Product Classification Link type allows for inheritance of attribute validity from the linked classification. These attributes will be included in the Smartsheet output. For full details on this functionality, refer to the Classification Roots for Inherited Attributes topic.
Map Data
On this step, mapping options are available depending on whether you are making a multi-object type or multi-level Smartsheet.
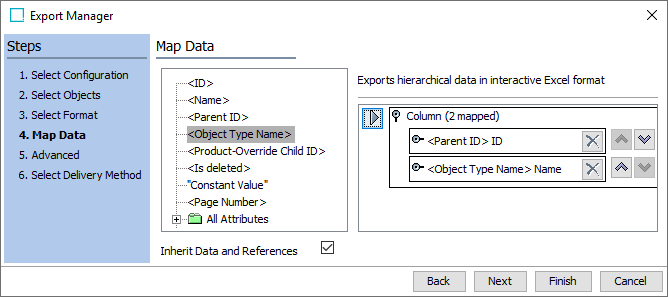
Special options for multi-object type Smartsheets
- Parent ID is used as a Parent ID selector in the Excel sheet so users can indicate the correct parent IDs for the products they are working with.
- Object Type Name Smartsheet column is used as an Object Type selector in the Excel sheet so users can indicate the object types for the products they are working with.
These two columns can be mapped in multi-level Smartsheet as well, but cannot be manually edited.
Special options for multi-level Smartsheets
- Start level specifies that the selected column starts a new object level. The top level can be left empty because it is implicit, however a value must be provided for all other Start levels below the first. The actual value is not important. To add a value, click the transformation button (
 ) and enter a value in the window that appears.
The Start level columns are also used for grouping products at each level. For example, all rows with 'T-Shirt' in the Name column (which is designated as a Start level column) become one product. All rows that have both 'Pink' in the Color column and 'T-Shirt' in the Name column become one SKU Level product under the new T-Shirt product.
It is not recommended to group by multivalued attributes and reference columns.
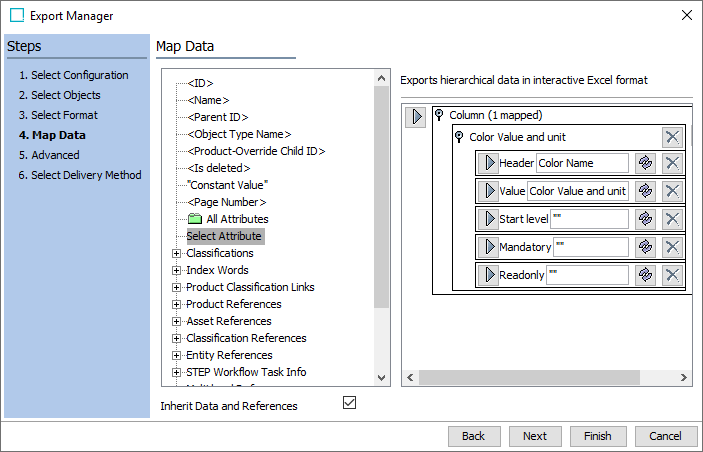
- Mandatory makes the column appear mandatory in the downloaded Smartsheet. If the Smartsheet is validated in Excel, cells that are empty but marked as mandatory will appear as invalid. However, no errors are generated when the Smartsheet is imported. To mark a column as mandatory, click the transformation button () and enter any value in the window that appears.
For more information, refer to the Mandatory Attributes topic in the System Setup documentation.
- Read only makes the column read-only and locks all cells in the column in Excel. This setting is only relevant for data export. In template export, mappings marked as read-only are omitted.
To mark a column as read only, click the transformation button (![]() ) and enter any value in the Transformation dialog. Click the Save button on the Transformation dialog and the 'Readonly' mapped value is updated.
) and enter any value in the Transformation dialog. Click the Save button on the Transformation dialog and the 'Readonly' mapped value is updated.
The following image shows that none of the special options have a transformation.
Important: Do not add any kind of transformation to the value of a mapping unless it is marked as read-only. Transformations are applied during Smartsheet data export. However, during Smartsheet import, the column will be handled as if it contains Value and Unit. This can lead to import errors or unexpected imported values.
Important: Do not apply aspects to any transformed values. Smartsheets do not contain this information and will treat the value in the cell according to the step type for the column.
Additional Information About Mapping
If attribute groups are mapped at this step, the individual attributes are ordered using the Display Sequence metadata for the attributes. If an attribute defines or starts a level in the Smartsheet, the first column in the group is used for sorting at this level.
Note: Attribute groups are not mapped recursively.
Sub-level description attributes cannot be exported to a Smartsheet unless a product of the sub-level object type is included in the export. This is usually not the case in template exports where it is recommended to select the Export only selected products option.
When Smartsheets are exported, LOV values are embedded in the Excel workbook so that a list of valid values is available when values are specified in an LOV-based column. The exported values are filtered according to the filters specified on the attribute and on the attribute link in the Product hierarchy.
Note: Smartsheets only support LOV filters on attributes and attribute links.
Advanced
On this step, do not select Locale conversion from context. It can break the automatic conversion to the client's native decimal separator and can cause the import of the Smartsheet to fail.
Select Delivery Method
On this step, if configured, a Smartsheet background process can be specified on this step. For more information, refer to the Using Smartsheet Export Background Process section of the Smartsheet Background Processes and Queues topic.
Saving and Modifying the Configuration
For this dialog, saving an export configuration is described in the Running a Data Export topic.
Once saved, an export configuration can be edited, as described in the Maintaining a Saved Export Configuration topic.