Unlike typical Excel sheets, Smartsheets are very restrictive and must be handled in a very specific way.
- In Excel, open the applicable Smartsheet. If the Smartsheet has never been opened before it will open on the Cover tab, which contains information about the download date and the color codes used in the Smartsheet. Additionally, a security warning will appear at the top of the cover page.

Click Enable Content to enable macros, otherwise, the Smartsheet will not work correctly.
- In the workbook, one or more additional tabs are available, each corresponding to the categories selected during the export process. Click the desired tab to open the sheet.
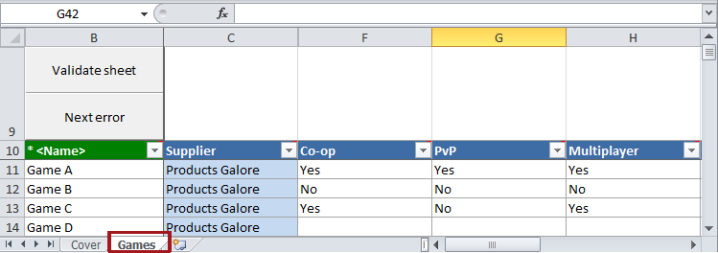
Important: Objects are broken into tabs based on the lowest level of the selected hierarchy in which common attributes are linked. Typically, this means that they broken up according to each individual object hierarchy selected in the export configuration. However, multiple additional tabs will be created for the same hierarchy if the exported attributes do not all link to the lowest level of that hierarchy.
- Enter the data for the objects to be imported.
Note: In template sheets, all rows are editable, but any unmapped columns are locked to the user. In maintenance sheets, all unmapped rows and columns are locked.
Entering Values for Multi-Valued LOVs and References
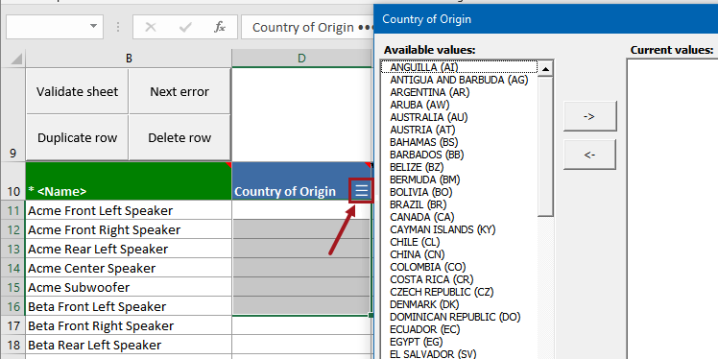
To enter values from multi-valued LOVs, multi-product reference types, multi-asset reference types, and parent IDs:
- Select one or more cells in the column in which you want to add data. Both adjacent and non-adjacent cells within the same column can be selected. Hold the Ctrl key while clicking the relevant cells to select non-adjacent cells.
Note: If entering data in multiple cells at once in a Smartsheet with a Supplier column, you must ensure that you have the same supplier selected in each row where you are adding data. Otherwise, the edit will be rejected.
- Click on the column header, which contains a collapsed menu icon ('hamburger button')
- The dialog from which multiple values or parent IDs are chosen is displayed.
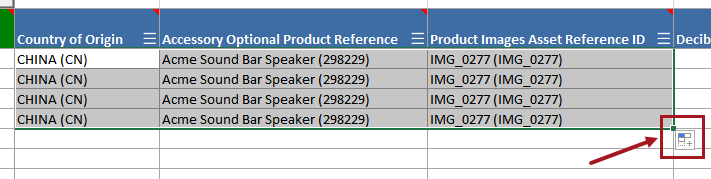
- Make the required selections, then close the multi-value dialog. All selected cells will be populated at once.
Like other values in Smartsheets, values populated from multi-valued LOVs, multi-product reference types, multi-asset reference types, and parent IDs can also be dragged down in adjacent columns using the Excel fill handle, as shown in the below screenshot. For more information on LOVs, refer to the Smartsheet and LOVs topic.
Validating the Sheet
To ensure that values have entered properly, the Smartsheet must be validated. Running a validation operation on a Smartsheet checks that the data on the sheet has been entered completely and correctly. If the data contains errors, the validation check will return error message(s) and/or shade cells red to indicate where data needs to be corrected.
Also, the Data Issues Report bind allows users to write JavaScript-based business conditions that, when run, will insert custom messages related to attribute and reference issues into Smartsheets. Upon validation, the messages are displayed when clicking on / hovering over the cells. Warnings are identified via orange-highlighted cells, and errors via red-highlighted cells. If both an error and a warning are found in the same row, the error will supersede the warning and the first cell in the row will display with a red highlight.
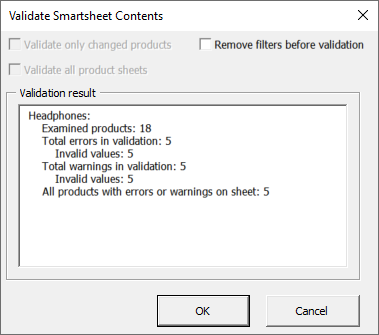
To validate a Smartsheet:
- Click Validate sheet in the top left corner. In the 'Validate Smartsheet Contents' dialog, three check boxes are available:
- Validate only changed products - The Smartsheet will only validate products that have been changed. Leaving this box unchecked means all products are validated.
- Validate all product sheets - The Smartsheet will validate all sheets in the workbook. Leaving this box unchecked means only products that appear on the currently selected sheet will be validated. This checkbox is only available if multiple sheets exist in the workbook.
- Remove filters before validation - The Smartsheet will remove all filters from the sheet(s) during validation. Leaving this box unchecked means that any rows currently being filtered will not be validated. Additionally, if the user hides any rows they will not be considered when troubleshooting errors via the Next Error button.
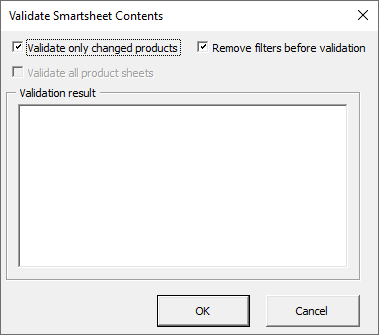
- Click OK.
- In the Login dialog, enter the relevant STEP user name and password and click Login.
- After the validation is run the Validate Smartsheet Contents window will display if the validation succeeded or if there are errors or warnings that need to be corrected.
Errors and warnings can be located and manually corrected via the Next Error button.
- Errors for mandatory fields are shown in the cell that is missing data.
- Errors and warnings from the business condition are shown are shown at the cell-level. Messages (configured or otherwise) are displayed when clicking on / hovering over the cells. Warnings are identified via orange-highlighted cells, and errors via red-highlighted cells. If both an error and a warning are found in the same row, the error will supersede the warning and the first cell in the row will display with a red highlight. (For more information about configured messages, refer to the Data Issues Report Bind topic in the Resource Materials online help documentation.)
- After resolving the errors, save the file.
Note: Some fields, such as node pickers, will prompt the user for a STEP user name and password. The system will only prompt for these credentials once.
Copying Data in a Smartsheet Template
When initiating products using a Smartsheet template, users can duplicate data on a row-by-row basis, potentially saving them a lot of time. Note, however, that rows can only be copied in Smartsheet templates, and may need to be configured to do so.
- To copy a row, select it and click the Duplicate row button.
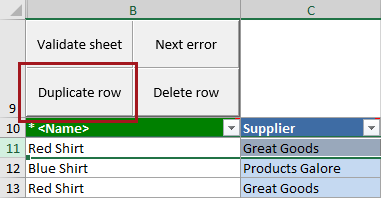
- A copy of the row will appear in the next open row.
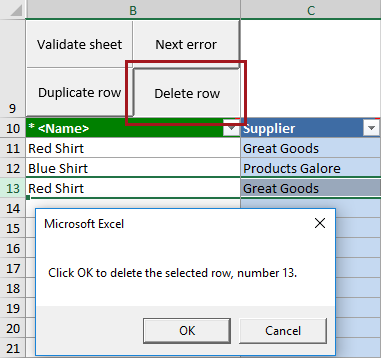
This action cannot be reversed using the 'Undo' function built into Excel. Instead, to remove an unneeded row, select the row and click Delete row. When asked if you want to delete the selected row, click OK to delete it.
For more information on configuring these functions, refer to the Smartsheet Data and Template Configurations topic.