It is often the case that certain attributes are considered critical to all processes, or to a particular process, and therefore there is a desire to make them mandatory (e.g., to enforce that they are populated). There are a variety of methods for doing this, ranging from simple visual cues prompting users to populate a value, or going so far as to prevent approval and/or processing of an object until the required values are populated.
This topic describes:
- The standard options for making attributes mandatory
- Detailed configuration and end user information for the various settings, or links to other topics that provide this information
- Considerations for how the different mandatory options behave across the varying interfaces (the workbench, Web UI, and Smartsheets)
- Recommendations for how and when to use the various settings
Standard Mandatory Attributes / Visual Indicator in STEP Workbench
An attribute can be set to be mandatory directly on the attribute, which enables a visual indicator in the workbench to prompt users to populate the value. This can optionally be used in conjunction with a system setting to enforce that attributes marked as mandatory are populated prior to approval of any object on which the attribute is valid.
STEP Workbench Visual Indicators
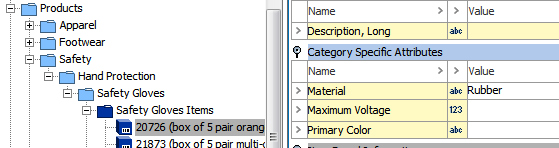
Attributes can be configured to provide a visual indicator within the workbench to prompt users to enter a value.
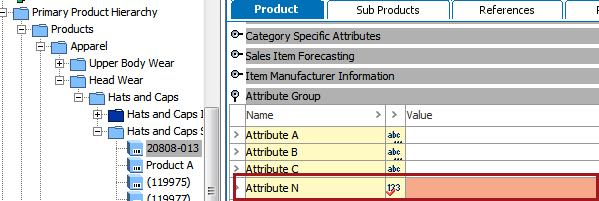
The attribute indicator has a red asterisk and the value field is highlighted red for attributes marked as mandatory. Note that the red highlighting is present regardless of the workbench interface (e.g., the standard object editor in Tree navigator, the Tasks tab on an object in Tree, or the STEP Workflow Items tab when using the STEP Workflow navigator). This is effective in calling attention to key attributes that users generally populate within the STEP Workbench.
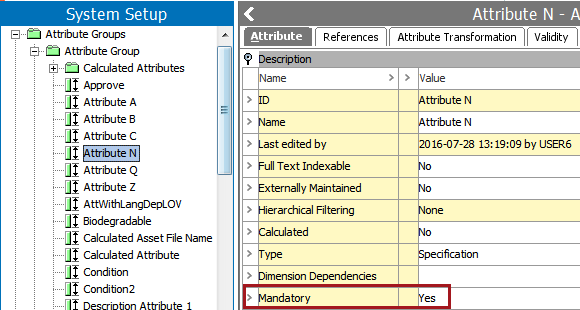
To configure this, update the standard Mandatory setting on the attribute to Yes.
Alternatively, the attribute can be set as mandatory on an attribute link (available on product and classification super types) by clicking the standard Mandatory checkbox. Attributes set as mandatory in this way behave in the same manner as described above, though at a more granular level as the indicators are only present on objects or their children where the attribute is linked. For example, a 'CountryOfManufacture' attribute is linked to an Tire Care SalesItems category, and marked as mandatory on that link.
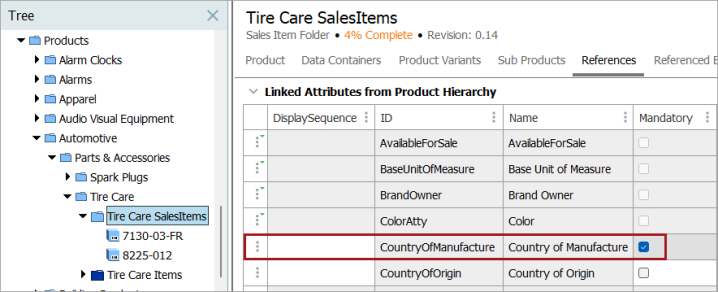
Child objects of the Electrical & Electronics category have the attribute shown as mandatory as shown below.
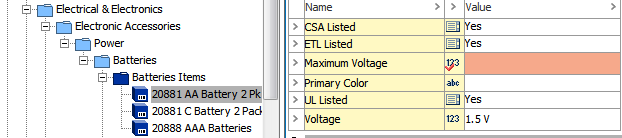
However, objects under other categories that also have the attribute linked but do not have it marked mandatory do not display the mandatory indicator.
It is important to note that attributes set to mandatory using either of the standard methods described above will cause those attributes to also display as mandatory in the Web UI, regardless of how those attributes might be configured for display in the Web UI.
Verify Mandatory Attribute Values Upon Approval
In addition to visual indicators, the system can be configured to enforce that the attribute is populated prior to the attribute being approved. This option is most often used only as a final 'safety check' and is applied only to attributes that are required for ALL objects of a particular type or category, with no exceptions. As approval is usually a final step in a larger process, it is more common to enforce that values be present earlier in the process, such as when they are actively populated (e.g., within workflows or imports).
Note: Validity influences the standard mandatory settings, so the mandatory requirement is only enforced for the object types on which the attribute is valid.
For example, if all 'Item' object types require a UPC or GTIN, attributes for those could be made mandatory. Alternatively, consider an 'Address' object type. It might make sense to make an attribute mandatory that holds the street name, but not ZIP Code as not all countries use ZIP Codes.
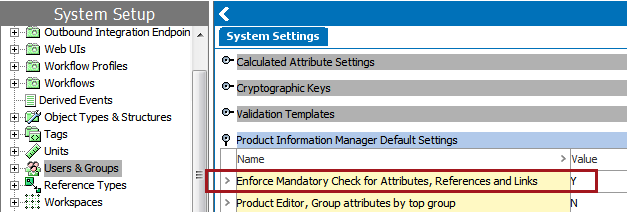
In this case, the visual indicators must be configured as described above (e.g., relevant attributes must be set to Mandatory = Yes). In addition, a system setting must be configured to enforce the mandatory checks prior to object approval. To do this, navigate to System Settings > Users & Groups > Product Information Manager Default Settings > Enforce Mandatory Check for Attributes, References and Links and set the value to Y.
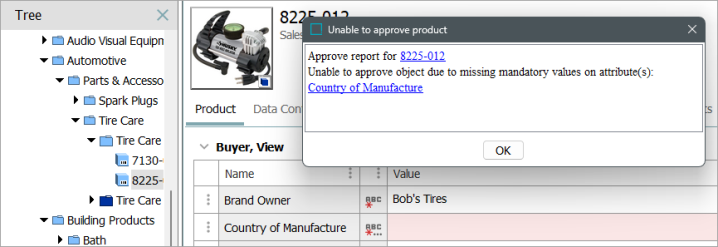
With the above setting in place, the system displays an error to a user attempting to approve an object with one or more unpopulated mandatory attributes. The below shows an example of the error in the workbench, as encountered when a user attempts to approve an object. A similar error is shown in Web UI upon attempted approval, though the visual indicators are not present unless configured on the screen the user is approving from. Refer to the Web UI Mandatory Attributes section below for more information on configuring visual indicators for mandatory attributes in Web UI.
The above settings have no impact on mandatory attributes in Smartsheets, since Smartsheets do not contain an approval action. In addition, attributes marked as mandatory for approval do not have any visual indicators in Smartsheets. Refer to the Smartsheet Mandatory Attributes section below for more information.
Business Rules for Mandatory Attributes
Business rules can be used to enforce complex and/or granular use cases for specifying mandatory attributes. Whenever possible, standard process-based mandatory settings should be used (e.g., workflow mandatory or Web UI screen mandatory, described below). When standard options are insufficient for the requirements, business rules can be used to close the gap. For example, a list price could be required only if the object has a reference to a web classification. The workflow mandatory attribute functionality optionally includes the use of business rules so that attributes are only made mandatory under specific conditions. However, the mandatory enforcement is only applied as part of a workflow, so if it is needed elsewhere (e.g., upon approval, import, or save in Web UI), standard business rule functionality may be necessary.
For more on business rules, refer to the Business Rules documentation.
Smartsheet Mandatory Attributes
Attributes can be made mandatory within a Smartsheet, providing both a visual indicator and error reporting on missing values. Attributes marked as mandatory for Smartsheets have their value cells highlighted blue to prompt the user to populate the field. If the user validates the sheet and has not populated the mandatory values, an error is reported.

For more information, refer to the Mandatory Attributes and References in Smartsheets topic in the Data Exchange documentation.
Web UI Mandatory Attributes
Mandatory attributes can be designated as mandatory either from the standard mandatory settings in the workbench or through configuration solely in Web UI. For more information, refer to the Mandatory Data in Web UI topic in Web User Interfaces documentation.
Workflow Mandatory Attributes
It is often necessary that certain attributes or attribute groups be set as mandatory for a state or transition in a workflow. This means that the object can pass further in the workflow only if the indicated attributes have values. To facilitate this, the STEP Workflow Designer includes an option to specify mandatory attributes or attribute groups on both states and transitions, requiring that the indicated attributes are populated prior to the task exiting the state, or taking a particular transition. In addition, attributes and groups can be set to be conditionally mandatory, meaning they are only required if specific conditions are met.
Detailed information on the configuration and use of workflow mandatory attributes is available in the Mandatory Attributes, References, and Variables in Workflows topic in the Workflows documentation.