In order to move an object or task through a workflow in workbench, it first must be initiated into the workflow. This then allows the task to be addressed accordingly through each state in the workflow.
To initiate a task in a workflow in Web UI, refer to Moving Tasks through a Workflow in Web UI in the Web User Interfaces documentation here.
Supplier Users
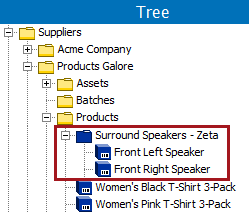
In a workflow, supplier users can only view objects that are directly linked to their supplier classification. Objects that are children to blue folders within a classification folder are not available to supplier user workflow tasks. For example, in the following image, the speaker products are not available for workflow tasks because they are child objects to the 'Surround Speakers - Zeta' product folder. The 't-shirt' objects can be worked as tasks because they have a direct link to a classification folder.
For more information about a supplier item Web UI, refer to the Supplier Web UI topic (here) and the Supplier Web UI Setup Guide topic (here), both in the Web User Interfaces documentation.
Initiating the Object into the Workflow
The below process describes how to manually initiate an object into a workflow. However, it is important to note that oftentimes workflows will be configured to automatically initiate objects of a certain type or types into the workflow upon creation of the object. In addition, workflows can be initiated by a variety of other actions or processes (both automated and manually initiated), such as business rules, imports, or bulk updates.
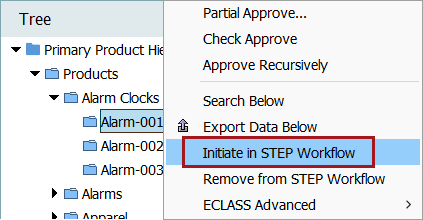
To manually initiate an object into a workflow:
- Navigate to the Tree tab and select the desired object. Right-click and select Initiate in STEP Workflow.
- In the dialog that appears, select which workflow to initiate the object into. Note that only workflows that the object is valid for appear, and any workflows that are disabled indicate that the object has already been initiated into those particular workflows.
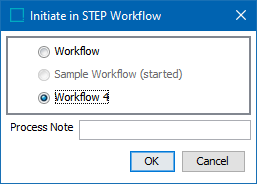
If desired, the user can enter a Process Note when starting the workflow. This note is posted to the object's State Log.
Refer to the State Log Tab section of the Workflows documentation for more information
Processing Tasks in a Workflow
Once an object is initiated in a workflow, it is available in one or more states of the workflow. Each instance of an object in a state represents a task to be completed. Each state is assigned to a particular user or group who has the responsibility of completing the tasks in that state. Because of this, tasks are most often accessed via the states themselves, rather than via the objects in the states. The STEP Workflow tab allows users to view tasks in the states to which they have privileges to access. The Tasks tab on an object allows users to view all tasks for a given object, across multiple workflows. Both options are described below.
STEP Workflow Tasks Tab
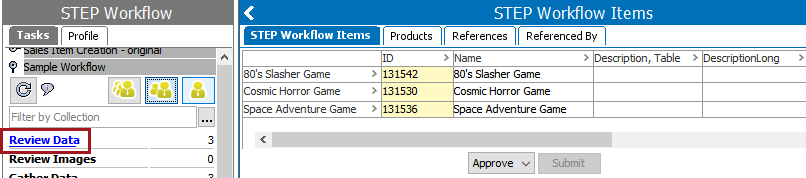
STEP offers a task list in the workbench that shows all tasks assigned to the current user (either directly to the user or to a group of which the user is a member). This is the primary interface for working with workflows in the workbench and displays all workflows that the user has the 'View and use STEP Workflow' privilege for. When any workflow flipper is expanded, a list of the configured states is displayed, with an object count displaying the number of tasks in the state that the user has access to.
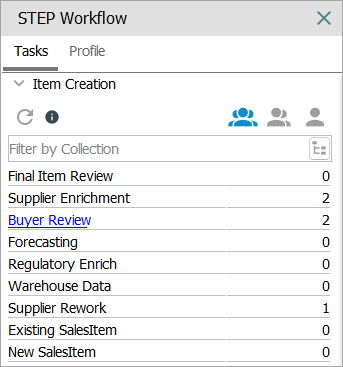
Note that only tasks that are available for the user are displayed. For example, a user who is not part of a group that can process tasks in the Review Data state will view a count of zero (0) rather than three (3).
Note: A legacy 'Advanced' sub tab is available (in addition to the Tasks and Profiles tab shown in the above screenshot). To view the tab, the user must have the 'View STEP Workflow Advanced tab' privilege and the configuration property 'STEPWorkflowNavigationXMLConfigurator.File' must point to a valid configuration file. Such a file is included in the STEP distribution and is unpacked to "STEP_HOME/config-examples/workflow/workbench-navigation.xml" when the application is deployed. If enabled, this tab lets users search for specific tasks based on workflow, state, assignee and a set of configurable search criteria. The tab gives access to view tasks assigned to other users and thus primarily should be used by administrators. Similar functions are available within the standard search functionality for workflow tasks, which honor privileges so it is generally advised to use those instead. For more on using the Search tab Refer to the Workflow Search Criteria topic
To work with tasks via the STEP Workflow tab:
- Navigate to the STEP Workflow tab, expand the flipper for the desired workflow, and select the appropriate view. There are three options to choose from:
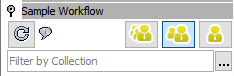
- Show All (triple user button): All tasks are displayed. This button is only available if the user has 'STEP Workflow Administrator' privileges for the workflow.
- Show Group (double user button): Tasks assigned directly to the current user or to a User Group of which they are a member are displayed.
- Show User (single user button): Only tasks assigned directly to the current user are displayed.
Note: By selecting the Show Group (double user button) icon, users that have the 'View task assigned to other users in my group(s)' privilege are able to view their assigned tasks, as well as any tasks assigned to others and any unclaimed tasks within any group in which they are a member. For more information about workflow privileges, Refer to the Workflows section of the Setup Actions and Error Descriptions topic in the System Setup documentation here.
Additionally, a user can further refine the task view by using the 'Filter by Collection' option. If a collection has been previously set up, click the ellipsis button ( ) to select that collection will filter the task list to display only tasks for objects contained in the collection. For more on creating collections, Refer to the Collections documentation here.
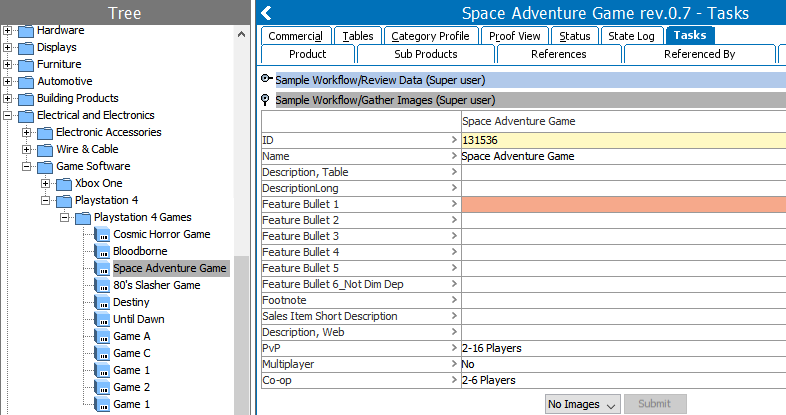
- With the appropriate view selected, click the link for the state in which tasks should be accessed. This will display the tasks in the state according to the view configured by the workflow administrator, allowing users to review and/or edit data as needed. Cells in yellow are read-only, while white cells can be edited. Red cells may be present and are considered mandatory and should be populated prior to submission, though the system may or may not prevent transition of the task if they are not populated (based on how the designer has configured the workflow).
Some workflows require tasks to be claimed before they can be updated by a user. This can be verified by the presence / absence of a task claiming icon ( ). If this is present in one of the columns on the STEP Workflow Items tab, Refer to the Claiming and Releasing Tasks in Workflows section
Note: If it is preferred to view in the objects listed in columns instead of rows in the STEP Workflow Items editor, right-click the table header and select 'Rotate Table'.
Note: The STEP Workflow Items editor will as a default show a maximum of 100 tasks / objects when you select a state on the Tasks sub tab. This limit can however be changed by a system administrator via the config property "STEPWorkflow.Assignee.TaskList.Max".
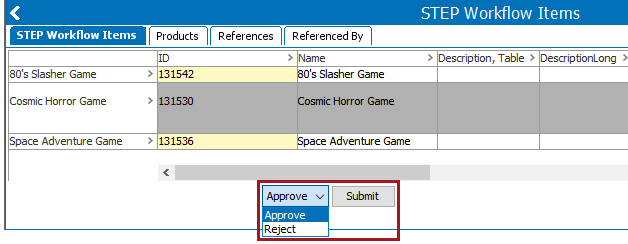
- Submitting a task to a subsequent state indicates that work on the task is complete. Unless the user has access to a subsequent task for that object, it will no longer be accessible for them in the workflow. To submit a task, select the task (multi-select is enabled using Ctrl + click), choose the appropriate selection from the dropdown (if applicable) and click Submit. The available options for selection are configurable based on the design of the workflow. In some cases only a single selection will be present and therefore it is not required for the user to select a specific transition.
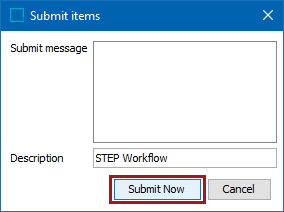
- A dialog will appear, allowing the user to input a comment, which will be recorded in the Notes field on the State Log tab of the object. Note that if multiple objects were selected, the same comment will be applied to all. From the dialog, click the Submit Now button to complete the task, or click Cancel to return to the STEP Workflow Items editor.
- Clicking the Refresh button in the Task pane will update the task list.

Tasks Tab on an Object
From an object in Tree, the Tasks tab displays all tasks across all workflows for that object, subject to the user's privileges. Only tasks that the user has rights to address are visible.
The interface and interactions are comparable to that of the task list, with the only difference being that users can expand or collapse flippers to access tasks in various states and workflows.