This topic details how to configure views for states. Without configured views, when accessing tasks on the object, the STEP Workflow navigator tab and the Tasks tab display only the ID of objects in a workflow. Therefore, if users will interact with the workflow in the workbench, it is recommended to create views for a user-friendly view of the data points relevant for their tasks in that state.
Note: There is no need to configure views for workflows that will be accessed only in Web UI. For information on working with workflows in Web UI, refer to the Workflows in Web UI section of the Web User Interfaces documentation.
Use the steps below to create views for a workflow accessed in the workbench and provide information for the view options.
-
In System Setup, select the desired workflow, right-click and select Edit STEP Workflow.
-
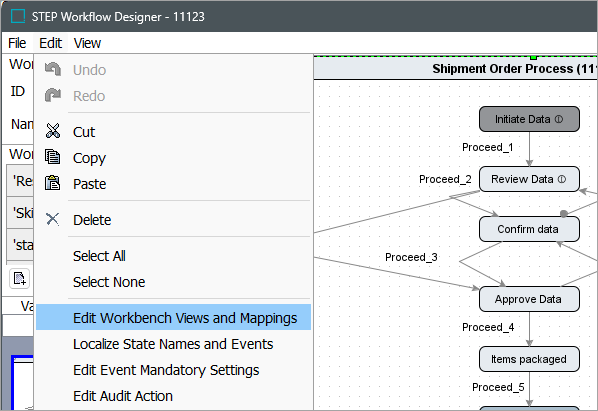
From the Edit menu, select Edit Workbench Views and Mappings to open the STEP Workflow Designer.
-
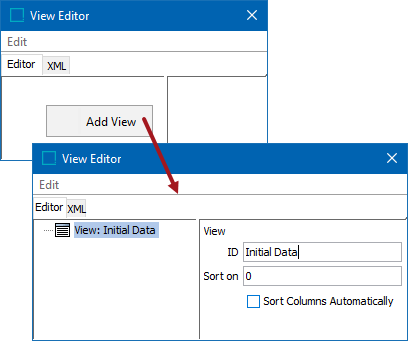
The View Editor opens and is blank. Right-click on the left side panel and click Add View. Enter an ID for the view. The view ID is displayed on the left side pane.
-
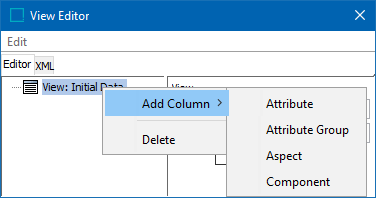
Right-click the view and select Add Column to add a column. Choose a type of data to add to the view.
-
The Attribute, Attribute Group, and Aspect options display object data.
-
The Component option displays data specific to the workflow task (e.g., a workflow variable, attachment, assignee, etc.).
As many columns can be added as needed. The below sections describe the view options and how to reorder columns within a view.
Important: For views to take effect, each view must be mapped to one or more states. For details on mapping views, refer to Configuring Mappings for Workflows.
-
Attribute
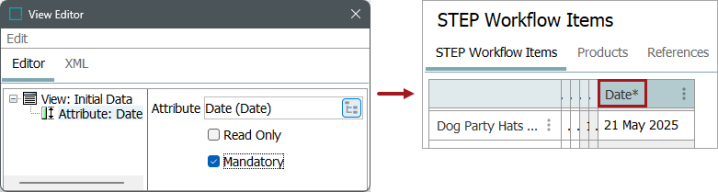
The Attribute column type is used to insert a single attribute into the view. Only attributes with validity that matches the validity of the objects in the workflow are displayed in the view. When working with specification attributes on products, the attribute must also be linked appropriately in the hierarchy to be valid for the workflow objects.
An attribute can be configured as 'Read Only' and/or 'Mandatory'. Attributes marked as 'Read Only' are not editable on the STEP Workflow Items or Tasks tabs. The 'Mandatory' setting uses an asterisk (*) to visually indicate that the attribute is required.
Note: The Mandatory checkbox in view configuration provides a visual indicator only—it does NOT enforce that the attribute is populated. If the attribute must be populated prior to exiting the state, the attribute must be marked as mandatory using the Mandatory Data tab of the state or transition editor. More information on this is available in the Mandatory Attributes, References, and Variables in Workflows topic.
To add an attribute to a view, right-click on the view, select Add Column, and select Attribute. Click the Select Attribute ( ) button, choose an attribute, and set the Read Only and/or Mandatory options as needed.
If a field is highlighted in red, the value is mandatory for approval of the object, independent of the workflow or state. This type of mandatory is set on the attribute by setting Mandatory = Yes. As with the mandatory indicator in the view, this does not force the user to populate a value within the state.

Attribute Group
The 'Attribute Group' column type is used to insert all attributes in a group into the view. The same considerations apply as for a single attribute, described above.
Aspect
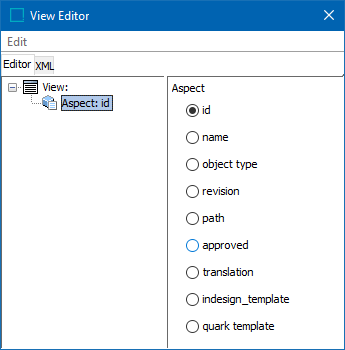
Via the Aspect option, it is possible to insert columns for ID, name, object type, revision, and other basic data for the object.
To add an aspect to a view right-click on the view > Add Column > Aspect. Click the appropriate radio button for the desired aspect. A full description of what each aspect option is can be found in the table below.
|
Aspect |
Description |
|---|---|
|
id |
Displays the ID of the object, which is not editable. |
|
name |
Displays the STEP Name of the object, which is editable if privileges allow. |
|
object type |
Displays the object type of the object. If privileges allow for editing, a dropdown is present from which valid object types can be selected. |
|
revision |
Displays the revision number, as well as when the object was last edited and by whom. The field is not editable. |
|
path |
Displays the path of where the object exists in STEP. The field is not editable. |
|
approved |
Displays the approval status of the object and date / time of last approval if applicable. The field is not editable. |
|
translation |
Displays the translation status of the object, for example: Up to date, In Progress, Not Translated, etc. (not editable). For more on translations, refer to the Translations documentation. |
|
indesign_template |
Displays the Print Publisher product template being used for print. By clicking on the hyperlink, the user is brought to the template. |
|
quark template |
Legacy option that should not be used in current implementations. |
Unique Key is not a selection option. If it is required to display the key value of an object, the attribute(s) driving the key should be selected using the Attribute or Attribute Group options.
Component
The component option gives access to a list of data specifically related to workflows, including assignee, workflow attachments, workflow variables, etc.
To add a component to a view right-click on the view > Add Column > Component.
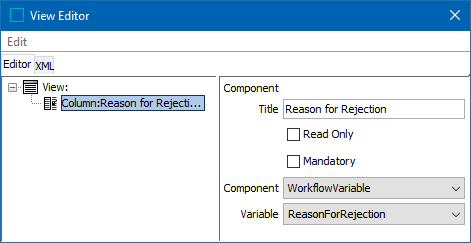
Populate the Title (header for the column in the view), select Read Only or Mandatory as appropriate, and select a component from the dropdown. Selection of a component may result in additional selection options.
For example, selection of Workflow Variable yields an additional dropdown to select the specific variable to be used. For more on variables, refer to the Workflow Variables topic.
Each component option is described in detail below.
Read Only and Mandatory fields are not applicable on all components and are disabled in that case. When available, fields marked as 'Read Only' are not editable on the STEP Workflow Items or Tasks tabs. Checking 'Mandatory' means that an asterisk (*) is shown with the Title to indicate to users that the field should be populated. However, it does not enforce that the field is populated prior to the task exiting the state.
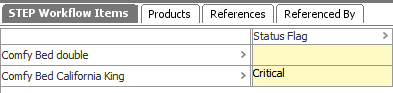
DeDuplication
Adding the DeDuplication component to a workflow view allows a user to review if there are any objects in the system that have been flagged as potential duplicates by a matching algorithm.
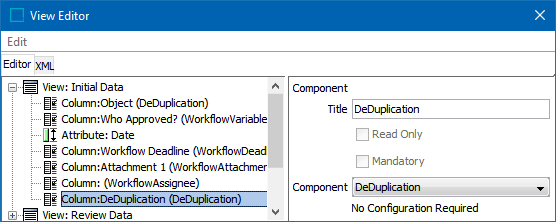
If potential duplicates have been identified, a Duplicates button is present that the user can click to access a list of possible duplicates for the selected object in the workflow. Clicking the Differences button opens a Compare screen where the user can view differences and confirm or reject duplicates.
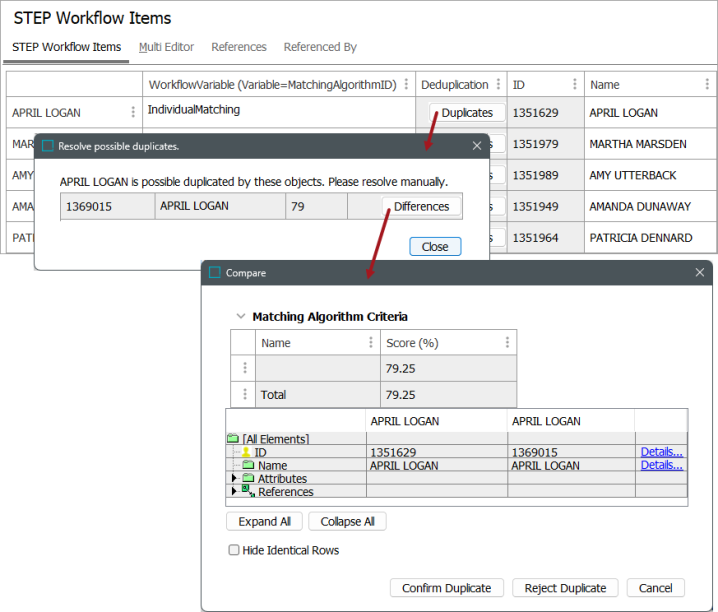
For additional information on deduplication workflows, refer to the Matching, Linking, and Merging documentation.
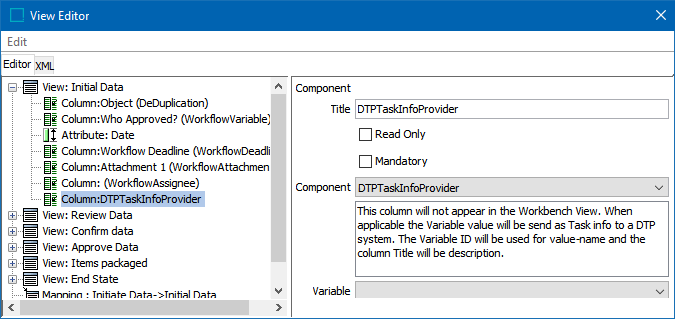
DTP task info provider
Component that can be used if a user wishes to show task data in the InDesign plugin tasks tab. It will not be rendered in the workbench. The Variable ID will be used for value-name and the column Title will be description.
Pluginable cell debug
Experimental debug option that generally should not be used.
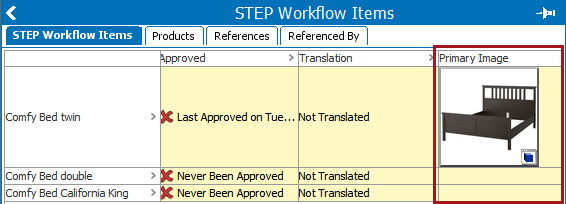
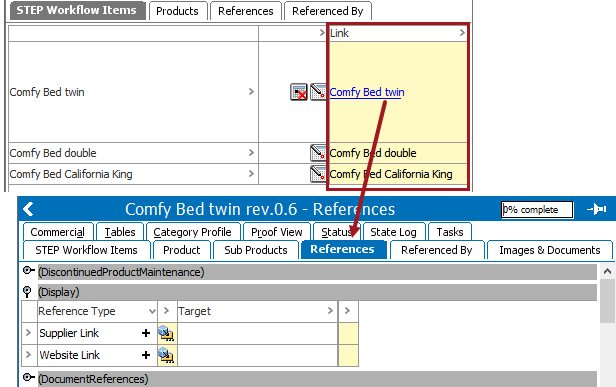
Pluginable cell primary image
Component for displaying the primary image of the object.
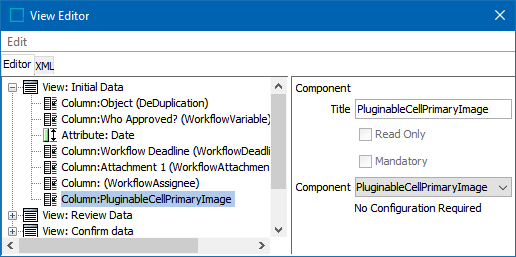
The component displays a thumbnail of the primary image. Neither the image nor the reference can be edited. Images cannot be added or removed using this component.
Note: If end users need to edit references (primary image or otherwise), use the standard editor functionality on the References and Referenced By tabs.
The reference type used to identify the primary image is set in System Settings as defined in the Primary Image Type topic of the System Setup documentation.
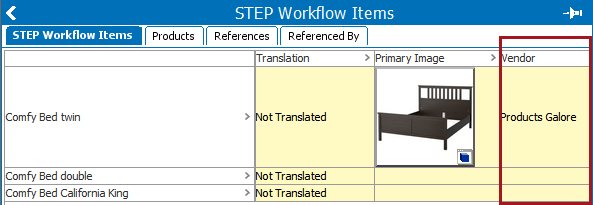
Vendor
The vendor component displays the name of the vendor / supplier that the object is assigned to. This is typically used for systems that have a supplier hierarchy in place. More information on this setup is available in the Supplier Web UI Setup Guide in the Web User Interfaces documentation.
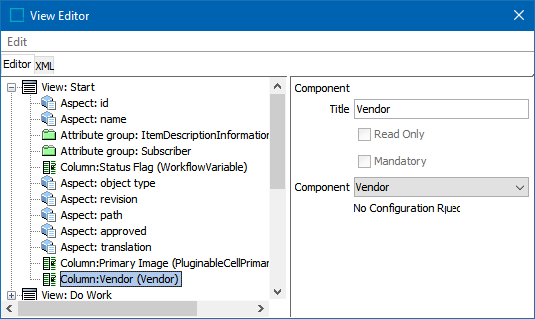
The component displays the name of the supplier classification folder that the object is linked to (the object is in the products sub-folder).
This component uses the reference type indicated in the 'Link type for vendor classification to product link' system setting, as defined in the Web UI Settings topic of System Setup documentation.
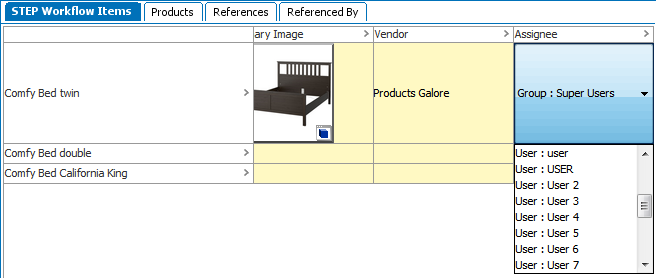
Workflow assignee
Used for displaying the current assignee and/or letting users with the STEP Workflow Administrator privilege re-assign the current task to another user / group.
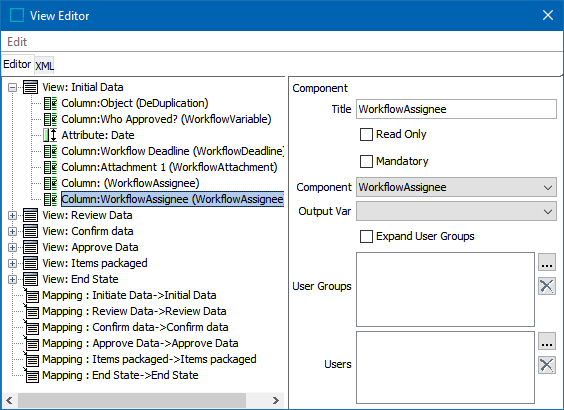
If to be used for re-assigning, either the User Groups or Users parameter (or both) must be populated. Selections will be the available assignees.
If the Expand User Groups checkbox is selected, all users in the selected user groups will be available for selection / assignment (as well as the user group itself). When a privileged user selects a user / group to re-assign the task to (in the STEP Workflow Items editor or on the object Tasks tab), the re-assignment will occur immediately, and the task might disappear upon refresh.
The Output Var parameter can be used to select a workflow variable to write the public ID of an assignee. If a selection is made, when an end user populates the cell, no reassignment takes place, and no special privileges are required. This allows a user to select a 'future' assignee - the actual assignment must be done later by a business action that looks up the assignee using GroupHome / UserHome. If the same ID is used on both a group and a user, the component will use the group, as it is found first.
For more on Assignees and the description of the various options for the Workflow Assignee component, refer to the Assignees in Workflows topic.
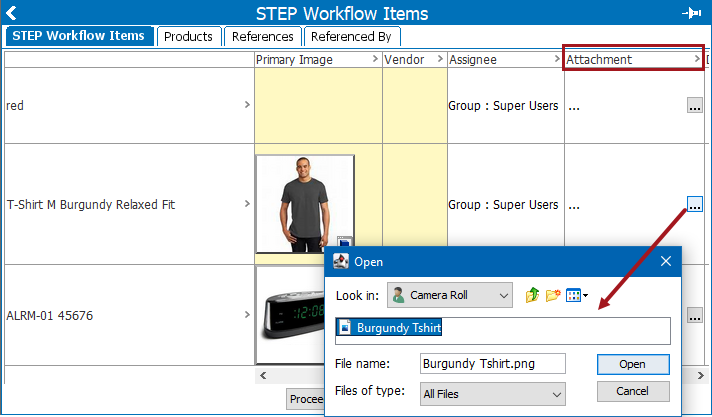
Workflow attachment
A component that lets users add, open, download, and delete Workflow Attachments. A Workflow Attachment must have been previously set up and saved in the STEP Workflow Designer to be selected in the Attachment dropdown. For more information on Workflow Attachments and the features in this component, refer to Workflow Attachments.
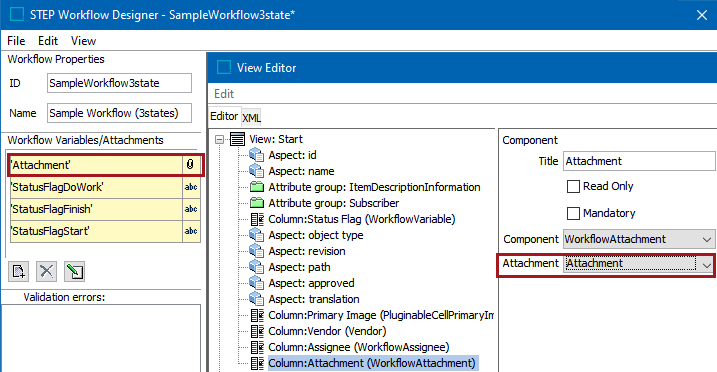
Note: If marked as 'Read Only', the add and delete options will be disabled, but users will still be able to open and download attachments.
Viewing the STEP Workflow Items tab includes a column that uses the Title assigned.
Workflow deadline
Users with the STEP Workflow Administrator privilege will be able to set, edit, and delete task deadlines. Users without the privilege will view different icons depending on whether the deadline is reached or not.
The editability of the deadline field is determined solely by privileges, and therefore the Read Only setting is not applicable for this component.

Deadlines will be displayed when a user hovers over the icons.

For more on this refer to Deadlines and Escalations in Workflows.
Workflow linked name
Component for displaying the object name as a link to the configured object editor. When the component is selected, default values are populated, which takes the user to the standard editor for each super type of objects (e.g., the Product tab in Tree view for "blue" objects in STEP). However, these default values can be edited so that the user is directed to another tab when clicking the hyperlink in the view (e.g., to the References tab or Images & Documents).
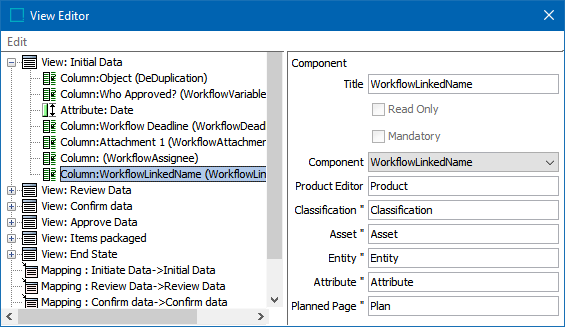
For example, to change the default landing page to be the References tab of the product editor, go to the desired editor, choose the desired tab, and look at the STEP URL field. In this example, the tab is named 'ProductReferences'.

Type 'ProductReferences' for the Product Editor parameter and save the changes to the workflow.
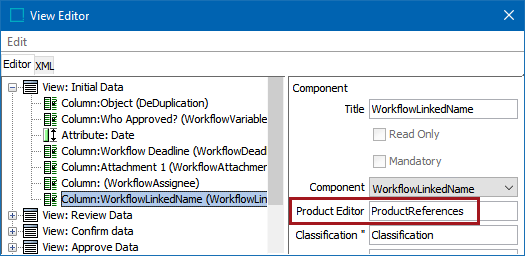
Display the STEP Workflow Items tab and click the name link to display the configured tab within the STEP Workflows editor.
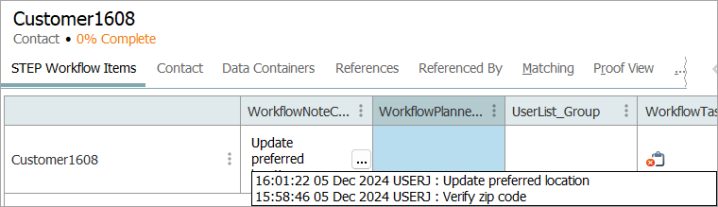
Workflow note column
Component for displaying the most recent Process Note or Transition Message. If not configured as Read Only, a new note can be added, and will persist throughout the workflow. Hover over the field to display the notes. The configured number of recent entries is determined by the Max Entries field. Along with the message, the user info and timestamp will also show.
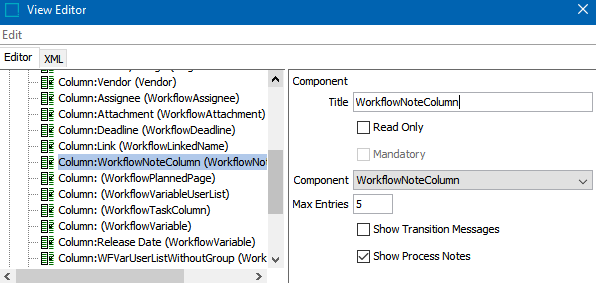
The Show Transition Messages and Show Process Notes parameters are used to define the types of notes displayed. Take care when making these selections as they significantly impact the user experience. Typically, only one option will be selected, as appropriate for the intended use.
- Show Transition Messages: Check this if a message is provided at the time the task is submitted, and the next user should view that message. If no message is provided at the time of transition, a transition is still logged, though without a message (e.g., time, date, and user is displayed upon hover, but no corresponding message is displayed). The intent of this is for serial work streams where one user will need to view a message entered from the immediately preceding user, but is unlikely to need to view previously entered messages from those further upstream. Therefore, only the message entered by the last user is displayed in the view.
- Show Process Notes: Check this if users will enter notes while working with tasks, and the notes should be visible to the next user. The intent of this is that the current user needs to pass information to one or more subsequent users, and they enter the message while working with the task (e.g., prior to submission). The most recently entered note will always be available in the direct view, with additional notes available upon hover.
- Both: Use caution when selecting both parameters in the same column. The most recent transition message is always displayed in the view (if no message was entered, the view displays no value). Any notes entered outside of the submit message are only available upon hover (even if a transition message was not provided). If a transition message is always provided, this can be a valid setup. However, if transition messages are not guaranteed, it can appear to the end user that no messages are present, when in fact process notes have been provided. If both process notes and transition messages need to be available, it is recommended to add the column to the view twice with only one parameter checked in each so that both process notes and transition messages are shown independently.
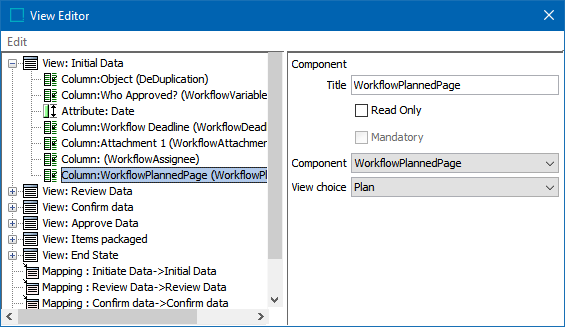
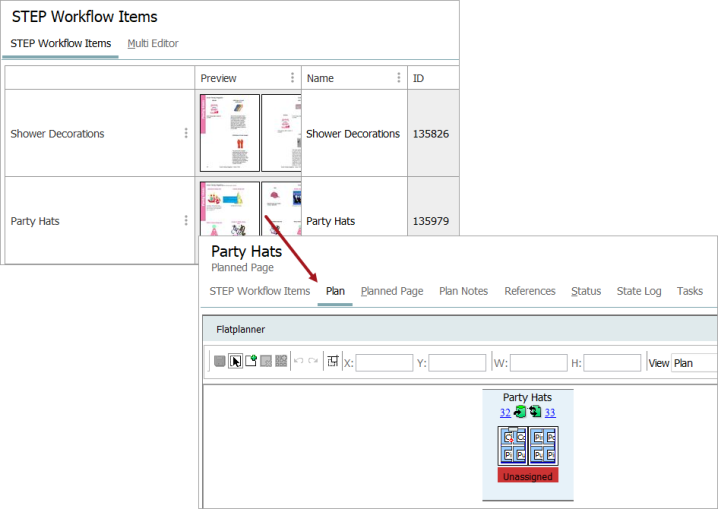
Workflow planned page
Component that can be used in workflows valid for Planned Pages. It will show a thumbnail of the plan, Sticker book, or Mounted pages (as directed by the View choice parameter), and links directly to the selection when clicked.
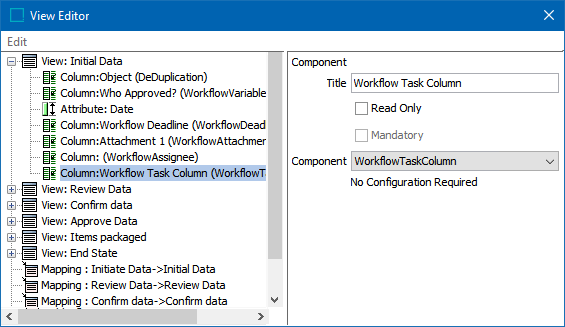
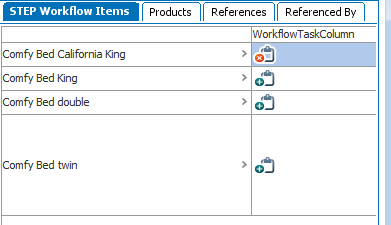
Workflow task column
The WorkflowTaskColumn component lets users claim / release a task. Users will not be able to work on tasks not assigned directly to them, so if a task is assigned to a user group they are a member of, they have to claim it in order to work with it. When a task is claimed, it is possible to release it again, assigning it back to the latest group assignee. If the task has never been assigned to a user group, the task is assigned to the default assignee for the state.
This component is especially useful for states where the assignee initially is a user group, and the desire is to let users in that group claim and complete tasks.
For more on task ownership, refer to the Assignees in Workflows topic.
Workflow variable
Component for viewing and editing Workflow Variables, which requires selection of the Variable that should be made available. For more on variables, refer to the Workflow Variables topic.
If the selected variable is bound to an attribute and the component is configured to not be Read Only, the cell editor matching the validation base type of the attribute will be used (e.g., a date picker for attributes with a type=Date).
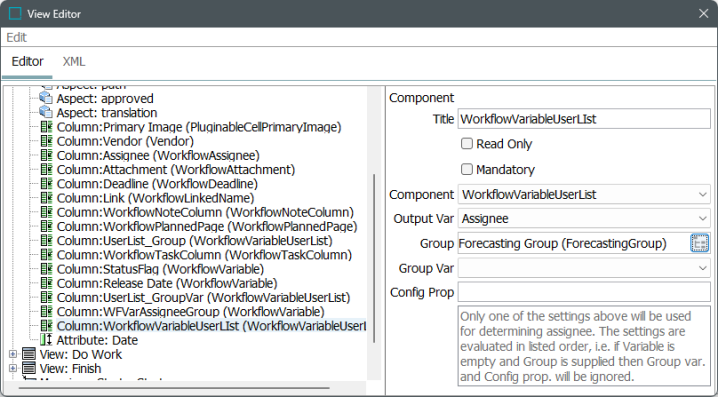
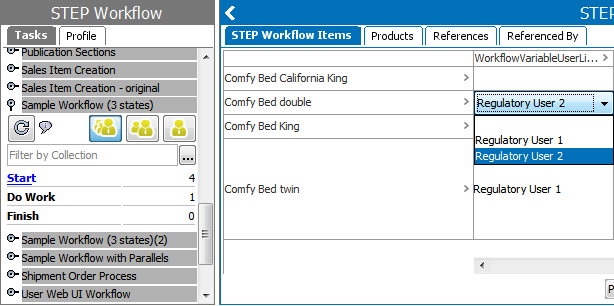
Workflow variable user list
Component for letting the user select from a list of users. The typical use case for this component is one where a user, as part of one task, selects who should handle a subsequent task. The ID of the selected user is then stored in the workflow variable specified in the Output Var parameter. From there, it can be used to apply an assignee in a subsequent state using the Fetch from Variable assignee option in the State Editor Assignee tab.
An existing workflow variable must be selected in the Output Var parameter. This is used to store the selection so that it can be accessed later in the workflow (e.g., at the time of task assignment in a subsequent state).
One of the three selection parameters must be configured (Group, Group Var, Config Prop). The three properties are evaluated in the order shown. Therefore, if Group is populated, it will be used, and Group Var and Config Prop will not be evaluated.
An existing User Group may be selected in the Group parameter, and the users in that group will then be available for selection by the end user. This is used when users will always choose a user from within the selected group. If the user group that users need to select an assignee from can vary based on other factors, then the Group Var parameter should be used. From this, an existing workflow variable must be selected, and it is expected that at some point in the workflow (prior to the state for which the view is being configured), the variable has been populated with the ID of a User Group. The system then reads the ID from the workflow variable on the task and makes the users from the corresponding user group available for selection. A Config Prop option is also available where the ID of a configuration property can be supplied, and the user group will be read from there. This is typically only used in conjunction with extensions.
For more on variables, refer to the Workflow Variables topic.
For more on Assignees, refer to the Assignees in Workflows topic.
View 'Sort On' Option
The Sort On option allows tasks in the workflow to have a default sort order specified by a column. An integer can be entered to indicate the column that should be used for sorting (1= first column, 2= second column, etc.). An example is below.
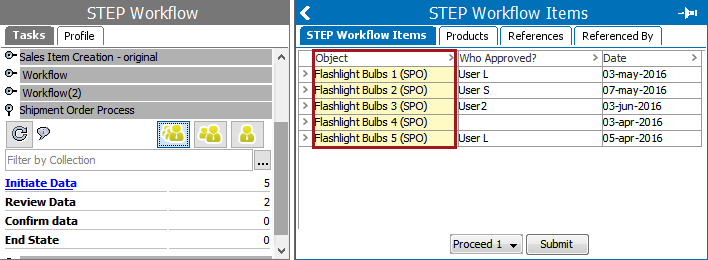
With no sort order specified, the items are in no particular order in the STEP Workflow Items tab.
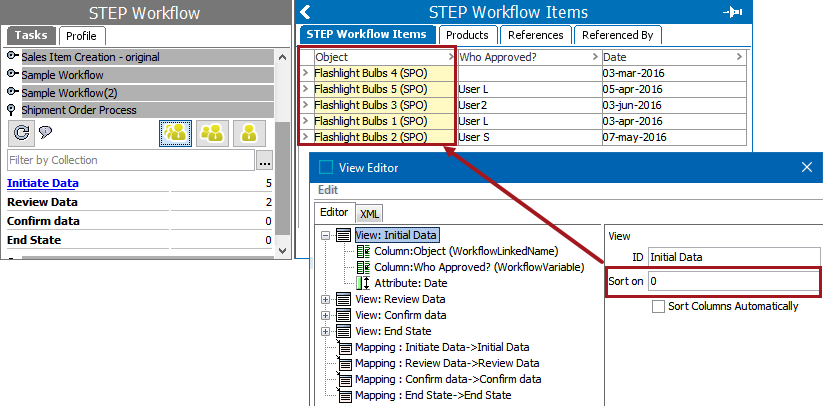
However, when you add a number for the Sort On option to distinguish what column the view should be sorted by, the items are sorted in ascending order. Notice that in the View Editor, the first view the object name appears in the first column. To sort by this, the user types in 2 to represent the first column in this view.
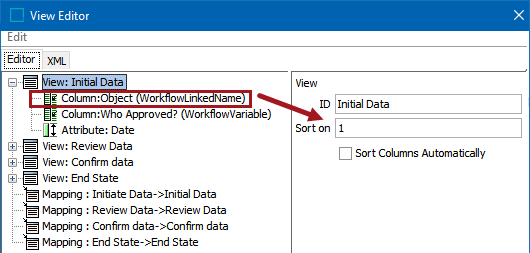
All objects in the workflow in this view are now sorted according to object name.
If the option Sort Columns Automatically is checked, the Title parameter for each element of the view is used and columns are sorted in alphabetical order based on this value, excluding aspects. To clarify, all columns of the 'Aspect' type (e.g., ID, Name, Revision, etc.) appear first in the view, followed by all other elements listed in alphabetical order by Title.
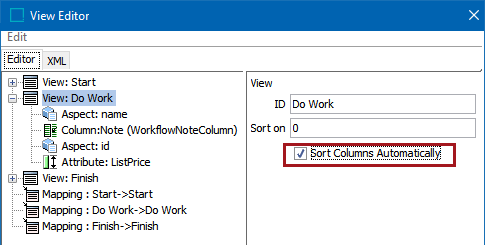
With columns sorted automatically, the Date column displays before the DeDuplication column, even though they are in the reverse order in the IDandName view.

Ordering Columns in Views
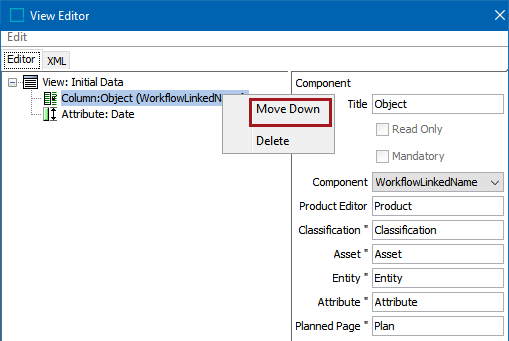
It is possible to reorder the data selections in a view by right-clicking on any element of the view and selecting either Move Up or Move Down, depending on what options are given according to the current position. By default, the order of columns in the View Editor determines the order in which they are displayed to the end user.
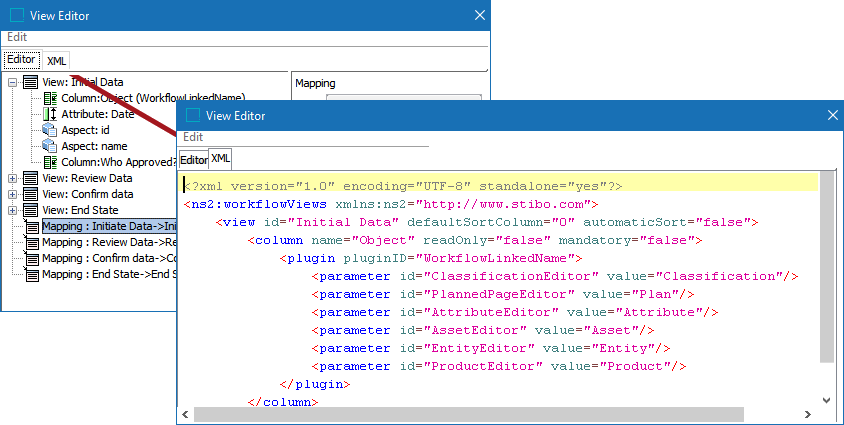
Using the XML View Editor
In addition to the Editor tab on the View Editor dialog, the XML tab shows an XML representation of the defined views and mappings. User can create and configure views via XML instead of the Editor option. This can be especially useful when a number of similar views need to be configured and workflow designers need to indicate only a few differences between them. In addition, the XML editor can be used to copy views across workflows, which is helpful when multiple workflows use a similar view, but the workflow itself differs and should not be copied (e.g., onboarding and maintenance workflows).