This topic covers information specific to the Asset super type that is important to know when working with assets. For general object maintenance information (applicable to all object types rather than specific to assets), refer to the All Objects topic.
Creating Assets
The basic methods for creating an asset are the same as any other object type, as described in the Creating Objects in the Tree Tab topic within this guide. However, there are a few considerations that are specific to assets that users should be aware of when creating assets, which are described.
Assets are essentially placeholders in STEP, to which a digital media file must be associated. When assets are created in STEP via import of a digital media file, this association happens automatically. However, when assets are created using standard object creation methods in Tree (e.g., right-clicking on a classification folder and selecting 'New Asset'), it is only the placeholder that is created. An asset created in this manner will initially have no system properties and no content. For example:

A user can right-click on the asset and select Replace Asset Content to open a dialog where a digital media file can be selected from the local machine. STEP will automatically read and populate the properties of the asset, and a thumbnail of the digital media file will display. For example:
To avoid this two-step process, assets are often introduced in STEP via import (or specific transfer protocols for an initial implementation). More information on importing assets is available in the Importing Assets topic of the Digital Assets documentation.
Asset Editor
General information about editing objects in STEP is available in the Editing Objects in the Tree Tab topic and is not repeated in this section. However, assets have some additional editing options specific to working with digital media files, which are described.
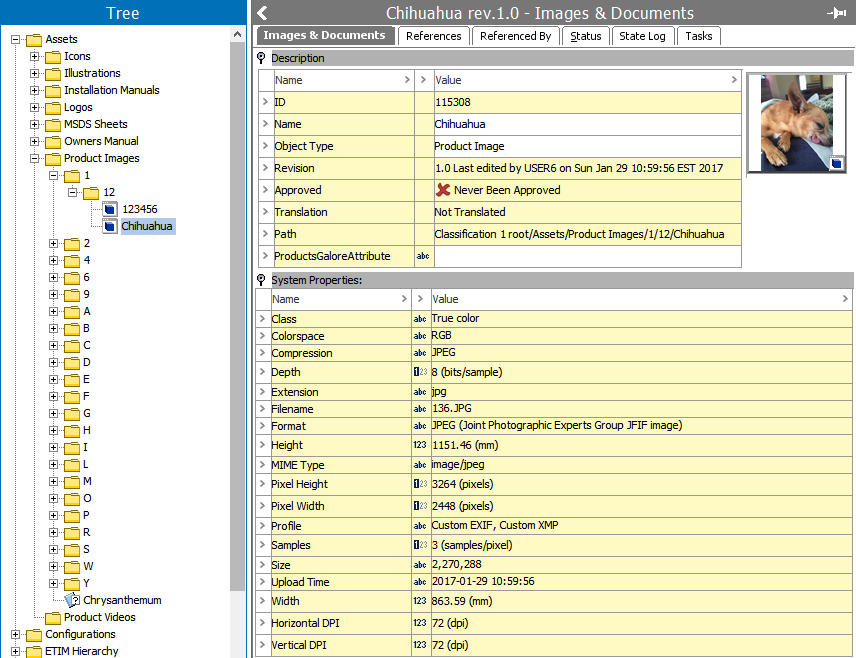
Images & Documents
The Images & Documents tab is the primary workbench interface for assets. It has three sections, described below.

- The Description section contains the same basic information as other object types. Additional Description attributes can be made valid for assets to support data such as keywords or asset descriptions. Specification attributes cannot be made valid for assets.
- The System Properties section displays data that is read automatically from the digital media file. This information cannot be edited.
- The asset thumbnail has a number of options available for editing assets. Additional right-click options are also available when the asset itself is right-clicked from the Tree. All of the options that are specific to assets only (accessible from right-click on the thumbnail or the asset) are described below.
- Create Local Content of Asset: Creates a local version of the asset specific to the current context. Refer to the Asset Dimension Dependencies section below for more information.
- Delete Local Content of Asset: Deletes the content of an asset that is not dimension dependent. Deletes the local (context-specific) content of the asset if the asset is dimension dependent. Refer to the Asset Dimension Dependencies section below for more information.
- Edit Asset: Opens the digital media file for editing in an external program, in addition to an Edit Asset dialog in STEP. Upon completion of editing in the external program, click save within the program to store the edited asset to a temporary directory. Then click OK in the Edit Asset dialog in STEP to have STEP retrieve the edited file from the temporary directory and store this in the asset. Note that the media file will open in the application associated with the file type. For example, for files ending with .xls, Excel will automatically be launched. This may be different from computer to computer. One user’s computer may open up EPS images in Photoshop, while another user’s computer may open the same file types in Illustrator.
- Export Images & Documents: Opens the Export Images and Documents wizard to make selections to export the currently selected asset(s). Refer to the Export Images and Documents Wizard topic in the Digital Assets documentation for more information.
- External Viewer: Opens an external viewer for viewing the asset. This is comparable to the Edit Asset function in that the program that is utilized is specific to the file type and the user's computer settings. It differs in that any changes made to the asset in the external program are not saved back to STEP.
- Image Viewer: Opens an image viewer within STEP for the user to examine the actual asset (as opposed to just the thumbnail).
- Push Asset(s): Initiates asset push for the selected asset(s). Refer to the Asset Push topic of the Digital Assets documentation for more information.
- Replace Asset Content: Opens a dialog for the user to select a digital media file for the asset. Refer to the 'Creating Assets' section above for more information.
- Save to disk: Opens a standard save dialog allowing the user to select a location on their local machine to save the digital media file to.
- Unlink asset: Only enabled if the asset has been linked directly into a publication, in which case it unlinks the asset from the publication. Refer to the Publication Hierarchy topic of the Publisher (Adobe InDesign Integration) documentation for more information.
References
The References tab displays the classifications that the selected asset is linked to, and allows for linking to additional classifications using the Link to Classification link. Each asset must be linked to at least one classification, but may be linked to many. Links can be removed by right-clicking on the row indicator and selecting 'Remove Link to Classification'. The Name of each classification displayed is hyperlinked for easy navigation, and revision, approval, and translation statuses are also displayed.
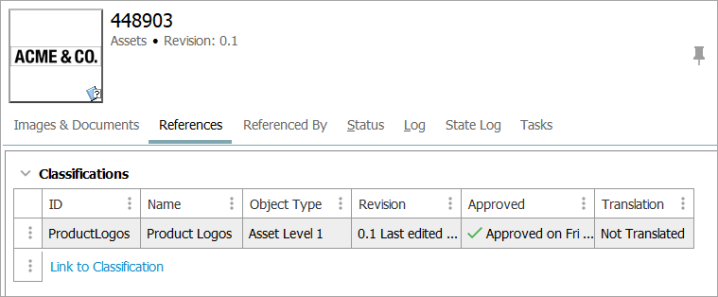
Note: While the maximum number of references to one object node is limited to 10,000 instances, this value can be changed; however, it is against Stibo Systems recommended practices to use this many references. Before changing this value, contact Stibo Systems for assistance.
Referenced By
The Referenced By tab is where all references of which the selected object is the target (e.g., all the objects that the selected object is referenced by) can be viewed and edited (assuming proper privileges are in place). The display of the Referenced By tab on an asset will vary slightly from system to system, based on the data model.

- Reference Sections: References can be placed in attribute groups for display purposes. All references for which the selected object is a valid target that have been placed in attribute groups will display first on the screen, with the section title being equal to the name of the attribute group. References can be added by clicking the (+) on the reference. This will open a dialog allowing the user to select a source for the reference, and a reference will be created from the object selected in the dialog to the currently selected object that you are standing on (e.g., current object = target, dialog selection = source). If any attributes are available on the reference and editable, they can be edited within this interface. References can be removed by clicking the (X) on any existing reference. Additional information on configuring and working with references is available in the Reference and Link Types topic in the System Setup documentation.
- Ungrouped Referenced by Products, Classifications or Entities: The functionality is identical to what is described for the Reference Sections section above. The only difference is that this area displays references that have not been placed in attribute groups for display purposes.
- Used on Page: Displays publications that the selected object is used in. Additional information about working with publications is available in the Publisher (Adobe InDesign Integration) section.
Status
The Status tab provides general information about objects, including revisions, translation status, and approval status. For more information on these basic settings, refer to the Status Tab topic. For assets specifically, this tab also includes an Asset Push Status section that describes the status of assets for the various asset push configurations on the system. For more information, refer to the Monitoring Asset Push topic in the Digital Assets documentation.
State Log
The State Log tab allows users to view the recent history of the object across all workflows in which it has been entered. Refer to the State Log Tab topic in the Workflows documentation for more information.
Tasks
The Tasks tab displays all active tasks across all workflows for the selected object, subject to the user's privileges (only tasks that the user has the rights to address are visible). When relevant tasks and privileges are in place, the user is able to act on the tasks from this editor, including to edit data and move tasks through the workflow. More information on the Tasks tab is available in the Moving Tasks through a Workflow in STEP Workbench topic in the Workflows documentation.
Asset Dimension Dependencies
Individual asset object types can be made dimension dependent using the Dimension Dependencies parameter on the object type. This configuration will only affect the STEP Name of assets, meaning that it allows for individual assets to have a different name based on the indicated dimension dependencies (e.g., 'Red Hat' in English and 'Chapeau Rouge' in French when the dependency is Language).

It is also possible to make the content of assets dimension dependent so that an asset in STEP can be tied to different digital media files in different Contexts. This is configured using the Image & Document Settings > Dimension Dependencies parameter in System Settings.
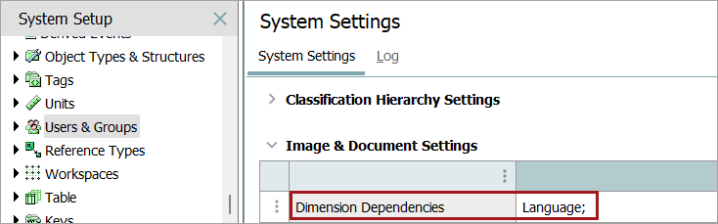
This setting is global, meaning it applies to all assets. Unless there is a very special reason for turning on asset dimension dependencies, this should be avoided. As mentioned, the setting is global, meaning that special procedures must be implemented for creating assets that are to have the same content in all contexts. Thus, if you import a digital media file (and via this create an asset instance) in a context that does not use the top-level dimension point for the dimension on which asset content depends, the content will be created only in the dimension point the current context uses.
For additional information, refer to the Image and Document Settings topic in the System Setup documentation.