STEP attributes can be created and updated using an Excel import file. This allows a user to update multiple attribute parameters at the same time, or create multiple new attributes with the desired parameter settings.
The easiest way to manage STEP attributes using Excel is to first export one or more attributes, then modify the Excel output, and finally import the modified file back into STEP. Use the configuration defined below to perform all necessary steps.
Configuration
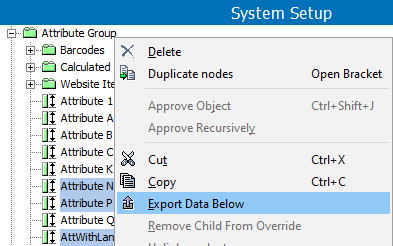
- In System Setup, select one or more attributes to export as follows:
- To update existing attributes, select all attributes to be modified.
- To create new attributes, select one attribute of each Validation Base Type to represent the attributes that will be created. These attributes will create a template to be modified for the new attributes. Validation Base Types are defined in the Validation Base Type table within the Validation Rules topic in the System Setup documentation.
- Right-click the selected attributes and click Export Data Below.

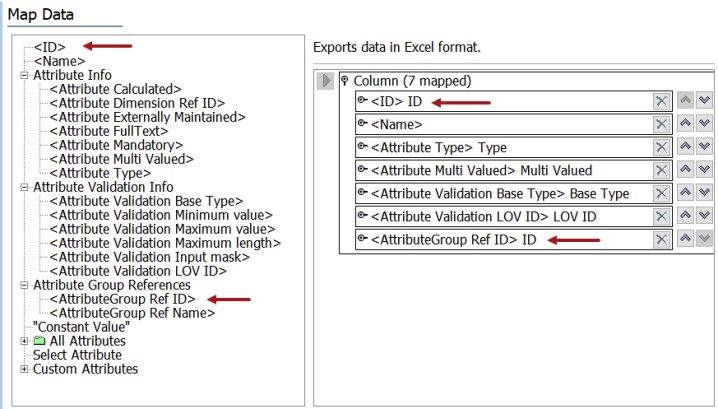
- In the Export Manager, click Next to display the Map Data step, and map all required data sources as defined in the Export Manager - Map Data topic.
Important: At a minimum, you must map the ID and AttributeGroup Ref ID (to indicate the parent) for the new attribute.

- Complete the Export Manager wizard as required and click the Finish button to display the Save Export Configuration window and generate the Excel file as defined in Running a Data Export.
- Click OK to complete the wizard and start the export as defined in Monitoring a Data Export.
- Open the Excel file and modify to create or update the attributes as desired, as shown in the image below:
- Update the values for all columns that require changes. Based on the data sources you mapped, your export file may include different or additional columns than those shown.
- Update the Attribute Type column to include "Property" for Description attributes or "Normal" for Specification attributes.
- Update any LOV attributes so the Attribute Validation Base Type column is blank, and the Attribute Validation LOV ID column must include the ID of the LOV.
The following image shows the original export file first, followed by the modified file that will create three new attributes. Notice that the ID, Name, and Attribute Type columns have been updated for all three attributes. The other columns have been modified as needed based on the previous notes.

- Save the modified Excel file and import using Import Manager, as defined in the Creating a Data Import topic. After completing the required parameters on a step, click Next to move to the next step in the wizard.
- On the Select Data Source step, choose your modified Excel file, as defined in the Import Manager - Select Data Source topic.
- On the Map Data step, in the Map to parameter, select Attribute as the super type, as defined in the Inbound Map Data - Map To topic.
- On the Map Data step, click Auto Map, as defined in the Inbound Map Data - Auto Map topic.
Although the AttributeGroup Ref Name column is not auto mapped, it is not needed to create an attribute when the AttributeGroup Ref ID column exists in the import file.
- If the Attribute Dimension dependencies column was included in the import file, manually map this column using the Map button, the Attribute Info radio button, and the Dimension Links option, as defined in the Attribute Info - Map Inbound topic.
- On the Identify Objects step, verify the data that will be created or modified, as defined in the Import Manager - Identify Objects topic.
- On the remaining steps, complete parameters as required and click Finish to display the Save Import Configuration dialog, as described in Running a Data Import.
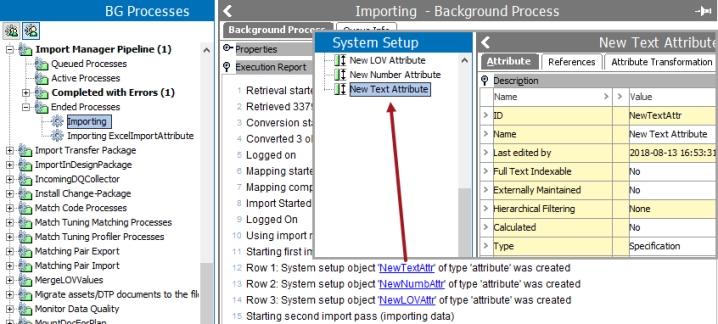
- View the result of the background process as defined in the Monitoring a Data Import topic.
Click a link included in the Execution Report and change from the BG Processes tab to the System Setup tab. The attribute for the created or modified by the import is highlighted in System Setup.
