Auto Map compares data in the input file's header row with the IDs or names of the attributes in STEP. When the inbound tool finds a match, the column is automatically mapped to the corresponding object attributes. The Auto map feature only works when the input file has a header row. You can add a header row if one does not exist, otherwise, you can manually map the data.
For more information about the additional import steps, refer to Creating a Data Import or Creating an Inbound Integration Endpoint.
Predefined Header Text
Auto Map recognizes the following case-sensitive header text to indicate these special columns:
| Header Text | Description |
|---|---|
|
<Data Type> |
Identifies data on the row of an Excel or CSV file as
Other values in this column are processed as NODE entries. |
|
<Data Container ID> |
ID of the data container object of the type identified in the <Data Container Type ID> field and owned by the object in the preceding NODE row. |
|
<Data Container Type ID> |
ID of the data container type identified in the <Data Container ID> field and owned by the object in the preceding NODE row. |
|
<Data Owner Node> |
ID of the object that owns the data on the row. This header text can be mapped during output but is not available for inbound mapping. |
|
<ID> |
STEP ID of object |
|
<ID KeyID=..> |
ID of unique key for object For example, <ID KeyID=SupplierPartNumber> will automap to the unique key with the ID 'SupplierPartNumber.' |
|
<Name> |
STEP name of object |
|
<Object Type ID> |
STEP object type ID Note: The default selection for exporting object type is 'Object Type Name,' however the importer expects the 'Object Type ID.' To generate an export file that is prepared for reimport, either manually map the object type, or use the Transformation Aspect to map object type ID in the exported file. For more information, refer to the Aspect - Transform Outbound topic. |
|
<Parent ID> |
STEP ID of object's parent |
|
<Parent KeyID=..> |
ID of unique key for object's parent For example, <Parent KeyID=Key3> will automap to the unique key with the ID 'Key3.' |
|
<Reference Type ID> |
ID of the reference type for the object identified in the Reference Target field and owned by the object in the preceding NODE row. |
|
<Reference Target ID> or <Reference Target Key KeyID=..> |
ID or Key of the target object of the identified in the <Reference Type ID> field and owned by the object in the preceding NODE row. For example, <Reference Target Key KeyID=DescriptionKey> will automap to the unique key with the ID 'DescriptionKey.' |
The import process attempts to auto map all other columns in the input file using Name or ID of existing attributes. Both successful and unsuccessful mappings are shown in the message dialog. If an auto mapping is unsuccessful, you can map that column manually as defined in the Inbound Map Data - Map topic.
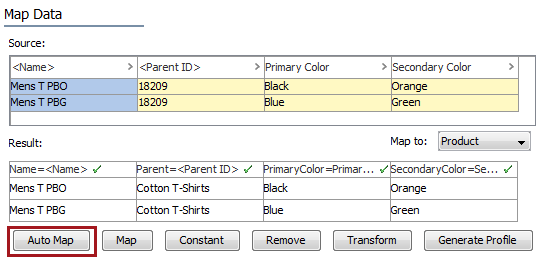
Auto Map Example
The file being imported includes the following columns:
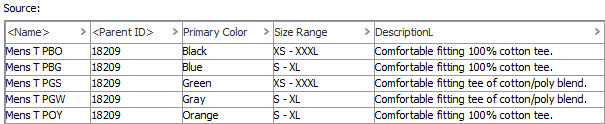
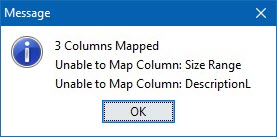
- In the inbound Map Data step, click the Auto Map button. After matching header text to the attributes in STEP, a message displays with the results. The 'Unable to Map Column' error indicates that no attribute exists in STEP with the name. Click OK.
Important: If your system has multiple attributes with the same name, use caution when auto mapping. STEP will find a match, but it may not be the attribute you expected. STEP will match exactly if the input file contains the Attribute ID in the header.
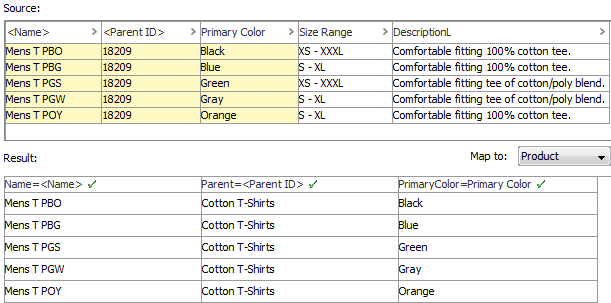
- The Map Data page is updated to show:
- Successfully mapped columns are displayed with a yellow background in the Source panel and a green check mark in the Result panel.
- Columns that are not mapped have a white background in the Source panel.
Note: ETIM users have the option to use the Auto Map feature, which is enabled when the system identifies industry standard attributes when importing various import formats. Auto Map allows you to map these attributes with attributes that are part of an already-installed ETIM version.
- Review the Result panel. Make any adjustments or transformations if needed.
- When the mapping is correct, click Next.