The ECLASS Advanced Editor Screen in the Web UI is designed to allow users to maintain products already linked to the ECLASS Advanced hierarchy and link existing or new products to one more versions of the ECLASS Advanced hierarchy. The ECLASS Advanced Editor Screen enables the users to add and remove blocks, modify product data attributes, and approve products all within the Web UI.
For more information on importing ECLASS data into STEP, refer to the ECLASS Classification Import section of the documentation.
Important: The ECLASS Advanced Editor does not auto-save changes made to products. It is recommended to frequently save changes made to products to ensure data is not lost. The user will be prompted every 'X' minute(s) based on the configuration (capped at 20 minutes) to save any unsaved data. In the example below, every 5 minutes a dialog is displayed prompting the user to save any unsaved data.

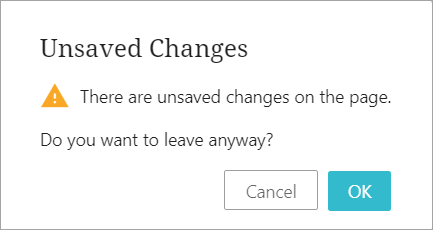
Additionally, if the user attempts to leave the page without saving data, the 'Unsaved Changes' dialog will display prompting users to stay on the page. When the user selects 'Cancel' to stay on the page, they still must save any changes made to the product by clicking save.
To access the ECLASS Advanced Editor Screen, you must first have obtained an ECLASS Advanced commercial license, 'X.ECLASSADVANCED' system license, and the eclass-advanced add-on component. Once the proper licenses, component, and privileges are acquired, you must configure the ECLASS Advanced Screen. For more information on configuring the ECLASS Advanced Editor Screen refer to the ECLASS Advanced Screen documentation.
Adding the ECLASS Advanced Editor Screen
To start using the ECLASS Advanced Editor, first create the ECLASS Advanced Editor screen and map it, or add it as a tab page on a node details page, so that it displays as needed for the relevant products. The screen is ready to use once added, and requires no additional configuration. The administrator may choose to configure the 'Link to ECLASS Advanced' button if the user(s) has privileges to link to the ECLASS Advanced Classification. For information on adding and mapping screens, refer to the Designer Access topic.
Linking a product to the ECLASS Advanced Classification
The ECLASS Advanced Editor Screen enables users to link products to an ECLASS Advanced Classification. To establish this link, follow the instructions described below:
-
Select a product to link from the product hierarchy in the Global Navigation Panel.
-
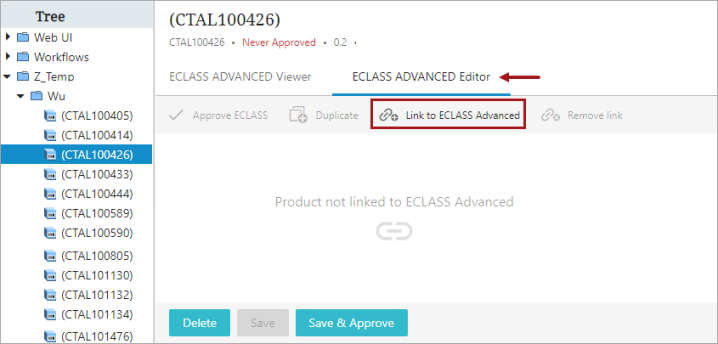
Navigate to the ECLASS Advanced Editor Screen to access the editor screen. If a product has not been linked to any ECLASS Advanced Classification, a message displays that reads, 'Product not linked to ECLASS Advanced.'
-
To link a product to the ECLASS Advanced Classification, click the 'Link to ECLASS Advanced' button available in the toolbar. A dialog displays titled 'Link to ECLASS Advanced Application Class.' The dialog will have the ECLASS Advanced versions displayed under 'Browse' based on ECLASS Advanced versions imported into STEP and user privileges. Web User Interfaces documentation
-
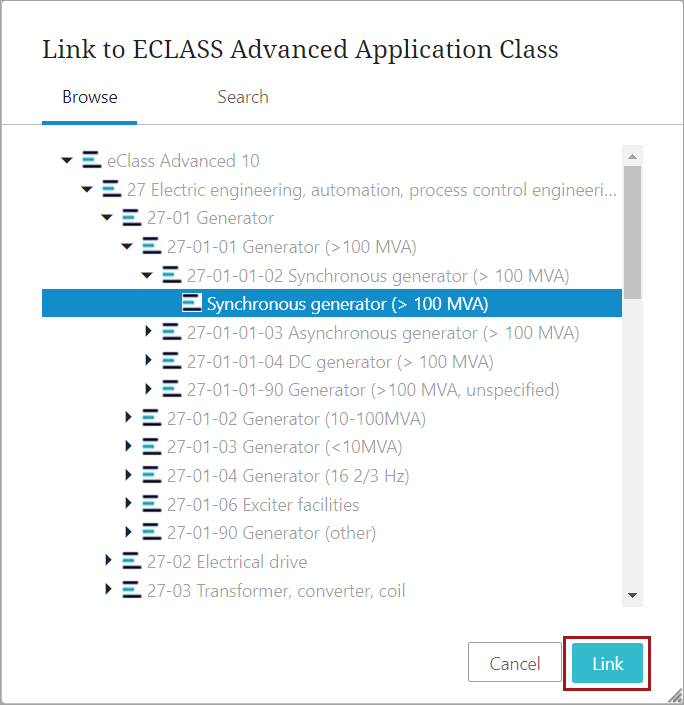
Within the relevant ECLASS version displayed in the dialog, navigate to the desired application class to be linked with the product. Only those application classes that are valid for the relevant product are available to select. When you select the desired application class, the 'Link' button is enabled.
-
To establish the link from the product to the ECLASS hierarchy, click the 'Link' button in the dialog.
Once the 'Link' button has been clicked, the dialog closes. Once the system has successfully fetched all relevant application class attributes and aspects being applied to the product, the screen reloads.
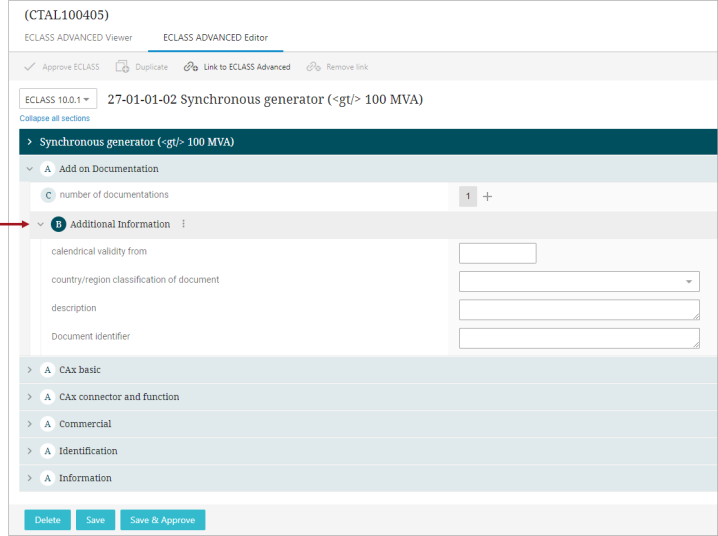
Linked Product View
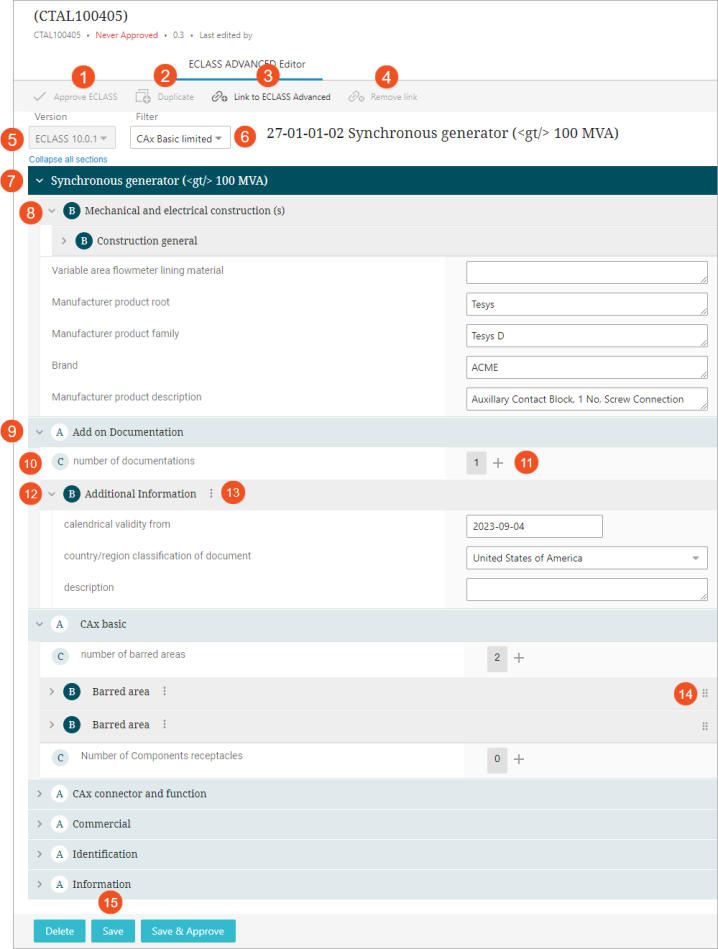
In the screenshot of the ECLASS Advanced Editor Screen shown above, the important elements of that screen are displayed in the image with an associated number. Below is a list of the relevant screen elements displayed in the ECLASS Advanced Editor Screen describing their purpose, and are numbered according to the corresponding numbers in the screenshot:
-
Approve ECLASS - This button allows the user to approve saved changes to a product and corresponding aspects and blocks.
-
Duplicate - This button creates a duplicate from the linked ECLASS version(s) to another product.
-
Link to ECLASS Advanced - This button allows the user to link a product to one or more ECLASS Advanced versions.
-
Remove link - This button allows the user to remove a product from a linked ECLASS Advanced application class.
-
ECLASS Advanced Version dropdown - This dropdown allows the user to select which ECLASS Advanced version data to display. If a selected object is linked to a specific ECLASS Advanced version, that version will display as an option on this dropdown.
-
Data filtering dropdown: This dropdown enables users to select a filter definition that allows them to focus on specific, relevant information within the extensive ECLASS Advanced dataset.
-
ECLASS Application class - The ECLASS Application class is a classification object to which the product is linked. Further, the Application class is referenced with aspects, blocks, and attributes.
-
Non dependent block - These blocks contain attribute that has the property 'NON_'DEPENDENT_P_DET_Type' set in it. These blocks cannot be duplicated.
-
Aspect - A grouping of attributes related to the object that are not descriptors of the object itself. Aspects are highlighted with the letter (
 ) in the screen.
 -
Cardinality - An attribute that defines total number of dependent blocks. Cardinality is highlighted by letter (
 ).
). -
Add icon (+) - Icon that allows adding more blocks inside an application class or aspect for a product.
-
Dependent block - This is a product block inserted based on the value defined in the cardinality attribute. In the screenshot above, the cardinality attribute 'number of documentations' has the value 1 that results in one dependent product block 'Additional Information.' These blocks contain an attribute that has the property 'CONDITION_DET_Type' set in it. These blocks exhibits cardinal behavior, meaning it can be duplicated.
-
Menu icon (
 ) - The options menu containing functionalities for block deletion and duplication.
 -
Grip Dots icon (
 ) - Icon that allows you to define the display order of blocks. Using this icon, you can manually adjust the order of elements without needing to modify the FORDER attribute directly. This improves product descriptions by ensuring a structured and logical presentation of data.
 -
Save - This button allows the user to save changes made to a product.
Linking products to multiple versions
Users can link a product to multiple ECLASS Advanced versions.
To link an ECLASS Advanced-linked product to an additional ECLASS hierarchy version, select a product and follow the same steps above for linking to an ECLASS Advanced Application Class. The versions of ECLASS that are already linked to the product will not be available to link with, as those versions are already linked to the product.
Linked ECLASS versions display in a dropdown menu on the left side of the page.
After linking a product to an ECLASS version, the attributes, aspects, and blocks will display on the page. Users can use the 'expand/collapse section’ link or arrow on the left of the section to expand a particular aspect(s) or block(s) to access the attributes.
Removing a link
If the user desires to unlink a product from an ECLASS Advanced version, click the 'Remove link' button available on the toolbar of the screen. A confirmation dialog will display as shown in the screenshot below.
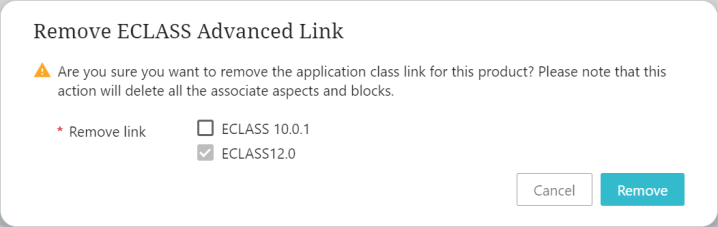
Select the checkbox of the ECLASS Advanced version that you desire to remove. Click the 'Remove' button in the confirmation dialog to unlink the product. After the user clicks the 'Remove' button, the product will be unlinked, and all linked objects (aspects and blocks) created during the maintenance process will be deleted. The page will reload with the current active ECLASS Advanced version, if one still exists otherwise, the page will display 'Product not linked to ECLASS Advanced'.
Adding and Editing blocks
To add blocks in the ECLASS Advanced Editor Screen, follow the steps described below:
-
Expand an aspect to display the attributes.
-
Click the plus sign '+' across from the cardinality attribute.
The user can also edit, remove, or add values to attributes in the editor screen. To do so, click the field across from the attribute to edit the data.
Every attribute has a validation base type that cannot be changed in the editor. For example, if the validation base type for an attribute is 'Number', text cannot be added to this field. Whenever a user tries to add invalid data in an attribute, a message is displayed below the field explaining why the input is invalid and asking the user to remove the invalid data. The ‘Save’ button at the bottom of the page will be disabled if any invalid data exists on the page, and it will be enabled when data has been altered and is valid on the page. Click the 'Save' button to keep any changes made to the product data.
Support for Cardinality - Adding more blocks
Users can add more blocks inside an application class or aspect for a product based on the cardinality attribute. For example, at the bottom of the product page, under the aspect section labeled 'Add on Documentation', users can add multiple 'Additional Information' blocks.

-
Click the plus sign '+' to the right of 'number of documentations' cardinality attribute to add an 'Additional Information' block.
-
Click the arrow on the left of the newly added 'Additional Information' block to expand and add details into the expanded fields. The 'Save' button will be enabled when changes are made to the product.
-
Click 'Save' to save your changes.
Support for Polymorphism - Adding more blocks of a specific block subtype
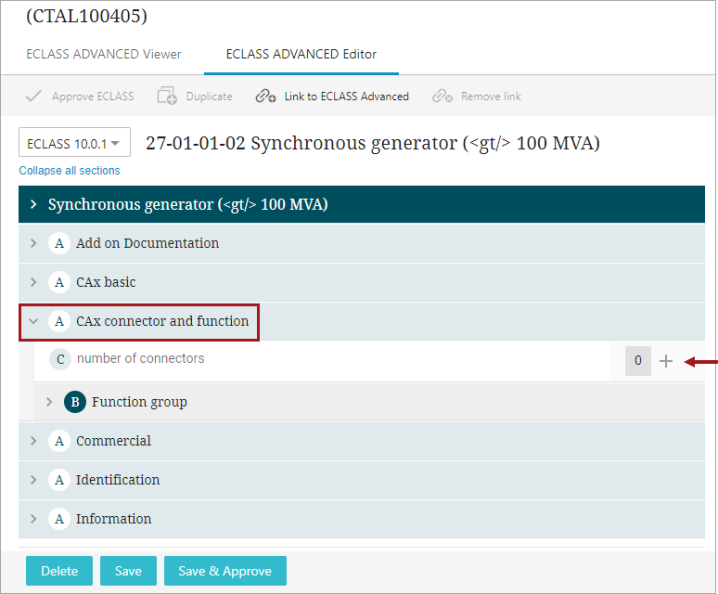
The ECLASS Advanced Editor screen supports polymorphism as well. Users can add more blocks of a specific block subtype when they click on the ‘+’ next to an attribute which allows both cardinality and polymorphism. The example below describes how a polymorphic 'Connector’ block is added to the 'CAx connector and function’ aspect next to the attribute ‘number of connectors’:
-
Click the 'expand section' link or arrow to expand the 'CAx connector and function' aspect.
-
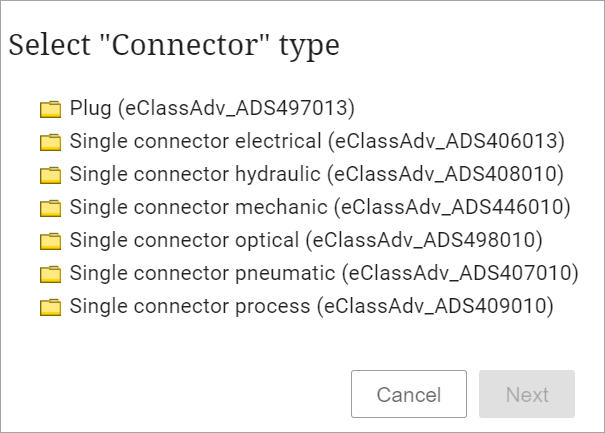
To add a connector, click the plus sign to the right '+' of the ‘number of connectors’ attribute and a dialog box will display. The dialog box will list the types of 'Connections' available to add this to the aspect:
-
Select a 'Connection Type' to enable 'Next.' Click 'Next' to display the 'Add New Block' dialog.
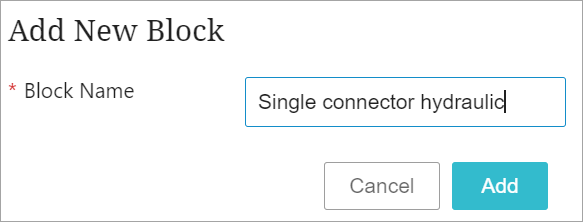
-
Edit the block name if required and click 'Add' to add the selected ‘Connection’ type block to the ‘CAx connector and function’ aspect.
Note: Data containers are rendered as blocks in the ECLASS Advanced Editor Screen. Data containers cannot be added in the editor. To add a new container, add a new block containing a data container which means only a single data container will be added to the newly added block.
New blocks are moved to the top of the list of blocks. Blocks are listed newest to oldest, from top to bottom.
Approving ECLASS Products
To approve product changes, the user must have approval privileges. To enable the 'Approve ECLASS' button, all changes must be saved. The 'Approve ECLASS' button is available as a toolbar action on the ECLASS Advanced Editor Screen. When the user clicks the 'Approve ECLASS' button, a confirmation dialog will display as shown in the screenshot below.
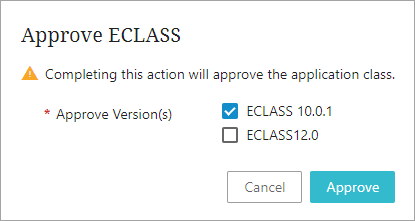
Select the desired version(s) you intend to approve and click the 'Approve' button in the dialog. A background process runs that approves the changes affecting the product, blocks, and aspects.
Duplicating ECLASS Versions
The 'Duplicate' button is available as a toolbar action on the ECLASS Advanced Editor Screen (as shown below) that allows users to duplicate the linked ECLASS version(s) to another product. To enable the 'Duplicate' button, all changes must be saved.
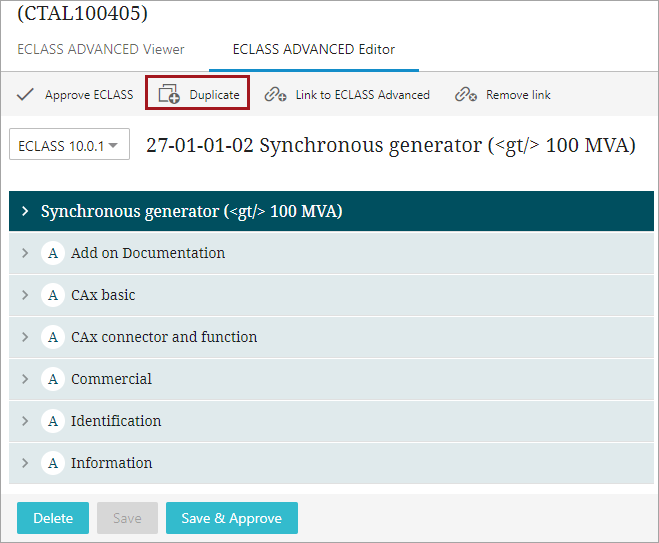
When the user clicks the 'Duplicate' button, 'Duplicate ECLASS' dialog will display as shown in the screenshot below.
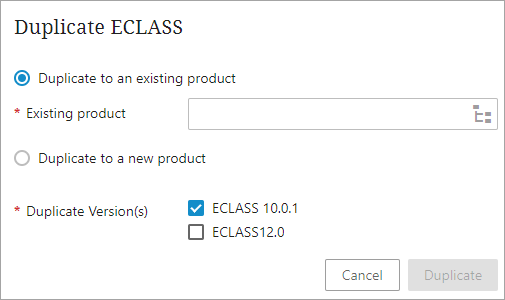
Within the 'Duplicate ECLASS' dialog, the following options are available:
-
Duplicate to an existing product: Selecting this option will duplicate version(s) into another product that already exists in the system. Find and select the target product using the node picker icon (
 ) available next to the field. Later, select the desired version(s) you intend to duplicate and click the 'Duplicate' button in the dialog. A background process runs that duplicates the version along with its blocks, and aspects. The existing product will be enriched with the additional versions. However, if the version is already defined for the target product (determined by the presence of an ECLASS Advanced classification link on the target product), this process will not duplicate the version.
 -
Duplicate to a new product: Selecting this option will create a new product with the ECLASS Advanced versions specified. Further parameters like ID and name for the new product must be defined along with this option.
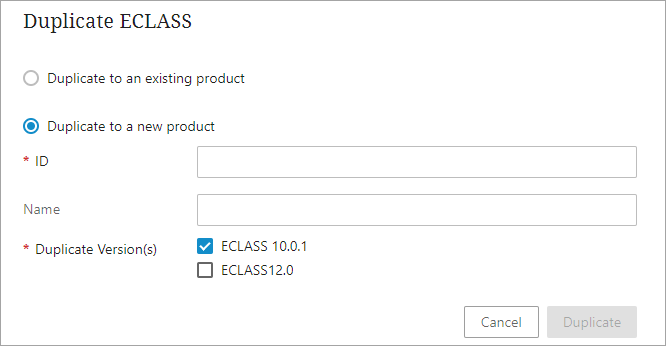
Once all fields are populated, proceed by selecting the version(s) you wish to duplicate and click the 'Duplicate' button in the dialog. This action initiates a background process, leading to the creation of a new product that includes the selected version linked to it. The new product will be generated within the same hierarchy as the source object.
-
Duplicate Version(s): This option displays the list of available versions in the current product. Select the versions that you intend to be copied to the target product.
Duplicating Blocks
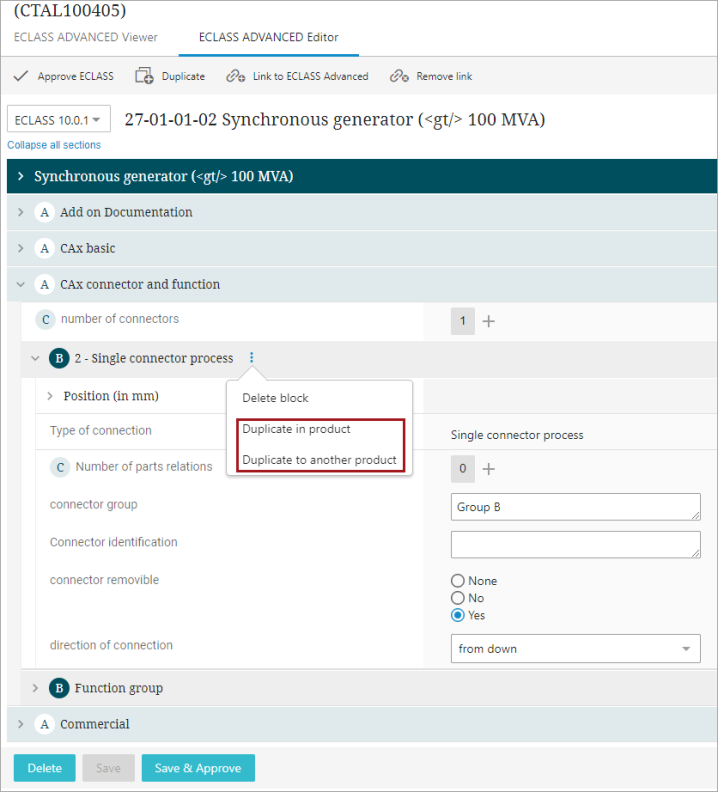
Users have the ability to duplicate blocks within the same product, and in cases where multiple similar products exist within the system, they can duplicate blocks from one product to another. This process is called as partial duplication of ECLASS Advanced data. Partial duplication options are available within the menu icon (![]() ) across each cardinal block as shown in the screen shot below.
) across each cardinal block as shown in the screen shot below.
-
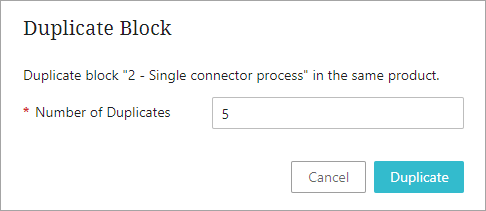
Duplicate in product: Clicking this option opens the 'Duplicate Block' dialog, facilitating the duplication of blocks within the product. Users can generate multiple copies of blocks as required. Simply input the desired number of block copies (limited to 100) within the 'Number of Duplicates' field.
-
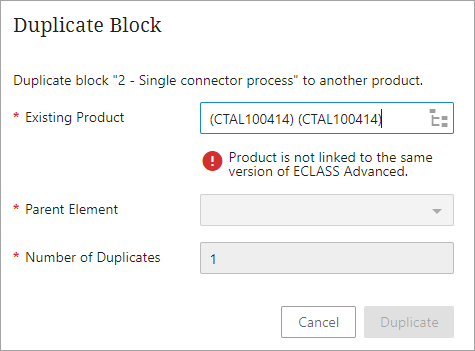
Duplicate to another product: Clicking this option opens the 'Duplicate Block' dialog, facilitating the duplication of blocks into another product. To activate the 'Duplicate' button within the dialog, users must complete the mandatory parameters listed below:

-
Existing Product:Users can find the target product by using the node picker available next to the parameter. It is essential to ensure that the target product is already linked to the corresponding ECLASS version. Otherwise, an error will be presented as shown in the screenshot below.
-
Parent Element: This parameter defines the parent of the block within the target product.
-
Number of Duplicates: Users can create multiple block copies as needed by entering the desired number of copies (with a limit of 100) within the dialog.
Advanced Filtering Mechanism
The ECLASS Advanced Editor screen features a sophisticated filtering mechanism that allows users to focus on specific information within the comprehensive ECLASS Advanced dataset. By selecting a filter definition from the dropdown menu, users can tailor their view to include only the relevant data for a given product. This ensures that users can maintain focus on the required data without losing context while contributing to the data.
The dropdown (shown below) in the screen allow users to select a filter definition.
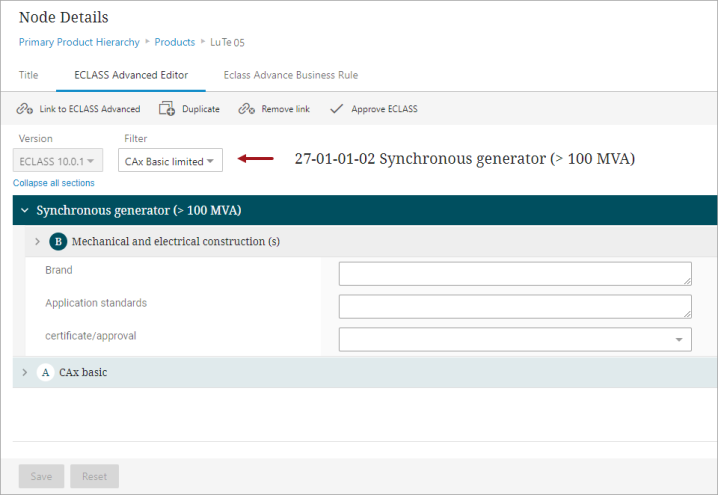
The filtering mechanism is highly configurable. Each filter definition available in the dropdown is an XML file stored as an asset in the system. A reference link is established between the product and the filter definition (i.e., XML asset) to enable its visibility in the dropdown menu. However, not all filter definitions stored in the system are immediately available for selection when the dropdown is clicked. The types of filter definitions visible in the dropdown menu can be customized and configured in the design mode. This level of customization is achieved through a combination of business functions and technical configurations.
The details about how to enable the filter definition accessibility is defined in the Configuring the Filtering Mechanism in ECLASS Advanced Editor Screen section of the Configuring ECLASS Advanced Editor Screen topic in the Web User Interfaces documentation.