The ECLASS Advanced Editor Screen is a preconfigured interface with a limited set of optional parameters for configuration. This topic covers the design prerequisites, configuration of an ECLASS Advanced Editor Screen, and setting up access to an ECLASS Advanced Editor Screen.
Prerequisites
It is expected that users who configure the ECLASS Advanced Screen familiarize themselves with the Web UI designer, as basic concepts for working with the designer are not covered in this section. In addition, the user must have appropriate privileges to access the designer. Additional information can be found in the Designer Access topic.
Additionally, to access the ECLASS Advanced Editor Screen, the ECLASS Advanced commercial license is needed. This license allows for the enablement of a new 'X.ECLASSADVANCED' system license and eclass-advanced add-on component required to access the functionality. Contact Stibo Systems to get any additional commercial licensing for your system.
Finally, to display ECLASS Advanced data on an ECLASS Advanced Editor Screen, the STEP system must contain the ECLASS Advanced taxonomy. Contact Stibo Systems if you want to import the ECLASS Advanced taxonomy. For generic information about the ECLASS Advanced solution, refer to the topics within the ECLASS: European Classification for Advanced e-Commerce section within the Solution Enablement: ECLASS Advanced documentation.
Configuring the ECLASS Advanced Editor Screen
To configure an ECLASS Advanced Editor Screen on your Web UI, follow the steps described below:
-
Add the ECLASS Advanced Editor Screen to your Web UI. Steps for creating a new screen are outlined in the Creating a New Screen section of the Design Mode Basics topic.
-
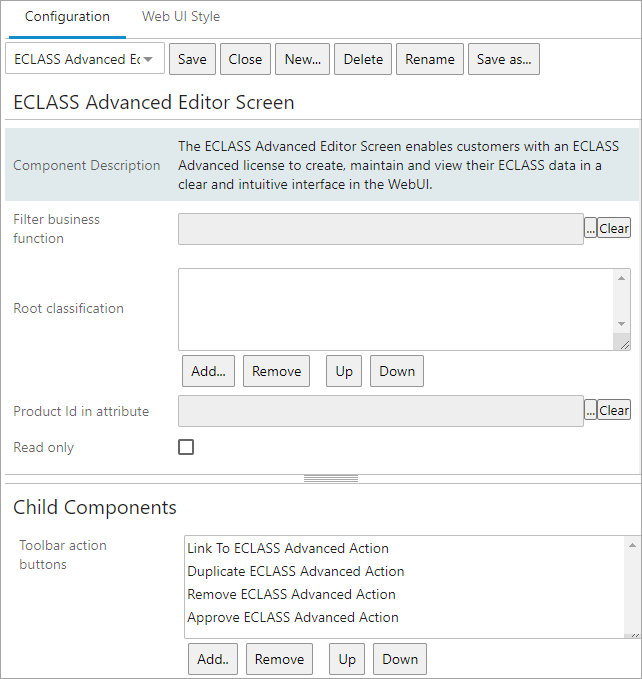
Populate the following parameters:
-
Filter business function: This parameter allow users to add a business function. The business function added to this parameter defines the filter definitions that need to be displayed in the ECLASS Advanced Editor screen.
-
Root Classification: This parameter is to be populated by selecting one or more classification folders in which the ECLASS Advanced-modeled data is contained. This parameter determines which versions will be available in the ECLASS Advanced Editor Screen. If no root node is selected, all versions will be displayed.
-
Product Id in attribute: This parameter has to be configured with an attribute. This creates an attribute ID containing a prefix that will be used to hash product IDs.
-
Read only: This checkbox is used to switch the ECLASS Advanced Editor Screen to 'read-only' mode. When enabled, it prevents end users from editing ECLASS Advanced data through the ECLASS Advanced Editor Screen.
-
-
The 'Toolbar action buttons' parameter comes preloaded with the following action buttons. You can customize the list by adding or removing buttons as needed:
-
Approve ECLASS Advanced Action: Adding this action will display the 'Approve ECLASS' button in the toolbar. This button allows users to approve saved changes made to a product, along with its corresponding aspects and blocks.
-
Duplicate ECLASS Advanced Action: Adding this action will display the 'Duplicate' button in the toolbar. This button facilitates the duplication of linked ECLASS version(s) to another product.
-
Link To ECLASS Advanced Action: By adding this action, the 'Link to ECLASS Advanced' button is displayed in the toolbar. This button allows users to establish links between a product and one or more ECLASS Advanced versions.
-
Remove ECLASS Advanced Action: Adding this action results in the 'Remove link' button being displayed in the toolbar. Users can utilize this button to remove a product from a linked ECLASS Advanced application class.
-
Click the 'Save' button to save the designer configuration, and then click 'Close' to close the designer.
Configuring Access to an ECLASS Advanced Editor Screen
An admin user must configure how a user will access an ECLASS Advanced Editor Screen. The ECLASS Advanced Editor Screen can either be mapped using Main Properties or added to a sub screen tab page on a Node Details screen. For more information about mapping, refer to Configuring the Parameters in the Main Properties topic, and for more information about sub screen tab pages, refer to the Tab Pages topic.
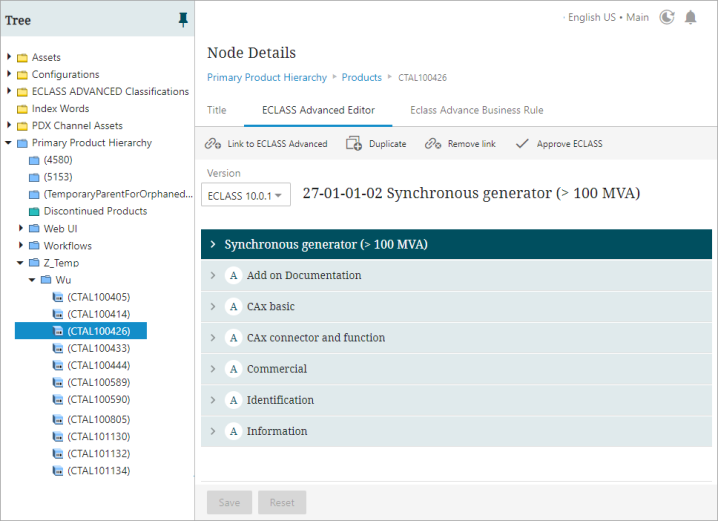
Below is an example of an ECLASS Advanced Editor Screen that is configured (mapped) to display when an object is selected.
Configuring the Filter Mechanism in the ECLASS Advanced Editor Screen
In the ECLASS Advanced Editor Screen, administrators configure the filtering mechanism by determining which filter definitions are accessible to users. These filter definitions are XML files stored as asset files in the system.
Prerequisites
The ECLASS ADVANCED Filter Model component model should be configured as described in the Initial Setup for ECLASS Advanced Editor Filtering topic.
Configuration Steps
The availability of filter definitions in the ECLASS Advanced Editor Screen is determined by either of the following methods:
-
Establishing a Reference link:
Administrators establish a reference link between the product and the filter definition. If the filter definition is valid for the linked ECLASS version, it becomes available for selection in the dropdown menu.
-
Configuring a business function:
Administrators configure a business function in the 'Filter Business Function' parameter. This function contains instructions about which filter definitions should be available to users. This method provides more flexibility to administrators in determining which filter definitions are made available to specific users. Business functions are created in the system as needed, but the methods involved in creating business functions are beyond the scope of this topic.
For more information about creating a business function, refer to the Business Functionstopic in the Business Rules documentation.
Note: Ensure that only one of the above methods is used to configure the filtering mechanism. If both methods are utilized, the instructions from the business function will override the reference, causing the filter definitions to be displayed based on the business function rather than the established reference.
However, if the filtering mechanism fails to retrieve the instructions from the configured business function, then the reference method is automatically adopted as the fallback method.