Note: ECLASS (formerly eCl@ss) has updated their branding. These branding changes will be reflected in Stibo Systems UIs in a future release. STEP functionality supports ECLASS Basic and the viewing of products, via the Web UI, in the context of an ECLASS Advanced taxonomy.
Use the following steps to start the ECLASS import.
- On File menu > Import > click eCl@ss... to open the eCl@ss Classification Import wizard.
- For the Select File step, click the ellipsis button (
 ) and search or browse for the relevant ECLASS file from your local machine. Once selected, click the Select File button, and then Next.
Note: If an invalid file is selected for import, an error message prompting the user to select a valid ECLASS XML file will appear when 'Next' is selected.

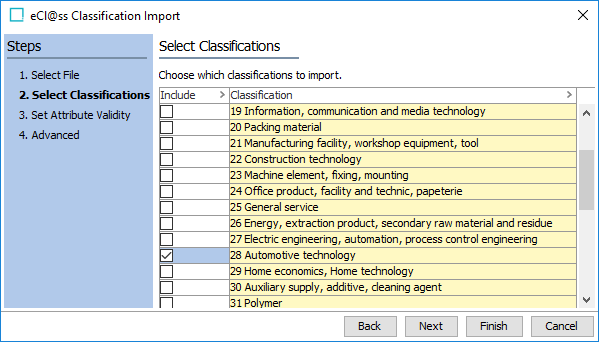
- For Select Classifications, select all classifications to import, and click Next.
- For Set Attribute Validity, select the valid product object types for the imported ECLASS attributes. This step is optional, and only available for ECLASS Basic XML imports.
Note: If an imported attribute already exists in the system, any selection made on this step will be added to the list of valid object types for the existing attribute.
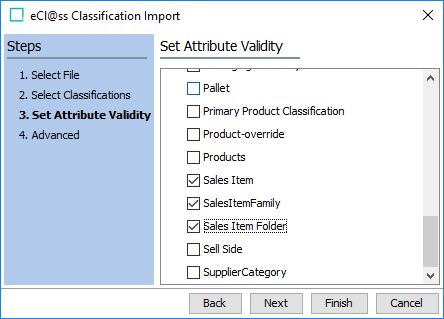
Important: If attribute validity is not set during the import it will have to be set manually later, otherwise you will not be able to maintain these attributes on linked ECLASS products.
- For Advanced, select the context for the language of the ECLASS file you are importing. When checked, the ‘Auto-approve’ option will attempt to approve the ECLASS Basic classifications and any products that are linked to the classifications.
Click 'Version specific object types' if the importer should specify the ECLASS version in the object types of the imported classifications. This will automatically create a new version specific object type structure for ECLASS classifications if one does not already exist for that version.
Click Finish to begin the import.
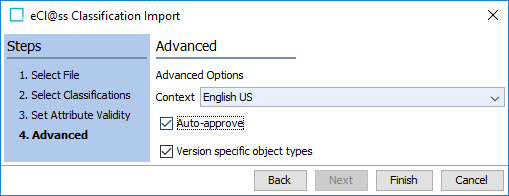
Important: It is not possible to import a classification structure with the 'Version specific object types' option selected if classification object types have previously been created for classifications of the same version (but without this option selected). Attempting to do so will display an error in the background process and the import will fail.
- Start the import. If required, refer to the information in Running a Data Import topic.
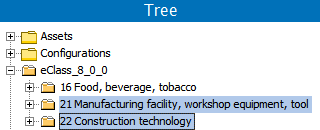
When the Import Manager Pipeline background process is complete, the newly created classification folders are displayed in the Tree.
- Only complete this last step if you will import multiple ECLASS languages for different contexts:
- Configure the language displayed in the Tree for the ECLASS classifications: In System Setup > Object Types & Structures > Alternate Classifications > eCl@ss Folder, for the top-level folder, set the Dimension Dependencies parameter to Language.
- Configure the language displayed for the eCl@ss attributes on the attribute editor: In System Setup > Attribute Groups > eClass Meta Attributes, for every attribute in this group, set the Dimension Dependencies parameter to Language.
- Import additional ECLASS data: Run the import wizard again for each ECLASS language required.
Import Report Messages
If you have previously used the ECLASS Basic data import functionality on your system, there are special circumstances that will prompt the ECLASS Basic importer to make updates to the existing ECLASS data model. These updates help ensure that the ECLASS Basic data model is aligned with the ECLASS dictionary. When these data model updates occur, they will be output in the import execution report. These execution report updates are described below.
Multi and Single Value Attribute Options
If you have already imported data using ECLASS Basic before, there are two types of messages STEP can generate based on changes to the ECLASS Basic data model. If ECLASS Basic attributes are changed, one or more of the following messages will display in the execution log:
-
'Single valued attributes changed to multi valued attributes: Attribute ID, Attribute ID 2...'
This message displays when an existing attribute has been changed from single-valued to multi-valued.
When this message displays, it means the existing data will not be impacted. Be aware of outbound integrations and export configurations that rely on a specific valency of the attribute.
-
'Multi valued attributes changed to single valued attributes: Attribute ID 1, Attribute ID 2...'
This message displays when an existing attribute has been changed from multi-valued to single-valued.
When this message appears, existing data will not be impacted. Be aware of outbound integrations and export configurations that rely on a specific valency of the attribute.
When an existing attribute cannot be changed from single-valued to multi-valued or multi-valued to single-valued, one of the following messages will display:
-
'Cannot update single-valued attributes to multi-valued attributes: Attribute ID, Attribute ID 2...'
-
'Cannot update multi-valued attributes to single-valued attributes: Attribute ID, Attribute ID 2...'
If the 'Cannot update multi-valued attributes...' message displays, the user must locate the nodes containing the attributes that have been identified, correct the attribute value, and delete the incorrect values. The user must set the attribute to single-valued.
Changing an attribute from multi-valued to single-valued manually may cause additional user prompts to appear:
The current message displays when the data revision has a multi-value attribute for one or more products. The user will receive a pop-up message when attempting to update the data that states, 'Cannot modify attribute definition. Attribute: attribute_ID has multi values.'
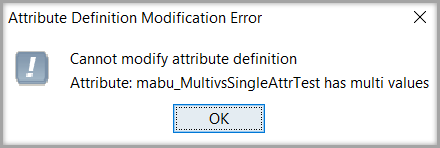
When this pop-up displays, the user must ensure that only one value is assigned and applied to all affected products in the current revision to make it a single. After the revised data shows a single-value, STEP allows the update.
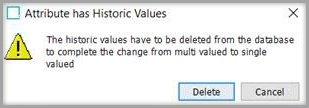
The second message displays when there are multiple values in one or more older data revisions. A dialog will display that says 'Attribute has historic Values.' If this occurs, the pop-up message displays, 'The historic values have to be deleted from the database to complete the change from multi-valued to single-valued,' with the options to 'Delete' and 'Cancel.'
Important: When a user selects 'Delete,' all historical data stored in the older revisions is removed for the particular attribute and relevant products.
For more information on updating attribute values, refer to the Editing Attribute Values topic in the System Setup documentation.
Dimension Dependency for LOVs and Attributes
When importing ECLASS with the List of Values (LOV) data type, a 'value_meaning' tag may be included in the ECLASS dictionary file. If so, the LOV should be created as language dimension-dependent.
ECLASS data types without a value_meaning tag should be imported as a dimension-independent list of values, as the value of the list of value are not translatable.
For existing lists of values, the dimension dependency should be updated based on the presence of a value_meaning tag in the ECLASS import file:
-
No value_meaning tag: The LOV should be updated to be dimension independent, if dimension dependent. If already dimension independent the list of values should not be changed.
-
No value_meaning tag: If the LOV contains LOV values in more dimensions, such as values in more languages, the dimension dependency should not be changed, but reported in the execution log.
-
Value_meaning tag: The LOV should be updated to be dimension-dependent, if dimension-independent. If already dimension-dependent the LOV should not be changed.
For more information on changing dimensions, refer to Dimension Dependent Attributes topic in the System Setup documentation.
When making changes to the list of values, there are several messages that can display in the execution log:
-
Cannot make list of values dimension-dependent as the user is not privileged to modify list of values dimension dependencies. Failed list of values: lov ID1, lov ID2…
-
Cannot remove list of values dimension dependencies as the user is not privileged to modify list of values dimension dependencies. Failed list of values: lov ID1, lov ID2
If the execution log delivers one of these messages, the attempt to revise dimension dependencies has failed. To successfully make the desired changes, a user that is privileged to modify dimension dependencies must run the import again.
If the dimension dependencies change, the execution log message will state:
-
List of values dimension dependencies update for: lov ID 1, lov ID 2…
When this message displays, it means the language dimension dependency has been added for the LOV and existing data will not be affected.
If the LOV is language-dependent and contains LOV values in more dimensions (languages), the execution log message will state:
-
List of values cannot be made dimension-independent because dimension dependent values exists: lov ID 1, lov ID 2…
When this message displays, the user must remove the dimension dependency manually in the workbench for each of the listed LOVs. When doing so, the user can choose which dimension is most important when merging the dimension-dependent values.
LOV Value Filters on ECLASS Attribute-Classification Links
When importing an LOV with or without constraints, the following execution log messages can display:
-
Added value filter for list of values eClass_LOV to classifications: eClass_classification…
Example execution log message:
Added value filter for list of value eClass_AAB637006 to classifications: eClass_10_AFR604003, eClass_10_ACN874011
When this message displays, it means that value filters have been added. If you had values that were filtered away, those values will be displayed as ‘orphan values’. For more information on Orphaned values, refer to the Linking Orphan Attributes topic in the System Setup documentation.
This message displays when a value filter is added to an existing LOV.
-
Failed to add value filters to list of values eClass_LOV to classifications: eClass_classification…
Example execution log message:
Failed to add value filter for list of value eClass_AAB637006 to classifications: eClass_10_AFR604003, eClass_10_ACN874011
This message displays when the ECLASS import fails to add a value filter to an existing LOV. This can only occur if a value filter is created based on a value that is not a legal LOV value. This indicates that there is an error in the ECLASS XML import file. When this happens, ECLASS should supply a new file without error.
This is an alternate option if you cannot wait to get a new corrected import file from ECLASS: the user can add the value that caused the import to fail to the LOV and the import file should be re-imported.
LOVs’ Usage of Value IDs
The following execution log messages will display following an update of the LOVs during an ECLASS Basic data import:
If the existing LOVs were changed to use value IDs, the message will read:
-
List of values changed to use value IDs: attribute ID 1, attribute ID 2...
When this message displays, the LOV values that are already in use by these products will not be affected by this change.
If the existing LOVs were changed to not use value IDs, the message will read:
-
List of values changed to not use value IDs: attribute ID 1, attribute ID 2...
When this message displays, existing data will not be affected by this change. However, removal of LOV value IDs may affect export configurations in the case where the export configuration is set to export LOV value IDs.
If the existing LOVs cannot be changed to not use value IDs, the message will read:
-
Cannot change list of values to not use value IDs: attribute ID 1, attribute ID 2...
This message is unlikely to occur, however if it does, the LOV affected is used by a data container key. To fix that you must:
-
Deactivate the data container key.
-
Remove the attribute that uses the LOV from the data container key.
-
Change the LOV to be single-valued.
-
Optionally find another attribute to be part of the data container key.
-
Active that data container key again.
-