The purpose of the Company Hierarchy Screen is to allow users to graphically explore company structures. Any number of Company Hierarchy screens can be added to a Web UI. Once added, as with any screen, an admin user must configure how users access a Company Hierarchy Screen.
To use the Company Data Hierarchy functionality, an admin user will need to do the following:
- Define the entity object type and reference type pair(s).
- Configure a way for users to access the Company Hierarchy Screen.
- Determine the visual representation of an object type.
This topic addresses:
- Prerequisites
- Creating a Company Hierarchy Screen
- Configuring access to a Company Hierarchy Screen
- Configuring Hierarchy Representation Properties
- Optional Configurations for the Hierarchy Representation Component
Prerequisites
It is expected that anyone configuring the Company Hierarchy Screen and the Hierarchy Representation component is familiar with the Web UI designer as basic concepts for working with the designer are not covered in this section. In addition, the user must have appropriate privileges to access the designer. Additional information can be found in the Designer Access topic.
To use this functionality:
- The data must form a hierarchy before the Company Hierarchy Screen can be configured.
- A hierarchy must be defined by a list of valid Object Type and Reference Type combinations.
- The Reference Type to be used, must have the 'Allow multiple references' equal to 'No.'
- The Reference Type cannot be dimension dependent.
- An object type can only belong to a given hierarchy via one reference type, however it may belong to multiple hierarchies via the same or other reference types.
Creating a Company Hierarchy Screen
A Company Hierarchy Screen powers the visualization of company hierarchies. When using this screen, configuration must be done to define a hierarchy via a list of valid object type and reference type pairings.
Though only one hierarchy can be displayed in a Web UI screen, more than one hierarchy can be defined and displayed using multiple Company Hierarchy screens within the same Web UI.
The steps below cover how to add a new Company Hierarchy Screen. Additional details for creating new screens are outlined in the Creating a New Screen section of the Design Mode Basics topic.
To create and configure a new Company Hierarchy Screen:
- With the designer window open, click the New button to create a new screen.
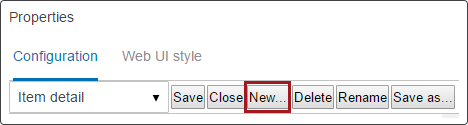
- Choose Company Hierarchy Screen from the screen list.
- Type in a descriptive Screen ID.
- Click Add.
The Company Hierarchy Screen Properties dialog will display.
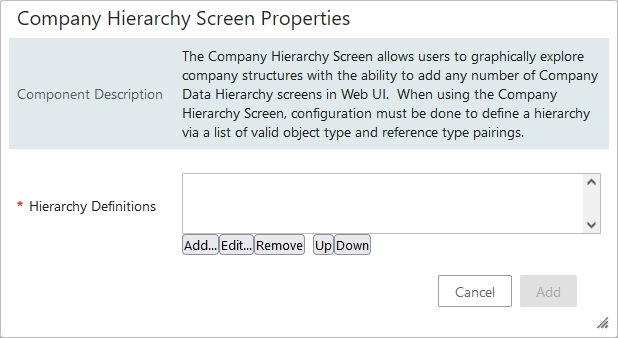
- Click Add to define an Object Type and parent Reference Type pair that are allowed in the hierarchy visualization.
The Object Type - Reference Properties dialog will display.
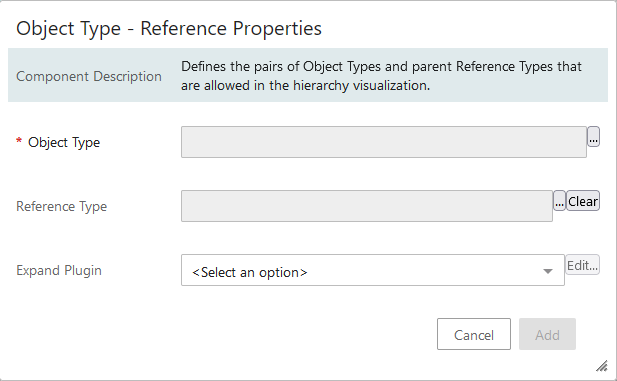
- Click the ellipsis button (
 ) and select one Object Type to be shown in the hierarchy screen.
 - Optionally, select one Reference Type to be shown in the hierarchy screen.
- The Reference Type will be used to identify the parent object.
- If no Reference Type selection is made, objects of the designated Object Type will not have parents in the hierarchy.
- Optionally, enable the Expand Plugin parameter by selecting Expand By Attributes from the dropdown.
- This parameter is suggested for larger hierarchies where users will benefit from selecting specific data dimensions (pre-configured filters) to properly navigate a large hierarchy.
- Once enabled, click Edit to add specific attributes for users to select from while expanding children within a large hierarchy.
- Click Add.
Note: Multiple Hierarchy Definitions can be added, if necessary, repeat steps 5 - 9 to add the desired additional parings.
- Click Add on the Company Hierarchy Screen Properties once the Hierarchy Definitions are complete.
- Click Save.
- Click Close.
Configuring Access to a Company Hierarchy Screen
An admin user must configure how an end user will access a Company Hierarchy Screen. The Company Hierarchy Screen can be either mapped using Main Properties or added as a Sub Screen Tab Page on a Node Details Screen.
For more information about mapping, refer to Configuring the Parameters section of the Main Properties topic, and for more information about Sub Screen Tab Pages, refer to the Tab Pages topic.
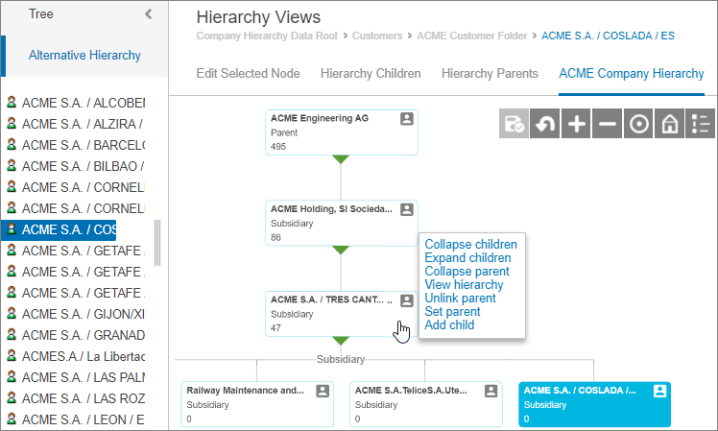
The example below shows the Company Hierarchy Screen displayed via a Sub Screen Tab Page on a Node Details screen and is displayed when an entity is selected.
Configuring Hierarchy Representation Properties
The Hierarchy Representation Properties determine the overall look of the graphical interface. Styling needs to only be set up one time and is applied throughout a specific Web UI, regardless of how many Company Hierarchy screens are configured.
To configure the Hierarchy Representation Properties:
- In Web UI designer, go to the MAIN (Screen) Properties > Global Representation List > Click Add.
The 'Add Component' dialog will display.
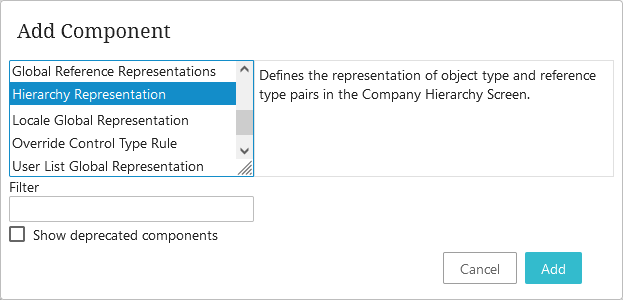
- Select Hierarchy Representation.
- Click Add.
The Hierarchy Representation Properties will display.
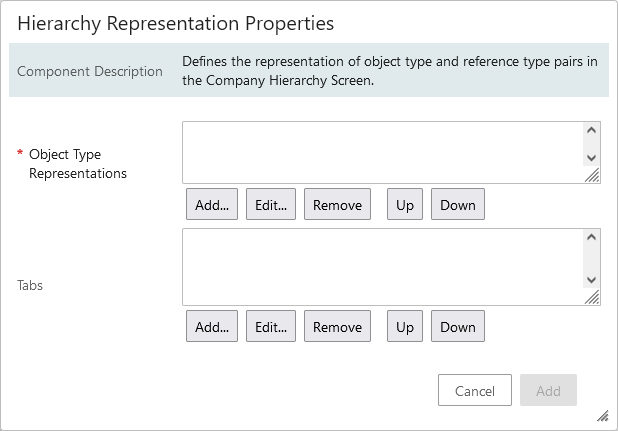
- For the Object Type Representations parameter, at least one object type representation must be added. If more than one is added, then the order listed within the parameter field determines the order for horizontal sorting in the Hierarchy screen. Click Add.
The Object Type Properties dialog will display.
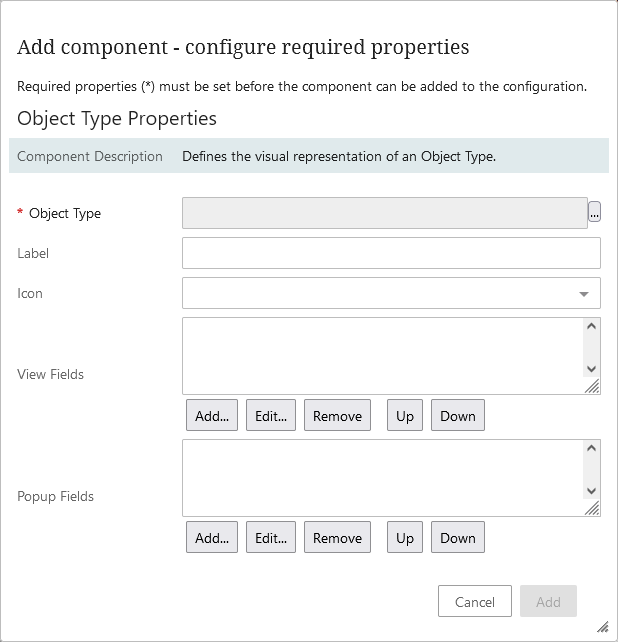
- Click the ellipsis button () to select the Object Type to be defined and displayed in the hierarchy.
- Optionally, enter an alternate label for the Object Type used in the Company Hierarchy Screen. If no Label is entered, the Object Type is used.
- Optionally, select an icon to represent the Object Type. Each value on the list represents a different icon to be used within the hierarchy.
The following icon options are available for selection:
- Account
- Aggregate
- Branch
- Classification
- Customer
- Division
- Employee
- Folder
- Legal
- Location
- Parent
- Region
- Sales-manager
- Subsidiary
- Territory
- Top-flag
- Optionally, select up to three View Fields to display on the graphical node when the hierarchy renders. If making an Attribute Value Field selection, then the attribute must be specified and an additional dialog will display.
- Popup Fields is also an optional parameter. Click Add to select attributes and/or attribute groups to display in the popup when a user selects a graphical node. Selecting 'Attribute Group Value Field' and/or 'Attribute Value Field' brings up additional dialogs for property selection.
- Click Add on Object Type Properties, and the Hierarchy Representation Properties will display.
- Click Add to return to the Main (Screen) Properties.
- Click Save.
- Click Close.
Optionally, when a user is adding or creating new objects in the hierarchy screen (Set parent, Add child), tabs can be configured to display, to help the user find or create an appropriate object. This can be done by clicking Add for the Tabs parameter within the Hierarchy Representation Properties.
Configuring options for 'Set parent' and 'Add child' are described in the Optional Configurations for the Hierarchy Representation Component topic.
For an example regarding how to use the screen once configured, refer to the Company Hierarchy Visualization and Maintenance topic.