Customer data users can browse and edit a visual representation of company hierarchy data using a Company Hierarchy Screen. When using the hierarchy functionality, company hierarchy data is saved as STEP entities, and references are used to connect the entities to each other. The visualization of entities and their references may help users better understand company hierarchies, and relationships between aggregates (e.g., companies, franchises, and branches). Users may also be able to identify patterns, better organize objects, and ultimately build better data relationships.
This topic addresses:
- Prerequisites
- Overview of a Company Hierarchy Screen
- Using a Company Hierarchy Screen
- Editing a Company Hierarchy
- Optional Tools for 'Set parent' and 'Add child' Actions
Prerequisites
It is very important to note that users with access to the Web UI designer will need to configure the Company Hierarchy Screen component before it can be used. For more information, refer to the Configuring a Company Hierarchy Screen topic.
Overview of a Company Hierarchy Screen
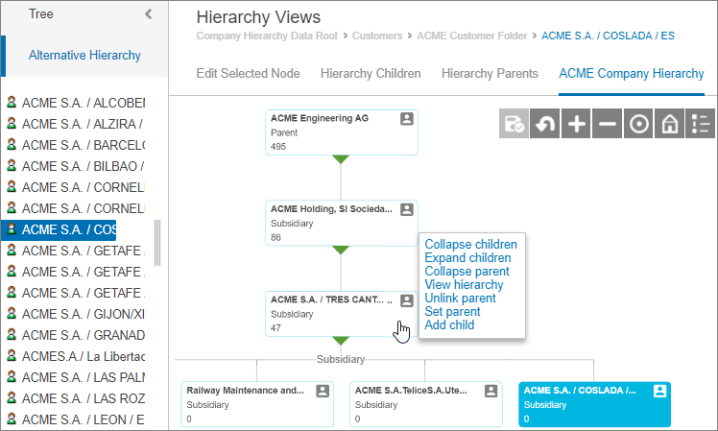
The below screenshot shows a sample of a Company Hierarchy Screen that is configured to display via a Sub Screen Tab page when a user clicks on an entity object within a Tree Navigator panel.
Using this example:
- An entity can be selected using the navigation panel on the left.
- If the panel on the left is expanded, then the selected entity node will display shaded.
- Selecting a different entity within the panel will render the respective company hierarchy.
- Selecting a different hierarchy to view within the Company Hierarchy Screen will update the selected entity node in the navigation panel.
- The initial view responsively adapts based upon screen size, so that the hierarchy view appropriately fills the screen.
- Each linked entity is displayed within individual graphical nodes.
- Each graphical node displays up to three configured attribute values, and a customizable icon representing the object type.
![]()
- A blue filled box represents the selected node within the hierarchy.
- A toolbar in the top right offers the following options for better viewing and editing:

- Save & Approve - all changes on these objects are saved and partially approved. Any references that were not created by the approving user or were left unaltered will remain unchanged in the existing workspace.
- Undo
- Zoom in
- Zoom out
- Recenter hierarchy view
- Default hierarchy view
- Symbol Legend
- Green arrowheads display at the bottom of a graphical node (and top, when applicable) to indicate when additional data is available but not displayed.
- When a parent is not displayed, the green arrowhead will display at the top of the graphical node.
- When a child is not displayed, the green arrowhead will display at the bottom of the graphical node.
- A hand shaped cursor and the following interactive options display when a user hovers over any of the entity boxes.
- Expand parent*
- Collapse parent
- Expand children
- Collapse children
- View hierarchy
- Unlink parent
- Set parent
- Add child
*Because the options are interactive, only those that are applicable display.
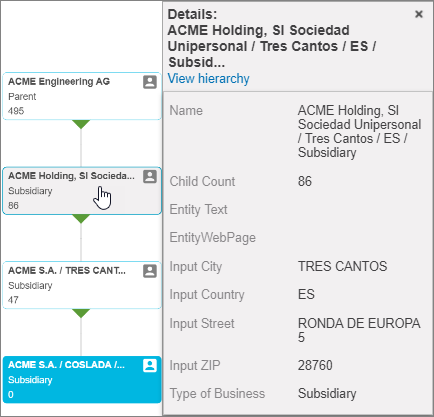
Users can view more information by selecting an individual node. The attributes that display are configurable in the designer by the admin users. Users also have the option to select the 'View hierarchy' link to render the hierarchy for the selected node. When this happens, the Tree Navigation (if applicable) will move to the newly selected entity object.
The below screenshot shows a sample of information that appears when a user selects any of the entity nodes within a Company Hierarchy Screen.
Using a Company Hierarchy Screen
Characteristics of many customer data models lend themselves to a hierarchical layout, even though the data model is referential. Many times the creation of customer hierarchy data does not occur in STEP but is created in surrounding applications (ERP, CRM, and eCommerce). Until now, this resulted in company hierarchy content and structure being maintained outside STEP. Orphaned hierarchies that do not naturally reside in the surrounding applications can also be created and maintained in the STEP Web UI Company Hierarchy Screen.
Using the Company Hierarchy Screen, users will be able to:
- View and maintain organizational hierarchies by making use of organic corporate data
- Make ad hoc changes as needed
- Associate account and other organizational data (e.g., revenue to date, credit score, etc.) to nodes within an organizational hierarchy
- Associate account and other organizational data received from third-party data providers to nodes within an organizational hierarchy
- Construct and manage differing perspectives of a singular hierarchy so as to accurately model the differing views stakeholders within an organization (e.g., Sales, Marketing, Finance / Legal) have for a given corporate customer organization
- Map and manage relationships between nodes across different hierarchies
A node can be a member of multiple hierarchies, but only one hierarchy can be viewed at a time. Though only one hierarchy can be displayed at the same time, more than one hierarchy can be defined and displayed using multiple Company Hierarchy screens within the same Web UI.
Editing a Company Hierarchy
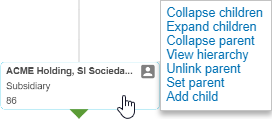
Users have many options to help them edit a company hierarchy. When using a company hierarchy screen, a user can hover over a graphical node and view the relative options for editing the company hierarchy. However, when working in an 'Approved' workspace, the hover menu options 'Unlink parent,' 'Set parent,' and 'Add child' are not available. Edits to the company hierarchy structure can only be done in the 'Main' workspace.
The screenshot below is an example of options displayed when hovering over a graphical node in a 'Main' workspace.
Each of these options is described below.
Collapse children
If the graphical node has any visible children, then the 'Collapse children' action will display. When selected, the children and underlying descendants will collapse into the node above.
Expand children
If the graphical node has a green indicator on the bottom, upon hover, the 'Expand children' action will display. If there is enough available space to fit all children on the screen, then the children will expand under the graphical node. If there is not enough available space and the Expand Plugin has not been configured, then all children will be displayed, but potentially outside the visible area.
Using the zoom in, zoom out, and panning tools is helpful when this occurs.
If there is not enough available space and the Expand Plugin has been configured, then an Expand Children dialog will display.
In the screenshot example below, the Expand Plugin has been configured to use a filter type of Branch and Subsidiary. The user can select to view all children, view all children within the Branch filter type, view all children within the Subsidiary filter type, or drill down into the Branch or Subsidiary filter types.

In the screenshot example below, the user selected the Branch filter type, and the dialog now displays the available additional filter types. In this example all the Branch children are located in the same country, 'ES.'
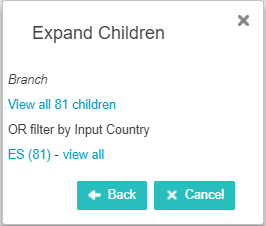
The user can select the Back button to return to the previous dialog, or the Cancel button to return to the Company Hierarchy Screen.
Note: If a user selects 'Expand children' on a node with more than 1,000 children, then an error message will display informing the user that there are too many nodes to display. The user will not be able to display the nodes. If somehow 1,000 nodes are displayed on the screen, then a warning will display informing the user that browser performance may be impacted.
Collapse parent
If the graphical node has a visible parent, then the 'Collapse parent' action will display. When selected, the parent and all siblings will collapse into the node.
Expand parent
If the graphical node has a green indicator on the top, upon hover, the 'Expand parent' action will display. When selected, all direct ancestors are expanded, potentially outside the visible area. Using the zoom in, zoom out, and panning tools is helpful when this occurs.
View hierarchy
If a Hierarchy screen is defined for the target node, then the 'View hierarchy' link will be available. Selecting 'View hierarchy' will navigate away from the originally rendered node hierarchy to the selected node hierarchy. The once white graphical node will display filled with blue, indicating it is the selected node. If the left panel is enabled, the panel will display the newly selected node.
Unlink parent
Selecting 'Unlink parent' will remove the reference link between the node and its parent. However, the user must click the Save button for the changes to formally take affect. When selected, the graphical reference link (the line connecting the two graphical nodes) will no longer display, but the graphical node itself will remain displayed on the screen. This allows a user to edit the graphical node in other ways, or view the existing hierarchy prior to saving.
Set parent
'Set parent' can be used to change the parent to either an existing object or a new object that is created within the 'Set parent' dialog. When selected, the 'Set parent' dialog will display with at least a Search tab; however, if STEP has been configured with the optional 'Set parent' and 'Add child' settings, then a 'Find Similar Search' tab and/or a 'Create' tab will display. More information on these tabs can be found in the Optional Tools for 'Set parent' and 'Add child' Actions section below.
The screenshot below is an example of the default Search option displayed when using Set parent.
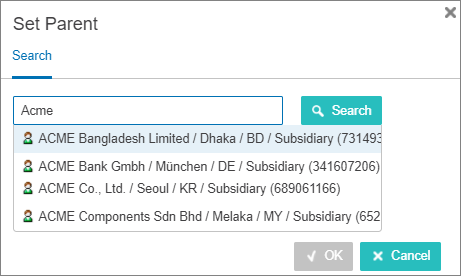
- Using the Search tab, find the desired entity.
- Select the new parent entity.
- Click OK.
- The link between the node and its original parent are removed, and the parent link is added to the newly selected node.
- The 'Set parent' dialog will close and the hierarchy will display with the original remaining graphical nodes disconnected from the newly linked graphical node and its parent.
- Click Save in the Company Hierarchy Screen toolbar.
Important: Changes will not take affect until the Save button is clicked.
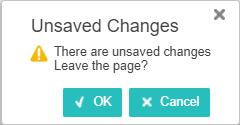
If a user tries to navigate away from the Company Data Hierarchy tab, then the following warning will display.

If a user selects a different entity from the left panel (if enabled) then the following dialog will display, and if the user clicks OK then the changes will be lost.
Add child
'Add child' can be used to add a child to the selected node. When selected, the 'Add child' dialog will display with at least a Search tab; however, if STEP has been configured with the optional 'Set parent' and 'Add child' settings, then a 'Find Similar Search' tab and/or a 'Create' tab will display. More information on these tabs can be found in the Optional Tools for 'Set parent' and 'Add child' Actions section below.
The screenshot below is an example of options displayed when using Add child.
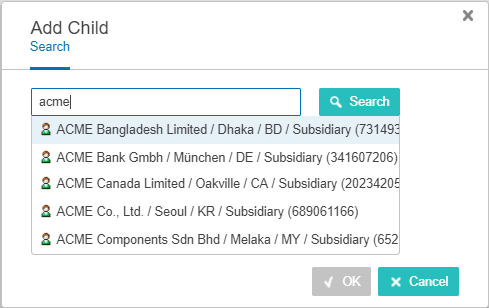
- Using the Search tab, find the desired entity.
- Select the new child.
- Click OK.
- The child link is added to the newly selected node.
- The 'Add Child' dialog will close and the hierarchy will display the graphical node with its newly linked child.
- Click Save in the Company Hierarchy Screen toolbar.
Important: Changes will not take affect until the Save button is clicked.
If a user tries to navigate away from the Company Data Hierarchy tab, then the following warning will display.
If a user selects a different entity from the left panel (if enabled) then the following dialog will display, and if the user clicks OK then the changes will be lost.
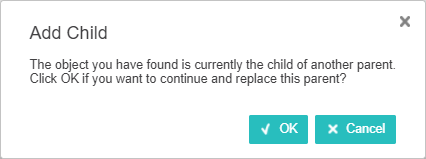
If the user selects an object that is currently the child of another parent, the user must confirm that they want to replace the parent.
Optional Tools for 'Set parent' and 'Add child' Actions
The 'Set parent' and 'Add child' actions offer optional functionality to assist users in properly editing a company hierarchy. The 'Create' tab and 'Find Similar Search' tab functionality are described below.
Create Tab
The Create tab will only display when a user selects the 'Set parent' and/or 'Add child' action, if a designer has set up the optional configurations. More information can be found in the Optional Configurations for the Hierarchy Representation Component topic.
Using the Create tab allows users to create new objects. Optionally, the user can also enter values into the attribute fields that have been configured in the designer to be applied to the new object. The attributes that display will depend on the selected Object Type.
The screenshot below is an example of a Create tab configured with attributes to populate.
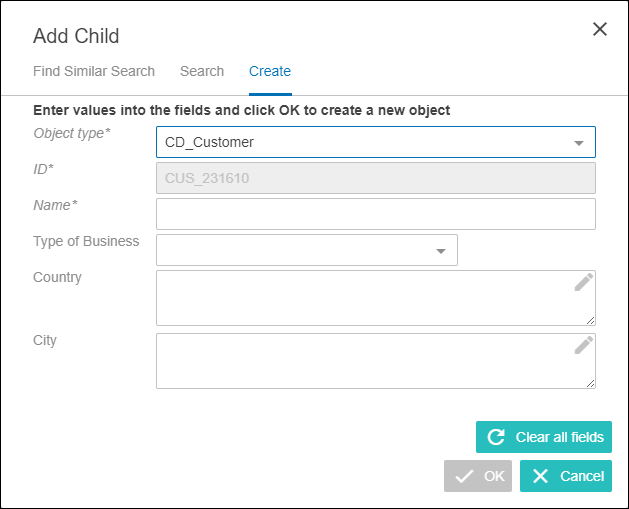
Clicking the Clear all fields button will remove all values from the visible fields.
When a user clicks the Cancel button, the actions are canceled and the dialog closes.
- Select the Object Type from the dropdown list (if more than one is configured).
- Complete any additional value fields, if displayed.
- Click the OK button.
If the following warning displays, the Web UI designer should update the temporary parent object selection to an object with an autogenerated id, or contact your system administrator to have the current temporary parent object configured with an autogenerated id.

When a user clicks OK, the new object and relevant reference are created based on the choice of the user. (The reference type is specified in the hierarchy screen for the object type in question.) A message displays notifying the user of the success of the new object creation back on the hierarchy screen.
Find Similar Search Tab
The Find Similar Search tab will only display when a user selects the 'Set parent' and/or 'Add child' action, if a designer has set up the optional configurations. More information can be found in the Optional Configurations for the Hierarchy Representation Component topic.
In an effort to prevent users from creating duplicate objects in the STEP system, users can use the Find Similar Tab to identify similar objects prior to creating new ones when working in Company Hierarchy screens in Web UI. This functionality can be accessed through the 'Set parent' and/or 'Add child' actions while editing a company hierarchy. Using Find Similar allows users to search for potential duplicates on a more granular level.
The key to Find Similar functionality is the matching setup that the customer creates and uses for duplicate handling. Every time a user enters data into the search fields and clicks OK, the Find Similar search checks the match code values involved, executes the relevant matching algorithm, and provides a set of results, if any are found.
If a user is not getting the results they expect, then the first place to check is the algorithm configured in the Duplicate Handler parameter in Object Type Specific Find Similar Properties. A relevant Match Code and Matching Algorithm needs to be set up before attempting to use the Find Similar Search tab. For more information about setting up and using matching algorithms, refer to the Configuring Matching Algorithms section of the Matching, Linking, and Merging documentation
The screenshot below is an example of a configured Find Similar Search tab.
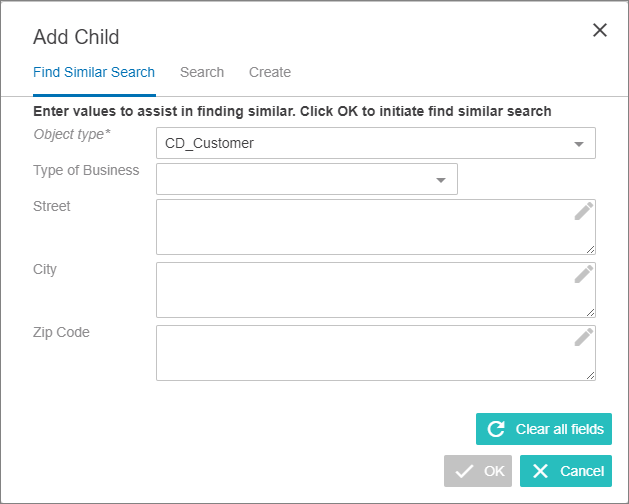
Clicking the Clear all fields button will remove all values from the visible fields.
When a user clicks the Cancel button, the actions are canceled and the dialog closes.
- Select the Object Type from the dropdown list (if more than one is configured).
- Enter searchable values for the attributes.
- Click the OK button.
If the following warning displays, the Web UI designer should update the temporary parent object selection to an object with an autogenerated id, or contact your system administrator to have the current temporary parent object configured with an autogenerated id.
Important: The attributes being searched must be part of the list of attributes that Match Codes are generated for. If not, the search will not work as expected.
If similar objects are found after running the action / algorithm, the user is provided with the results in a admin user-configured detailed dialog list.
If a similar object cannot be found, then click Cancel to return to the 'Set parent' or 'Add child' dialog.
- Select an object.
- Click OK.
The system creates the reference to the similar object selected by the user, and the reference type is specified in the hierarchy screen for the Object Type in question. The dialog closes and the Company Hierarchy Screen displays.