Running step 1 of Easy Setup for each standard (AutoCare / NAPA / TecDoc) will create two Application Editor Screens:
- One for when a Part is selected to display the applications belonging to that Part.
- One for when a Vehicle / Assembly is selected to display the applications belonging to that Vehicle / Assembly. This screen can also be used for searching missing application records for the selected vehicle.
Web UI users can view, edit, create, and delete application records within these screens. Users can also further configure results table in the screen to meet their requirements.
The Application Editor Screen require an object selection, so these screens need to be mapped for a particular object type or added on a tab within another screen that is mapped to the appropriate object. To map the Part's or Vehicle's screen, so that when you are on a part or vehicle, only that screen is displayed, refer to the Mappings topic within the Web User Interfaces documentation of STEP Online Help.
To add the Parts or Vehicles screen to an existing screen, use the Sub Screen Tab Page configuration, described in the Tab Pages topic in the Web User Interfaces documentation of STEP Online Help.
Note: AutoCare will be used as an example throughout this topic.
Each of the automatically configured Application Editor Screens for the different standards are described below:
AutoCare
Each of the automatically configured screens for the AutoCare solution are described below:
- AutoCare Application Editor Screen (Parts): A screen for viewing / editing application records when a part is selected. This screen is mapped to the AC_PIESITEM object type.
- AutoCare Application Editor Screen (Vehicles): A screen for viewing / editing application records when a vehicle is selected. This screen is mapped to the AC_Basevehicle object type.
NAPA
- NAPA Application Editor Screen (Parts): A screen for viewing / editing application records when a part is selected. This screen is mapped to the NAPA_Product object type.
- NAPA Application Editor Screen (Vehicles): A screen for viewing / editing application records when a vehicle is selected. This screen is mapped to the NAPA_Year object type.
TecDoc
- TecDoc Application Editor Screen (Articles): A screen for viewing / editing application records / linkages when an article is selected. This screen is mapped to the TD_DS_SupplierArticle object type.
- TecDoc Application Editor Screen (Assemblies): A screen for viewing / editing application records / linkages when an assembly is selected. This screen is mapped to the TD_VehicleType(PC) object type.
Prerequisites
It is expected that anyone configuring the Application Editor Screen (Parts / Vehicle) is familiar with the Web UI Designer, as basic concepts for working with the designer are not covered in this section. In addition, the user must have appropriate privileges to access the designer. Additional information can be found in the Designer Access topic in the Web User Interfaces documentation.
Configuring Application Editor Screen Properties
The Application Editor Screen Properties includes the following parameters:

Object Type Filter: This parameter allows users to restrict the Application Editor results by an object type. If left blank, application records belonging to all object type will be displayed.
Note: Selecting the Filtered Assembly Application option within the Data Provider parameter requires adding at least one object type in the Object Type Filter parameter.
Part Object Type Filter: This parameter allows users to restrict the application records displayed in the Application Editor results based on the object type of the applicated part. If left blank, application records belonging to all part object types will be displayed.
Data Provider: This parameter is prepopulated either with the Part Application, Filtered Assembly Application, or Assembly Application option.
-
The Part Application option is selected for the Application Editor Screen that is used to display the existing application records while selecting a part
-
The Assembly Application option is selected for the Application Editor Screen that is used to display the existing application records while selecting a vehicle / assembly
-
While the Filtered Assembly Application option is selected for the Application Editor Screen to display the existing application records, it can also search for missing application records for the selected vehicle / assembly.
Further configuration may be required for the Filtered Assembly Application option, and no additional configuration is required for the other options selected within the Data Provider parameter.
Select the and click on the 'go to component' link to configure Filtered Assembly Application Properties. Edit the following parameters as necessary.

-
Additional Search Attribute: This optional field allows users to add attribute criteria to their search. All attribute validation base types (e.g., Text, Number, List Of Values) are allowed. Click the ellipsis button (
 ) to find and select the attributes. The selected attributes must be valid for the part type object type, and the attribute value must be populated on the part type in order for it to display correctly in the typeahead search field.
 -
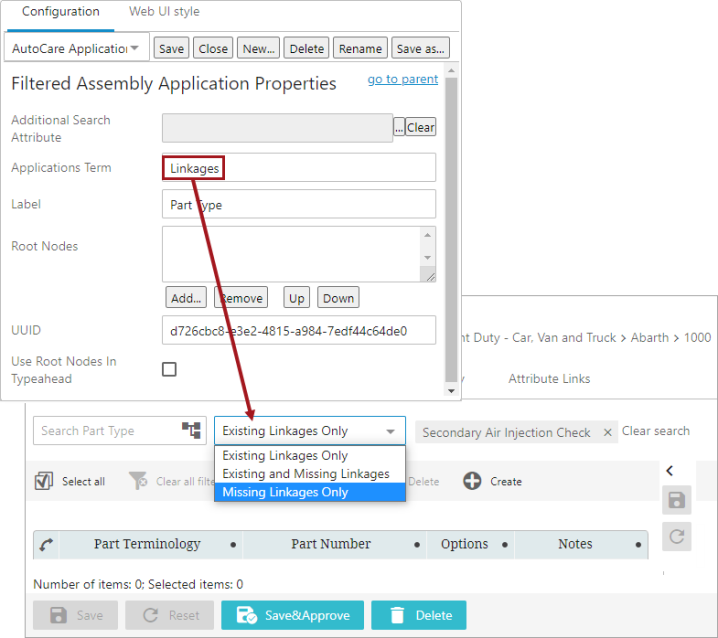
Applications Term: This parameter provides users the ability to change the terminology 'Applications' within the Existing and Missing Applications drop-down list. This parameter is defaulted to be populated with value 'Applications' as shown below.
Below is an example of the Applications Term parameter populated with the value 'Linkages'.
-
Label: By default, the Label parameter is populated as 'Part Type.' Optionally edit the parameter to a more suitable label.
-
Root Nodes: Allows for the restriction of root nodes to be used within the Part Type search box when searching / filtering for a Part Type. Once the root node(s) is defined, the search input field displays only suggestions of objects that belong in the root node defined within this parameter. Additionally, when the Node Picker is used, its dialog will display the only those classification folders that pertain to the root nodes defined within this parameter. Click the Add button below the parameter field to browse or search for the necessary vehicle root node object(s).
-
Use Root Nodes In Typeahead: Selecting this parameter allows the display of suggestions in the typeahead field of only those objects that belong in the root node defined within the Root Nodes parameter. However, the user needs to be aware that the selection of this parameter would affect the performance of the display of suggestions in the typeahead field.
Node List: The Application Editor Screen Properties is pre-configured with a Node List in Multi Edit Display Mode along with the 'Delete Application Action' and 'Create Application Action' toolbar actions (as shown above).
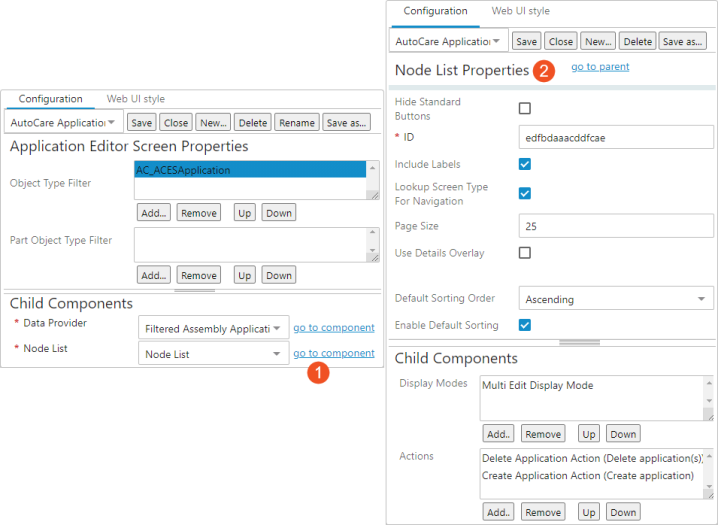
- Select the 'Node List' option in the dropdown and click on the 'go to component' link.
- Configure the Node List component. For more information, refer to the Node List Component topic within the Web User Interfaces documentation of STEP Online Help.
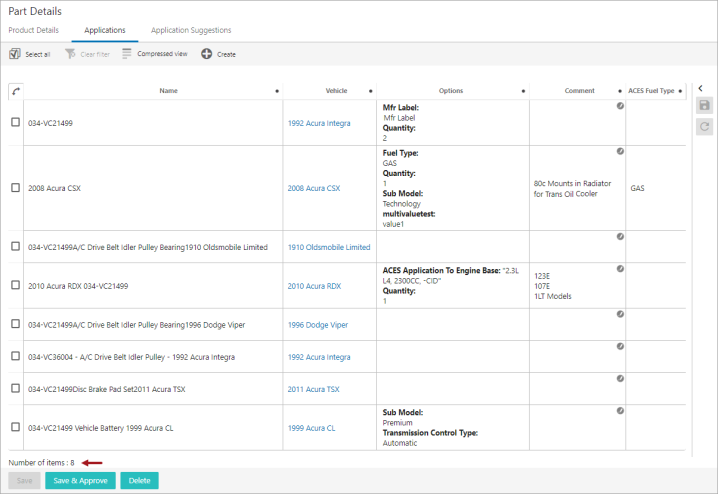
Since the Application Editor Screen is based on the Node List component and the Multi Edit Display Mode, sorting and filtering of the header component values are supported. This allows for multiple information of the application records to be shown in the same table with the column filtering capabilities. Also, the 'Number of Items' shown in the Application Editor Screen is displayed towards the bottom of the results table, allowing a user to review the total number of application records without having to scroll through the data. In the example screenshot shown below, the Application Editor Screen is configured as a tab page within the Node details screen and eight application records are displayed for the selected part.
Node List Properties
Only the significant information applicable to the Application Editor Screen is detailed below. Additional information about the Node List Properties can be found in the Node List Component topic within the Web User Interfaces documentation of STEP Online Help.
The following are the parameters available within the Child Components section of the properties screen:
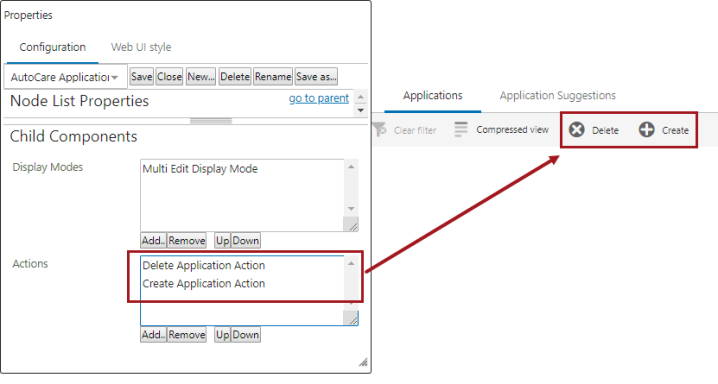
Display Modes
The Multi Edit Display Mode comes pre-configured in this Node List. As the name implies, users can edit multiple application records and multiple attributes in the same screen and save the changes automatically (using the 'Use Immediate Save' parameter) or manually. For details, refer to the Auto-Save in the Web UI topic within the Web User Interfaces documentation of STEP Online Help. When the user double clicks the Multi Edit Display Mode component available within the Display Mode parameter, the Multi Edit Display Mode Properties dialog displays. The Multi Edit Display Mode Properties dialog allows to further configure the component based on the user requirements.

Table Headers
The Headers parameter available within the Multi Edit Display Mode Properties allow users to add multiple table header components that gets listed as individual columns in the results table of the Application Editor Screen.
Below are some header examples. The bullet under each header explains what is displayed in that header column. Additional headers may be used (e.g., Name, Attribute Value, Attribute Value Group). When adding headers, you can read a description of each before adding them to the Headers field.
Note: It is suggested that the Application ID Header be used in place of the ID Header to display the ID of the application records.
- Application Condition Header - Individual - Table header expanding to show all 'important' conditions for an application. For details, refer to the Application Condition Header Components topic.
- Application Condition Header - Group - Table header showing attributes that serves as conditions for an application. The attributes could be on the application object, the child object to the application or on the reference from the application object to the assembly object. For details, refer to the Application Condition Header Components topic.
- ACES Application Qualifiers - Table header that shows AutoCare application qualifiers. For details, refer to the ACES Application Qualifier Table Header topic.
- Application Approval Status - Table header that shows application approval status.
- Application Assembly Value - Table header that shows the value of an attribute of an assembly linked to an application. For details, refer to the Application Assembly Value Table Header topic.
- Application Asset Reference - Table header that shows the asset reference for an application.
- Application Comment - Table header that shows comments.
- Application Competitor or OE Part Numbers - Table Header used to display competitor or OEM part numbers and manufacturer names (optional) in the Application Manager results table. Additionally, when users click a part number value within the column, a read-only dialog will display the competitor or OEM applications.
- Application Country Handling Table Header - Component used to display and edit country handling data within the Application Editor Screen table.
- Application ID - Table header that shows the ID of an application.
- Application Part Type Title Header - Table header that shows the name of the part type that is linked to the applications in the table.
- Application Part Type Value - Table header that shows the value of an attribute of a part type that is linked to an application.
- Application Set Assembly - Table header that shows the name of the assemblies linked to the applications in the table. For details, refer to the Application Set Assembly Table Header topic.
- Application Set Part - Table header that shows the name of the parts linked to the applications in the table.
- Application Suggestion Info - Table header component used to display information for why the application record is being suggested.
While configuring the headers in Display Mode properties, a user can choose to set up the table sort order based on a specific header. By editing a particular header's properties, sorting order (ascending or descending) can be designated using the dropdown next to Table Sorting. Once the properties are saved, the table will sort itself based on the new header settings, and the Display Mode properties will be retained until configured differently.
The Table Sorting designation can only apply to one header at a time. It has to be removed from one header before setting up on another. Additionally, if 'Enable Default Sorting' is enabled / selected in the Node List properties, selecting a header to sort by overwrites this setting.
Actions
Many action buttons can be added to a screen to be used with a Node List. These are all added and configured within the Actions field on the Node List Properties screen. The Create Application Action and the Delete Application Action come pre-configured. These actions and the Bulk Application Updates action are described below. Other actions can be configured based on the user requirements.
After clicking the Add button, the 'Add component' dialog is displayed. Selecting a component in the left area will display the description for that component in the right area.

Create Application Action
The Create Application Action button (  ) opens a 'Create Application' dialog with Select Assembly (or Select Part depending on the type of Application Editor Screen) option.

When a user clicks on a node picker icon (as shown in the screenshot above), they are presented with standard Browse and Search tabs to select an existing vehicle / assembly or part. The 'Select Assembly' and 'Select Part' value fields support typeahead functionality, which allows users to easily add a vehicle / assembly or part without having to click through various hierarchies and/or folders.

Additional functionality can be configured that allows users to set a name of the newly created application records with a unique name format, search for vehicles / assemblies or parts in an effort to only select below the defined hierarchy, or narrow the search result in the Faceted Search window to aid efficient vehicles / assemblies or parts selection. For more details regarding how to fully configure the properties for the Create Application Action component, refer to the Create Application Action Component topic of the Automotive Reference Guide documentation.
Delete Application Action
The Delete Application Action (  ) is enabled when an application record is selected in the table. When clicked, it will delete the selected application record from the table without showing any warning dialog.
Bulk Applications Updates
The Business action(s) for Bulk Update(s)  button is enabled when one or more application records are selected in the table. When clicked, it will update multiple application records in a single operation. Users have the flexibility to add any number of bulk updates. If more than one bulk update is configured then the Bulk Applications Updates dialog will display (as shown below), prompting users to select the desired bulk update to be executed. For more details regarding how to fully configure the properties for the Bulk Application Updates component, refer to the Bulk Applications Updates Component topic of the Automotive Reference Guide documentation.

Approve Application Action
The Approve  button is enabled when one or more application records are selected in the table. When clicked, it will approve the selected application records in a single operation. Upon clicking the button, the Approve Applications dialog will be displayed (as shown below), asking users to confirm the approval of the application records. For more details on how to fully configure the properties for the Approve Application Action component, refer to the Approve Application Action Component topic of the Automotive Reference Guide documentation.

Searching for the Missing Application Records
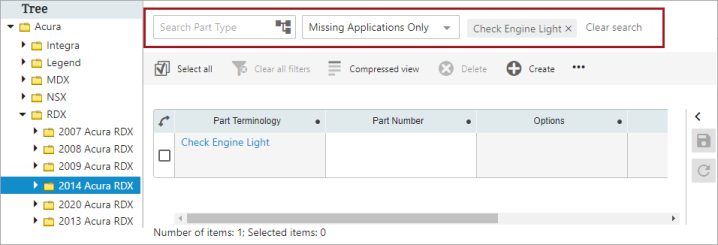
The Application Editor Screen (Vehicle) can search for missing application records for the selected vehicle / assembly only if the Data Provider parameter is configured with the Filtered Assembly Application option.
Selecting the Filtered Assembly Application option displays search fields on top of the Application Editor Screen (as shown below). Users can enter the part type(s) to define their criteria to search for the missing application records.
