The Page Inspector is a tool in the STEP Workbench used for viewing and editing InDesign pages generated through AutoPage. From the Page Inspector, mounted objects can be repositioned, remounted, and reflowed on a page; content can be updated; documents can be opened directly in InDesign; layouts can be locked; pages can be sent to the printer; and more. To view the Page Inspector, select the relevant publication, section, or subsection in the Tree, then click the Page Inspector tab.
Overview of the Page Inspector Interface
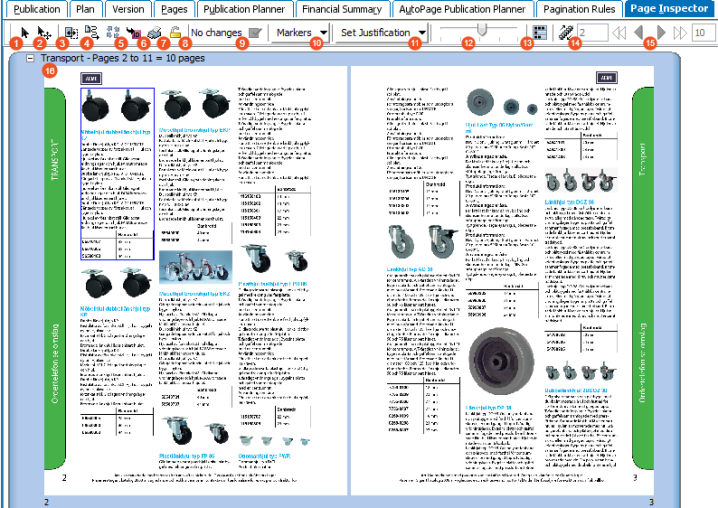
The following screenshot shows an example of an autopaginated catalog spread as viewed in the Page Inspector. The toolbar at the top of the Page Inspector contains the tools that can be used on the mounted objects and pages. The numbers in the following screenshot correspond with the numbered entries in the table directly below it.
| No. | Tool | Description |
|---|---|---|
|
1 |
Selection
|
Using this pointer, single-click on a product or page to select it. Double-click to go to that object in the Tree hierarchy. To select multiple objects, hold down the CTRL key when making selections. |
|
2 |
Positioning
|
Change the position of objects on a page. After moving an object, the 'No Changes' button (9) indicates the number of changes made. Click Apply Changes for the changes to take effect. |
|
3 |
Remount objects
|
Remount one or more objects at a time. For more information, refer to Remounting and Reflowing Objects here. |
|
4 |
Reflow objects
|
Reflow objects from the selected object until the end of a page or the end of a section. For more information, refer to Remounting and Reflowing Objects here. |
|
5 |
Update content
|
Update the product content. You can either update the entire content of one or more selected objects, or you can update specific items such as attributes, commercial terms, image references, and object names. For more information, refer to Updating Documents in AutoPage here. |
|
6 |
Open document in InDesign
|
Open a document in InDesign. You can manually make edits to the document in InDesign, then save it back to STEP from within InDesign. For more information, refer to the Saving Finalized InDesign Documents to STEP section of the Publisher (Adobe InDesign Integration) documentation here. |
|
7 |
|
Print sections, subsections, or pages. For more information, refer to Printing Pages in AutoPage here. |
|
8 |
Lock layout
|
Remembers a product presentation layout while you are using autopagination, reposition, remount, or reflow. Select the changed product presentation and click the Lock Layout icon. Locked layout only concerns the product presentation layout and has nothing to do with the position on the page. |
|
9 |
No changes / changes made
|
Indicates the number of changes that have been made with the Positioning Tool (2). Click the checkbox |
|
10 |
Markers
|
Select a marker to view detailed information about the mounted objects. For more information, refer to Viewing Markers and Overset Text here. |
|
11 |
Set Justification
|
Justification options are enabled when a page is selected. The available options are Justify Top, Justify Bottom, and Justify Balance. For more information, refer to Repositioning Objects in the Page Inspector here. |
|
12 |
Zoom slider
|
Use the slider to zoom in to get a close-up view of a page or zoom out to view more of the page. |
|
13 |
Hide / show subsections
|
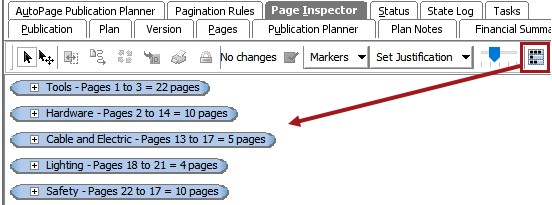
Select whether to show or hide subsection titles. Subsection titles indicate the start of a new subsection. Subsections hidden:
Subsections shown:
By default, subsections display as expanded. The subsections have been collapsed for this illustration. |
|
14 |
Specify number of pages to be shown
|
Show all pages or specify a page range to be shown. The default is to show all pages. |
|
15 |
Page range options
|
Specify the start and end page of a page range. This option is only enabled if Show a page range is used. The navigation arrows show the following.
|
|
16 |
General section information |
Displayed in the upper left corner of the interface are:
|


 to apply the changes.


 /
/ 

 /
/ 

 First page range in section
 Previous page range
 Next page range
 Last page range in section
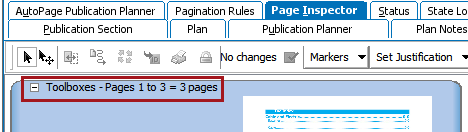
Inspecting Multi-version Publications in the Page Inspector
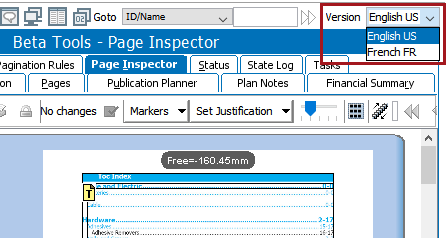
While in the Page Inspector, to view a different version of your publication, select the relevant version from the Version dropdown in the upper-right corner of the STEP GUI. This dropdown is not a part of the Page Inspector toolbar, but is a part of the STEP Workbench interface that is visible when viewing most publication hierarchy objects.
Note: When you apply any of the following actions—Remount, Reflow, Update content, Apply changes, or Justification—they apply to all versions of a publication, not just the selected version.