Important: Image Analytics Package / Image Deduplication: This functionality has been deprecated and is no longer supported and/or available for new installations. This documentation is retained as a reference only for customers already using the functionality and for whom it remains available in the current state. The functionality will be removed in the future so customers using this should make plans to transition away from their implementation of it.
The image deduplication functionality includes a default clerical review workflow. A single task is created for a set of images that fall below the auto-match threshold, but that are above the clerical review threshold. The task holds images that cannot be definitively identified as duplicates by the deduplication algorithm. A user with appropriate access can then manually mark images as confirmed duplicates or confirmed non-duplicates, and select a master.
Using the Web UI for clerical review involves a workflow configured in the workbench and screens and components configured in Web UI.
After this configuration is complete, continue with the Image Deduplication process as defined in the Running the Image Deduplication Process topic.
STEP Workbench Configuration
The following default workflow is created when the component is activated and can be viewed in the workbench.
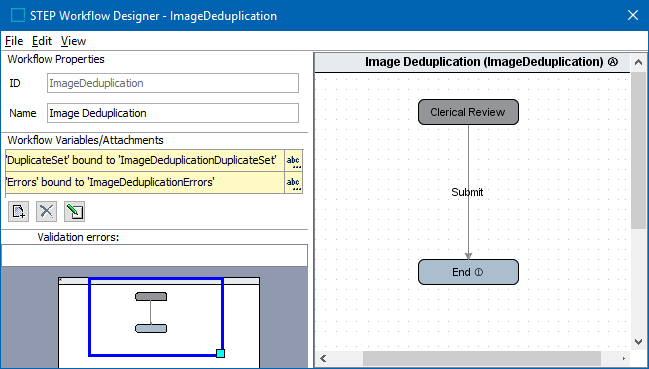
While only a single item is in the workflow, the 'DuplicateSet' attribute used as the workflow variable holds the IDs of the duplicate images. For the workflow to show multi-valued in the workbench, the parameters for this attribute must include the following settings: Type = Description, Externally Maintained = Yes, Validation Base Type = Text, and Multi Valued = Yes. Additional information about viewing workflows in the workbench can be found in the Configuring Mappings for Workflows topic and the Configuring Views for Workflows topic in the Workflows documentation.
Prerequisites
The image deduplication workflow must have the following settings:
- Prior to activation of the image deduplication component, the 'Workflows' object type must already exist in System Setup under 'Setup Group Type Root.'
- Workflow variables are used by the workflow: one to store errors and another to store the IDs of the assets in a set of duplicates. For the workflow to function as expected, these workflow variables must not be modified.
Important: If you create your own workflow for Image Deduplication, you must include the workflow variables that exist in the default workflow. Otherwise, the duplicate image handling fails.
- Attributes for the workflow variables are auto-created and can be found in the 'ImageDeduplication' asset group. These attributes manage data for: confirmed non-duplicates, confirmed duplicates, and the deduplication delete flag. For the workflow to function as expected, these attributes must not be modified.
- A state must exist with the ID = ClericalReview for the workflow to function as expected.
Note: If the image deduplication workflow is not functioning as expected, delete the elements mentioned above and reinstall the component, as specified in the Deduplicating Images topic.
Workflow Configuration
Use the following steps in the workbench to modify the default workflow for your data model:
- Set the 'Assignee' to the clerical review user (by default, this is the executing user and should be changed). For more information, refer to the Step 5: Set Assignees section of the Creating a Workflow topic in the Workflows documentation.
- Verify that the default workflow is valid for all asset types that should be deduplicated (by default, this is set to all asset types). For more information, refer to the Step 6: Set Validity section of the Creating a Workflow topic in the Workflows documentation.
- Verify that the default workflow has the 'Use executing user's write privileges' parameter not checked. This ensures that the workflow can perform the required actions, without the restrictions set on the current user. For more information, refer to the Step 7: Set Workflow Options section of the Creating a Workflow topic in the Workflows documentation.
- Verify that the clerical review user has access to workflows, otherwise the following background process error can be displayed in the execution report: Could not start asset [ID] in the workflow 'ImageDeduplication'. Most likely the object type of the asset is not valid for the workflow. For more information on privileges related specifically to workflows, refer to the Workflow Privileges topic in the Workflows documentation.
Web UI Configuration
Images being considered for the deduplication process can be viewed in Web UI using the following methods:
- Task List - when all images in the system are managed by the same user(s), a Status Selector Homepage Widget can be configured to map to a task list, which maps to the clerical review screen.
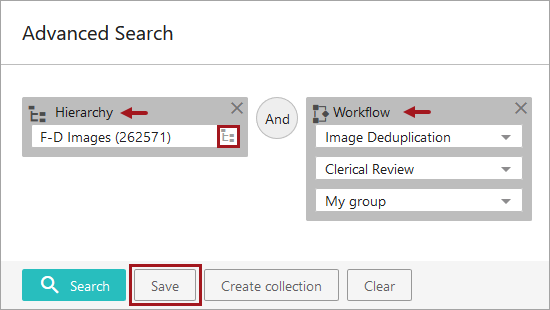
- Advanced Search - when images are managed by different users, such as suppliers or business units, image deduplication tasks should also be isolated by supplier or business unit. In this case, a search can be configured with a hierarchy criteria for classification and a workflow criteria to only display results for the selected images.
Configuration for each method is included below.
Image Deduplication Task List Configuration
Use this configuration if all images are under the same ownership and manual deduplication tasks do not need to be assigned based on hierarchy or supplier.
Note: While completing these steps, routinely click the designer's Save button to prevent the loss of your work.
- In Web UI, create a 'Image Deduplication Clerical Review Screen' by following the steps described in the Image Deduplication Clerical Review Screen topic in the Web User Interfaces documentation.
- Create a 'Image Deduplication Task List Screen' by following the steps described in the Task List topic in the Web User Interfaces documentation.
On the Node List child component, click the 'go to component link' and set the following specific parameters:
- For the Lookup Screen Type For Navigation parameter, disable the option by removing the check mark. This allows the Image Deduplication Clerical Review Screen to be used when an image ID is clicked.
- Under the Selection Screens section, for the Asset Selection Screen parameter, select 'Image Deduplication Clerical Review' from the dropdown.
- Under the Selection Screens section, for the Multi Selection Screen parameter, select 'Image Deduplication Clerical Review' from the dropdown.
- In the Child Components area for the Display Modes parameter, click the Add button, select the 'Gallery Display Mode, and click Add. Set Gallery Display Move as the default display by moving it to the top of the list by clicking the Up button. No further configuration is required.
- In the Child Components area for the Display Modes parameter, double-click the Table Display Mode to display the properties and add the necessary headers to the Headers parameter. Click the Add button, select a header from the Add Component list, and click Add. For example, Name Header, Path Header, and Thumbnail Header.
For more information, refer to the Node List Component topic in the Web User Interfaces documentation.
- On the ---[HOMEPAGE}--- screen, edit the Widget Grid child component, in the Widgets parameter click the Add button, select the Status Selector Homepage Widget component, and click Add. Edit the following parameter data:
- Set the Result Screen parameter to the 'Image Deduplication Task List' screen created previously.
- Set the States parameter to the 'Image Deduplication | Clerical Review' state and click the Add button.
- Set the Workflow parameter to the 'Image Deduplication' workflow.
- Set other parameters as desired based on the Status Selector Homepage Widget topic in the Web User Interfaces documentation.
- Click the Add button to display the new homepage widget.
- Click the Save button to commit your changes and click the Close button to exit the designer.
Image Deduplication Advanced Search Configuration
Use this configuration if all images are not under the same ownership and manual deduplication tasks must be assigned based on hierarchy or supplier.
- In Web UI, create a 'Image Deduplication Clerical Review Screen' by following the steps described the Image Deduplication Clerical Review Screen topic in the Web User Interfaces documentation.
- On the homepage, click the Advanced Search link to open the Advanced Search page. For information on setting up an Advanced Search link, refer to the Advanced Search Initial Configuration topic in the Web User Interfaces documentation.
- Configure a new search using the following search criteria:
- Hierarchy - use the node picker to select the classification that holds the images to be deduplicated.
- Workflow - use Select workflow' dropdown to select the 'Image Deduplication' workflow, use the '[any State] ' dropdown to select the 'Clerical Review' state, and use the 'My group' dropdown to select the assignee for the tasks.
- Click the Save button and add a name for the search.
- While displaying the Advanced Search screen, open the designer.
- On the Advanced Search Screen Properties dialog, check the Enable Workflow Selection checkbox.
- On the ---[MAIN]--- screen, add a mapping for the Image Deduplication Clerical Review screen as follows:
- In the Mappings parameter, click the Add button.
- On the Screen Mapping Properties dialog, in the Conditions parameter, click the Add button and select the Workflow Condition component and click Add.
- On the Workflow Condition Properties dialog, in the Workflow Details parameters, select the Image Deduplication workflow and the Clerical Review State. Click the Add button.
- On the Screen Mapping Properties dialog, in the Screen parameter, use the dropdown to select the Image Deduplication Clerical Review screen. Click the Add button.
- The Image Deduplication Clerical Review screen mapping displays as the last item in the Mappings parameter. Since the first mapping that matches the condition of the current selection will be used, adjust the order if necessary.
For more information, refer to the Mappings topic in the Web User Interfaces documentation.
- Click the Save button to commit your changes and click the Close button to exit the designer.