Rather than using the file structure in STEP, an asset push configuration specifies how to organize the generated external file structure via a Relative Path Template (RPT). Typically the folder structure is based on the asset's ID, which cannot be changed and ensures the external structure is stable and free from accidental duplication. This means that it is not possible for the same image to occur in multiple folders in the external structure (unless multiple configurations are used).
The RPT is used in conjunction with the ImagesFolder property in the assetpush.properties file to tell the system where to place the extracted assets. Specifically, the RPT dictates a path, file name, and appropriate file name extension, with the intent that all the images pushed into the structure have a unique path and/or file name. The RPT is typically populated with a series of predefined STEP macros and also allows users to control whether the assets will be pushed to a flat file structure or a folder hierarchy structure. In this field, some predefined STEP 'macros' may be used.
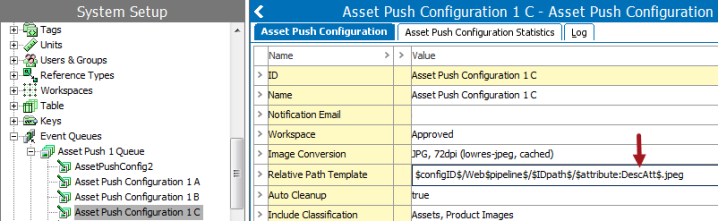
Note: RPT takes effect after the path specified in the ImagesFolder property of the assetpush.properties file: [ImagesFolder value]/[Relative Path Template]
The RPT can be constructed using a series of macros for dynamic creation, as well as any static text that is required. Static text can be applied in many ways, including file extensions, folder names, or anything that designates a static folder into which assets and / or child folders should be placed. The system will automatically create all folder structures dictated by the RPT on the local file system, with each slash (/) creating a new directory level.
Important: Care should be taken to ensure that the RPT is constructed in such a way that: file paths do not exceed the length limits of the target system; only legal characters for the target system are incorporated (illegal characters will be automatically replaced by an underscore); and each asset is assigned a unique file name within the target folder.
Many of the macros are optional. The one macro that really is mandatory is the '$assetID$' (or '$assetName$') macro. Without this, all images would be converted to the exact same file name, which is hardly practical.
If assets have been declared as dimension dependent, then it is mandatory to include either the '$contentdimensionpointsID$' or the '$contentdimensionpointsName$' macro in the RPT. The system will not save your RPT entry if you exclude this.
The following is a list of relevant macros:
|
Macro |
Notes |
|---|---|
|
$configID$ |
STEP ID of the asset push configuration. Often used as a parental folder level for the RPT. |
|
$contentdimensionpointsID$ / $contentdimensionpointsNAME$ |
STEP ID / Name of the dimension point of the asset. ID macro should be used whenever possible in place of Name. Required to use a dimension macro if any assets are dimension dependent. System will not save the RPT entry if a dimension macro is not specified and the system includes dimension dependent assets. |
|
$IDpath$ |
Tells the system to autogenerate external file folders using the ID of the asset. Use when a folder structure for assets is needed. Excluding this will result in a flat file structure being created on the local file system (all assets placed within the same folder). It is also possible to use $IDpath3$, $IDpath4$, or $IDpath5$ to specify how many characters to use to create the external file folders. For example, if an asset has an ID of 0123456789, then:
The use of more characters reduces the number of possible asset entries in each folder. Higher numbers recommended if large numbers of assets are being pushed as the user should aim to have fewer than 1,000 assets per folder to allow for navigability on the file structure. |
|
$assetID$ / $assetNAME$ |
STEP ID / Name of the asset being pushed. It is required that one of these or the attribute:key macro be used to define the file name, otherwise all assets will be pushed with the same file name. ID must be used if any of the assets being pushed are dimension dependent (NAME cannot be used in this case). Recommended practice is to use ID (rather than NAME) whenever possible. Note that STEPXML only includes asset ID in the product references section so communication of product to asset relationships to downstream systems will require an additional section and/or feed to map asset Names and IDs if the NAME macro is utilized. Also note that if any asset types are declared dimension dependent (i.e., the asset’s Name is dimension dependent) then the user cannot use the $assetNAME$ macro for file names, $assetID$ must be used instead. |
|
$attribute:key$ |
Extracts values from any Description attribute on an asset so that they can be used as the asset file name. When the asset is pushed, the value of the attribute specified by the key replaces the macro configuration in the file name. Note that this macro can also be used as part of the relative path rather than as the file name, but the intended use is for file name. Refer to the section Configure $attribute:key$ Macro section for setup instructions. Dimension dependent Attributes are not available for use as path keys. This is checked when the attribute dimension is changed for an attribute and when a new asset push template is created. A change in value on the attribute bound to the path key will cause the asset to be re-pushed. If the asset push configuration is set to publish from the Main workspace, any changes made to the relevant attribute value will prompt an asset push. Likewise, if the configuration is set to publish from the Approved workspace, the asset push will trigger when the value change is reflected in the Approved workspace. Changes made to externally maintained attributes will prompt an asset push from either workspace. Note that if 'Auto Cleanup' is set to 'true' in the asset push configuration, the previous version of the updated asset will be deleted. |
|
$autodetected-extension$ |
Detects the type of file generated by the conversion and applies the appropriate extension. Used only when intelligent conversion is used, whether via asset metadata or a custom conversion, as intelligent conversions may produce different types of output files. Standard conversions produce only one file type per conversion, so static text or the $extension$ macro should be used, and are the preferred methods for applying the file extension. When using this, be sure to insert a text entry of “.” before the $autodetected-extension$ macro so that the file name will have the usual period between the name and its extension (e.g., xxx.$autodetected-extension$). |
|
$extension$ |
Applies the file type extension specified by the conversion. If the configuration does not include conversion, assets are passed through and assigned the same extension they had within STEP. When using this, be sure to insert a text entry of “.” before the $extension$ macro so that the file name will have the usual period between the name and its extension (e.g., xxx.$extension$). Either this macro or static text should be used to generate the extension for all standard (non-intelligent) conversions. |
|
$workspaceID$ / $workspaceNAME$ |
STEP ID / NAME of the workspace which the assets are being pushed from (e.g., Main or Approved). ID macro should be used whenever possible in place of Name. Typically used only if the system has multiple configurations with at least one pushing assets from each workspace. |
|
$conversion$ |
Specifies the type of image conversion in the file path. This macro is not frequently used, but can be useful if it is required to keep different versions of the same asset separated by conversion type. Example ($conversion$ is bolded): AssetPushConfig1/plain-thumbnail/23/45/12345.jpg |
Important Macros
Most frequently used macros
- $configID$
- $contentdimensionpointsID$
- $contentdimensionpointsNAME$
- $IDpath$
- $assetID$
- $extension$
Additional useful macros
- $IDpath3$
- $IDpath4$
- $IDpath5$
- $assetNAME$
Relative Path Template Example
- ID of asset push configuration=AssetPushConfig1
- ImagesFolder property in assetpush.properties file set to ‘images’
- RPT in configuration set to ‘$configID$/$IDpath$/$assetID$.jpg’
- Assumes conversion is used with resulting file type of JPG
- Two assets are pushed, with STEP IDs of ‘12345.gif’ and ‘67890.png’
- The resulting Relative Paths in the asset status tab should read:
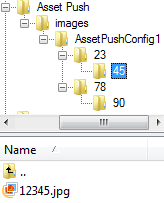
- AssetPushConfig1/23/45/12345.jpg

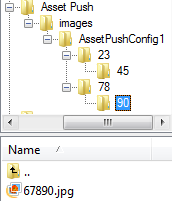
- AssetPushConfig1/78/90/67890.jpg

- Once on an external server, they resemble the below images:
For an example using a calculated attribute and attribute macro key within a Relative Path Template, refer to the Asset Push File Name Scenario topic.
Configure $attribute:key$ Macro
Before the $attribute:key$ macro can be used the applicable attributes must be configured in System Settings.
- In System Setup, click on the Users & Groups node and navigate to the 'Asset push attribute macro keys' section under the System Settings tab.
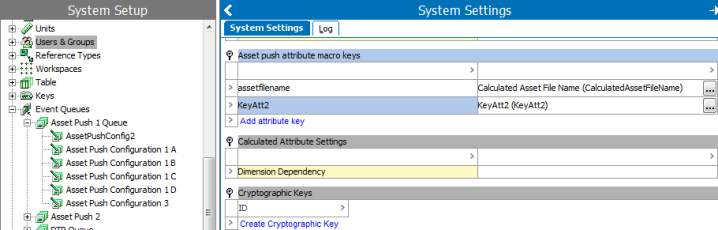
- Click Add attribute key.
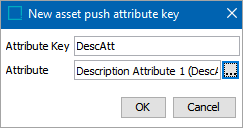
- In the pop up window, enter a name for the Attribute Key. This name can differ from the selected attribute, and is used in place of 'key' in the macro. Click the ellipsis button (
 ) and select the desired attribute from the list.
Note: On the System Settings screen, the Attribute Key appears in the first column and the attribute's STEP name appears in the second column.
- Return to the desired asset push configuration and enter the desired Attribute Key.
Additional Information
If the user does not have dimension dependent images, there is no need to use either of the $contentdimensionpoint macros (ID or NAME) in the RTP.
Even if the names of the images have not been set to dimension dependent, use the macro $assetID$ in favor of $assetName$.
Use one of the $IDpath macros when it is necessary to have a folder structure for the assets.
- Do not use this macro if it is not needed. It is normal to have an $IDpath macro for high-resolution images, but for low-resolution web images, you may not need to use a folder structure.
File name extensions — For DTP applications, where there is no image conversion at all, use the macro $extension$.
- Do not use the $autodetected.extension$ macro if it is not needed. It should only be a very rare occurrence when you do need it.
- For web images, use the actual filename extension that the conversion is creating. If your conversion is creating jpg images, just put .jpg in the RPT.
- Do not bother to use a macro for the extension. Same if the conversion is creating a gif or png file – just type that extension directly in to the RPT.
Specify a Classification Folder to be monitored for assets. Leaving this entry blank forces the system to monitor and review all classification folders.
Also, specify the MIME types that you want the conversion to work on. Otherwise, the conversion will attempt to convert assets such .exe files, .wav files, xls files etc.
With print items, to avoid using the approved workspace for images, do not set up a configuration for it (e.g., raw-approved). However, ensure that in the sharedconfig.properties file that the system pulls from raw-main even when in the Approved workspace.