After configuring an outbound integration endpoint (OIEP), it must be enabled before it can run on schedule or be invoked manually.
The following colored icons are used to indicate the status of the integration endpoint. The endpoint status is displayed in the System Setup OIEP hierarchy and on the endpoint editor in the Description section on the Endpoint Status parameter.
| Icon | Endpoint Status | Description |
|---|---|---|
|
|
Enabled |
The integration endpoint is active, connected, and running. |
|
|
Disabled |
The integration endpoint has stopped, and no data is being exported. Newly created endpoints, and endpoints that have been manually disabled, will have this status. |
|
|
Failed (retrying) |
The OIEP is running and is attempting to recover from a connection error. After retrying in the original background process (BGP) for approximately one minute without success, the wait time begins, and the process goes into a Waiting state before the next attempt to retry processing. When the wait time expires, the BGP state changes to running and the connection is reattempted. |
|
|
Failed |
An error occurred during processing that caused the integration endpoint background process to fail. No data will be exported until the endpoint has been manually resumed / reactivated. For more information, refer to Handling Failed OIEP Background Processes. |


Enable and Invoke an Outbound Integration Endpoint
Both event-based and select objects OIEPs must be enabled and invoked before they can run. Additionally, event-based OIEP must have the proper setting for queue status.
For example, if the external system is down and cannot accept data, you can enable the endpoint but do not schedule or invoke the endpoint until the external system is ready to consume the data. In this way, events are collected from STEP and data is then pushed to the external system when it is available.
Prerequisites for Event-Based OIEPs
For an event-based OIEP, verify the Queue Status is set to Read Events or Discard Events, as appropriate. For information about how the Endpoint Status and Queue Status settings work together on event-based endpoints, refer to the Event-Based OIEP Status and Queue Status topic.
For information about setting up an event processor, refer to the Event Processors topic in the System Setup documentation.
Required Setup for All OIEPs
-
On System Setup expand the Outbound Integrations Endpoints node to display all existing OIEPs.
-
Select a disabled endpoint (
 ) or a failed endpoint (
 ), right-click, and select Enable Integration Endpoint from the menu.
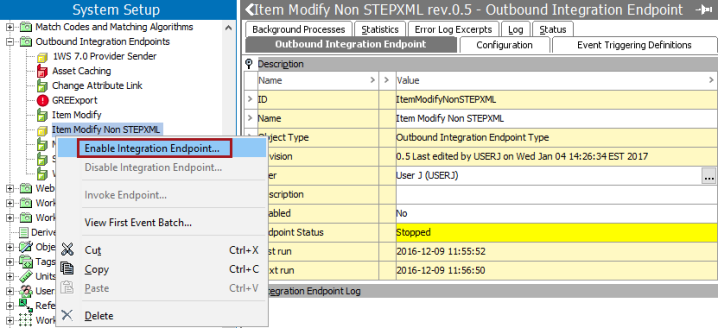
The tree navigator icon now shows
 enabled. On the Outbound Integration Endpoint tab, the Description section includes the 'Enabled' parameter, which now displays 'Yes.'
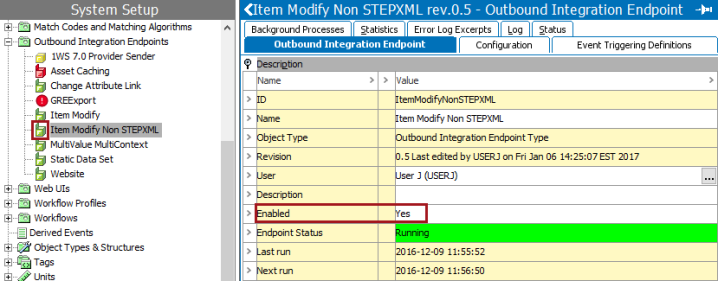
-
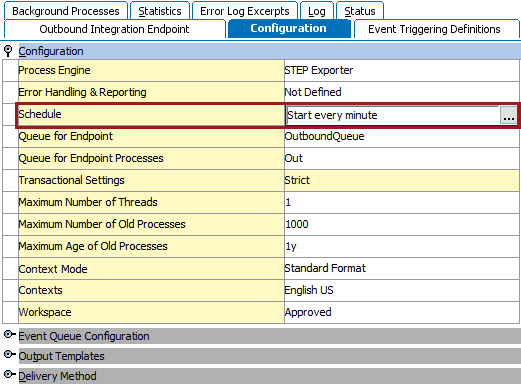
On the Configuration tab, open the Configuration section to view the Schedule parameter.
-
If scheduled, the Schedule parameter shows when the OIEP will be invoked automatically.
-
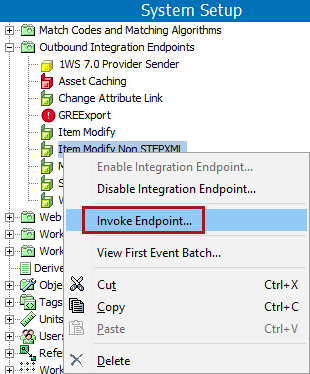
If 'Not scheduled', or if the OIEP needs to be invoked manually. Right-click the enabled OIEP and click Invoke Endpoint.
-
-
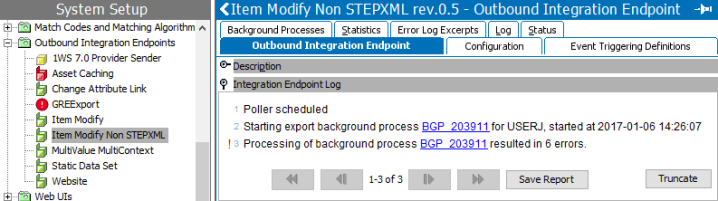
When invoked on schedule and manually, files or messages ready for export as identified by the OIEP configuration are processed. The Outbound Integration Endpoint tab Integration Endpoint Log section displays the time the endpoint was invoked. For scheduled OIEPs, the log includes a link to the background process that was started. For more information, refer to the Maintaining an Outbound Integration Endpoint topic.
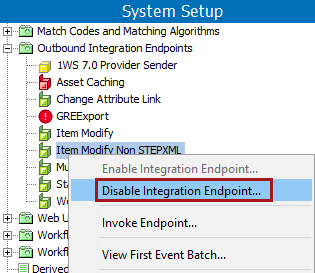
Disable an Outbound Integration Endpoint
When an OIEP is displaying the enabled icon () should be stopped from processing data, you can disable it. The configuration remains unchanged, and no further data is processed. After selecting the OIEP, right-click and select Disable Integration Endpoint to set the OIEP to disabled and display the disabled icon ().
For example, disable an endpoint when running a data refresh activity on the system and the objects should not be published. Disabling an endpoint does not alter the configuration.
Once disabled, the OIEP can be restarted using the Enable and Invoke an Outbound Integration Endpoint section above. If collecting changes for future processing by the OIEP is no longer necessary, then also change the Queue Status to Discard Events to prevent excessive events from accumulating.
Additional information about restarting a failed endpoint, indicated by the failed icon (), can be found in the Handling Failed OIEP Background Processes topic.
Important: When changing the schedule of an IEP, it is recommended to disable the IEP, update the schedule, and then re-enable the IEP to ensure the schedule change is correctly applied. Otherwise, the schedule change might cause the IEP to initially run at an incorrect time. For example, if an IEP is originally scheduled to run daily at 6 p.m. and the schedule is changed to 7 p.m., the next execution might still occur at 6 p.m. At this time, the schedule is updated on the BGP, resulting in another run at 7 p.m., as the updated schedule is applied when the IEP is either manually or automatically invoked, or when it is restarted.