In an effort to prevent users from creating duplicate objects in the STEP system, users can use the Find Similar Action to identify similar objects prior to initiating new ones when working in Initiate Item screens in Web UI. Also, users can use Find Similar functionality to search for and identify similar objects prior to adding references and creating target objects within a Multi-Reference Editor. Using Find Similar allows users to search for potential duplicates on a more granular level.
The key to Find Similar functionality is the matching setup that the customer creates and uses for duplicate handling. Every time a user enters data into the search fields and clicks OK, the Find Similar search checks the match code values involved, executes the relevant matching algorithm, and provides a set of results, if any are found. If a user is not getting the results set they expect, then the first place to check is the algorithm configured in the Duplicate Handler parameter in the Add Reference Action Properties. Two bind types work with the Find Similar functionality. They are: First Match Object and Second Match Object. A relevant Match Code and Matching Algorithm needs to be set up before attempting to use the Find Similar Search tab. For more information about setting up and using matching algorithms, refer to the Configuring Matching Algorithms topic in the Matching, Linking, and Merging documentation.
Prerequisites
All the steps provided in this topic assume the Web UI designer is in design mode and on the applicable Properties screen prior to starting the configuration process. It is also assumed that all users (designers and end users) have the proper privilege to work with these features. For more information about privileges and user setup, refer to the Users and Groups topic and Adding User Privileges for a Group topic of the System Setup documentation.
Configuring Find Similar on an Initiate Item Screen
- Create a new Initiate Item screen or use an existing one.
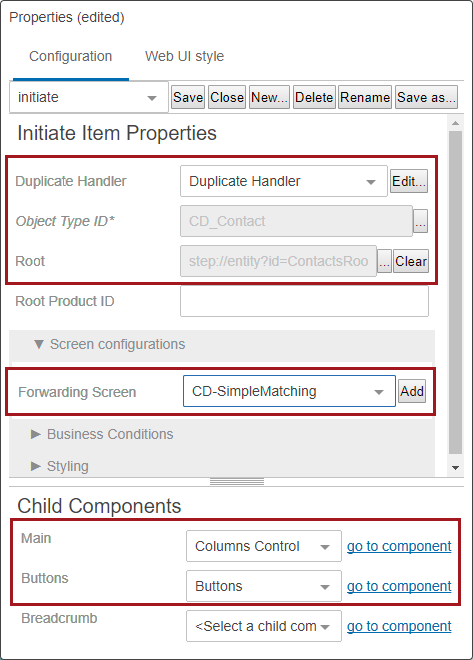
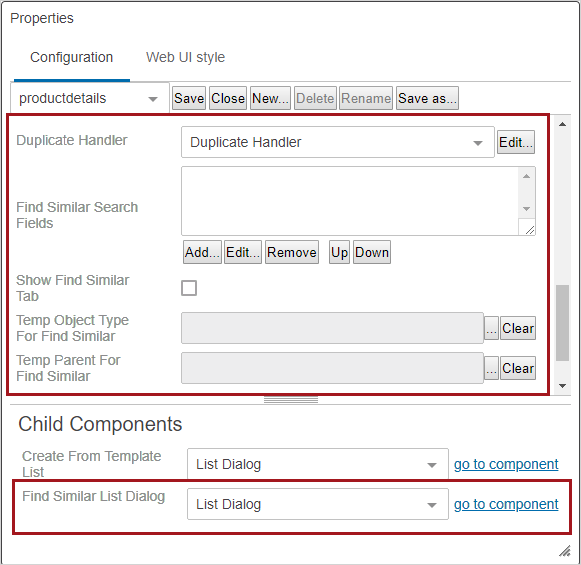
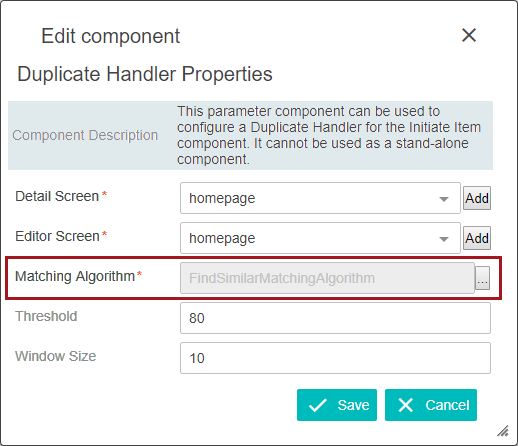
- In Initiate Item Properties, select Duplicate Handler in the dropdown for the Duplicate Handler parameter.
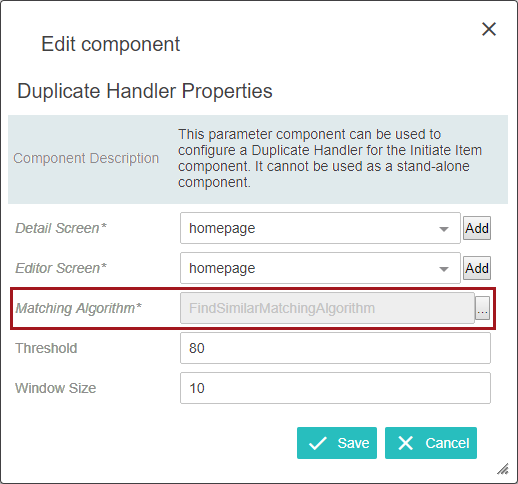
- The Duplicate Handler Properties screen will display. The only required setting is the Matching Algorithm parameter. Click the ellipsis button (
 ) to the right of the value field and select a matching algorithm. Click Save.
- Click the ellipsis button () to the right of the Object Type ID parameter to select the object type of the objects that will be initiated in to STEP.
- Click the ellipsis button () to select a Root. New items will be created below the designated root.
- Make a Forwarding Screen selection. This is the screen that will be shown once an object is created. (Using the example setup portrayed in the screenshots, when you click on a CD_Contact object in the Web UI Tree, you are taken to the CD-SimpleMatching screen. So, if you are creating a new CD_Contact object using the Initiate Screen, after saving the object, you want to go to the CD-SimpleMatching screen to view that object.)
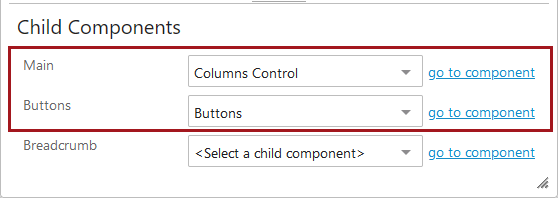
- For Child Components > Main, choose Columns Control from the dropdown. Then click on go to component and select Node Editor in the Child Components > Columns of the Columns Control Properties.
- Within the Node Editor Properties, the search attributes need to be configured within the Child Components > Rows value field using the Add, Remove, Up and Down buttons. These search attributes are for searching direct objects.
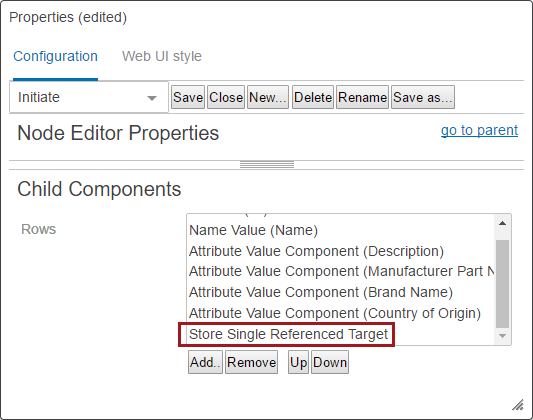
- Add the Store Single Referenced Target component if end users will be searching on referenced objects in addition to direct objects (refer to example above).
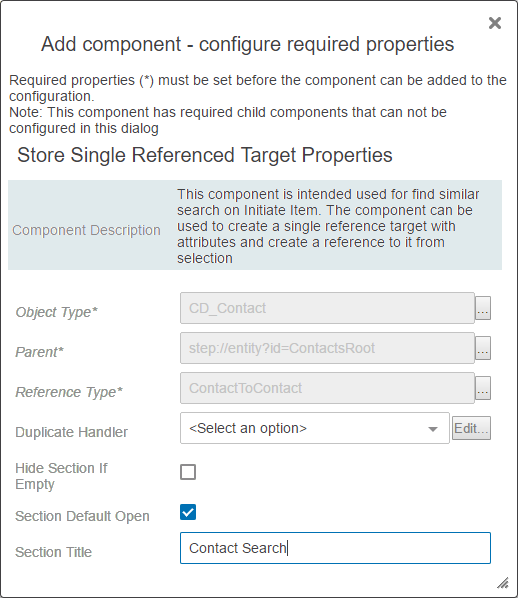
- Double click on Store Single Referenced Target to configure the component. Object Type, Parent, Reference Type, and Child Component > Rows (not shown) are required parameters / components. Go through each parameter one-by-one to complete the configuration.
- Back on the Initiate Item Properties screen, go to Child Component > Buttons and click on 'go to component.' In the Actions value field, click Add and select Find Similar Action.
- Double click on the Find Similar Action title and open the Find Similar Action Properties.
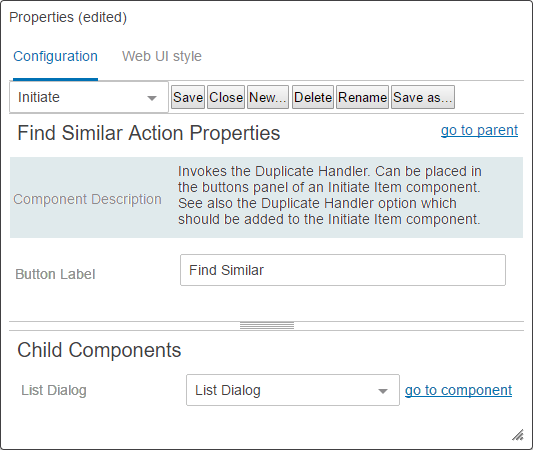
- Edit the Button Label, if desired. Under Child Components > List Dialog, select List Dialog from the dropdown menu.
- On List Dialog Properties, select a Dialog List Screen. If a Dialog List Screen does not exist, follow the next two steps to create one.
- Click Add to the right of the Dialog List Screen value field.
- Create a new screen by selecting Dialog List Screen from the list of available screen types / components. Enter an easily identifiable Screen ID, click Add. The screen ID will automatically populate in the Dialog List Screen value field.
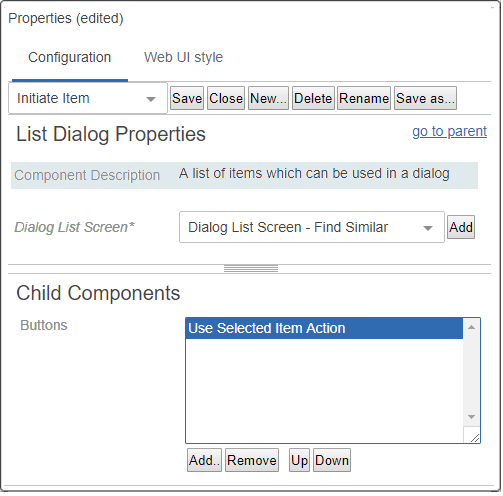
- Also on the List Dialog Properties screen, in the Child Components > Buttons field, click Add and select Use Selected Item Action. Click Add, and then click Save in the designer window.
- Before exiting design mode, select the Dialog List Screen ID of the screen you just created from the dropdown menu. In the example above, the screen ID is Dialog List Screen - Find Similar.
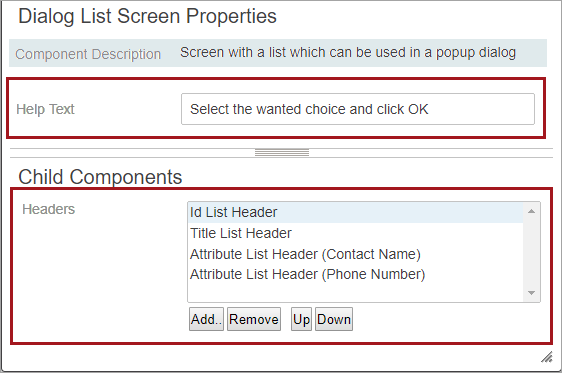
- Configure the Child Components > Headers section of the Dialog List Screen Properties. Click Add under the value field to set up the attributes that will display in the Find Similar Search tab for the results list. The Help Text is editable and will display at the top of the results list.
- Click Save and Close design mode to return to normal Web UI mode.
Using Find Similar on an Initiate Item Screen
This is a very basic example of how Find Similar is used on an Initiate Item screen.
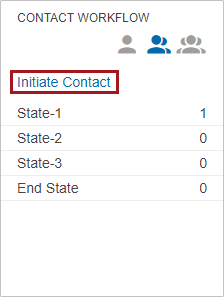
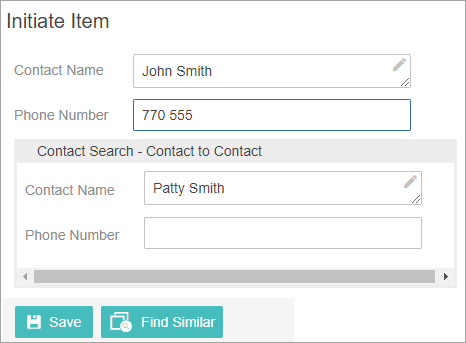
The end user begins the object (Contact) initiation process by clicking Initiate Contact on the Status Selector Homepage Widget. On the Initiate Screen, the user enters data into the direct object search fields and also into the referenced object search fields and then clicks the Find Similar button.
The algorithm runs in the background and the configured Dialog List Screen displays. Remember that this is not a standard search and results are based on the matching algorithm running in the background.
Important: As stated at the beginning of this topic, the key to Find Similar functionality is the matching setup that the customer creates and uses for duplicate handling. This is important because the attributes being searched must be part of the list of attributes that Match Codes are generated for. If not, the search will not work as expected.
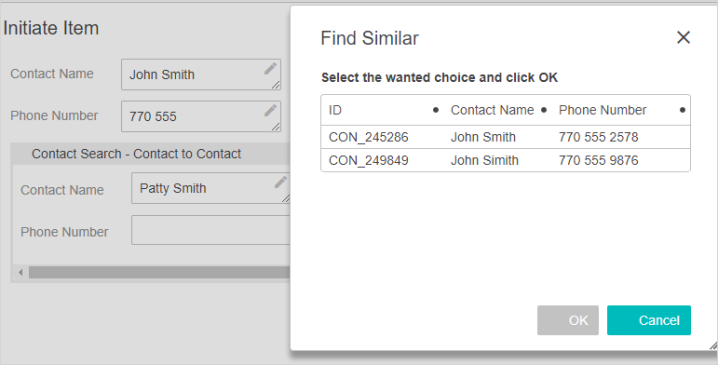
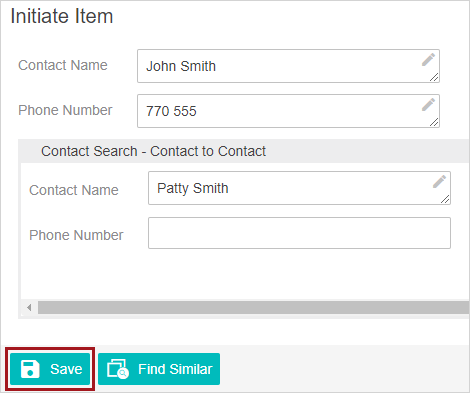
A maximum of fifty (50) objects are shown at one time on the results list. The user can select one of the objects shown in the results list. Once a selection is made, the OK button is engaged. Clicking OK takes the user directly to that object via the appropriate Web UI screens. If the user wants to create a new object with the search data entered, the user clicks Cancel to exit the results list. Back on the Initiate Screen, the user will click Save and be taken directly to the new object. The data entered into the attribute value fields (configured in the Store Single ReferencedTarget Properties) is also used to create the referenced object and the reference between these objects is also created.

If applicable, the new object will automatically be initiated into a workflow or workflows based on existing workflow rules. For more information about workflows and auto-initiation, refer to the Auto-Initiation of Tasks in Workflows topic in the Workflows documentation. It is advisable to also make use of standard STEP tools like business rules and workflows to manage the referenced objects that are created in this manner.
Configuring Find Similar on an Add Reference Action
This setup information is also available in the Add Reference Action topic.
- Edit the properties for an existing Add Reference Action configured for a Multi-Reference Editor, or add an Add Reference Action and complete the configuration.
- In the Add Reference Action Properties, select Duplicate Handler in the dropdown for the Duplicate Handler parameter.
- The Duplicate Handler Properties screen will display. The only required setting is the Matching Algorithm parameter. Click the ellipsis button () to the right of the value field and select a matching algorithm. Click Save.
- Back on Add Reference Action Properties, click Add under the Find Similar Search Fields value box. Add, remove, and re-order Attribute and Referenced Attributes as desired. Remember that these search fields will need to be incorporated into the matching algorithm configured in the Duplicate Handler parameter.
- It is important to fill in the Label fields during the Find Similar Search Fields configuration. These labels will appear on the Find Similar Search tab. If adding a Find Similar Search Referenced Attribute, fill in the Attribute, Label, Object Type, and Reference Type values. Save all changes.
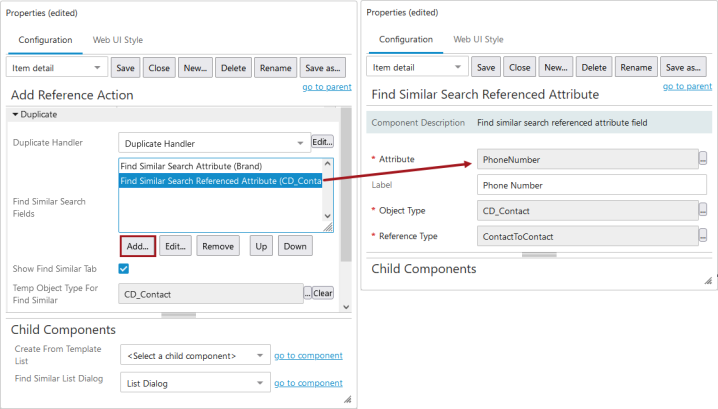
- Enable the Show Find Similar Tab setting back on the Add Reference Action Properties.
- Click the ellipsis button () to make a selection for the Temp Object Type For Find Similar parameter and the Temp Parent For Find Similar parameter. (When the matching algorithm is run, it creates temporary objects based on the input in the search fields. These objects are then used in the algorithm to compare and find similar objects. The temporary objects need a parent and object type to be created. After the user finishes the operation, the temporary objects are deleted by the system. These parameters have to be configured for the functionality to work. The object types of both the direct objects and the referenced objects need to be made valid under the location used for the Temp Parent For Find Similar parameter.)
Important: The node selected for Temp Parent For Find Similar in the configuration, must also be included in the category specified in the match code definition, if a category is specified. If this is not done, the match codes will not generate properly and the match results will be incorrect.
- Under Child Components > Find Similar List Dialog, select List Dialog from the dropdown menu.
- On List Dialog Properties, click Add to the right of the Dialog List Screen value field.
- Create a new screen by selecting Dialog List Screen from the list of available screen types / components. Enter an easily identifiable Screen ID, click Add. The screen ID will automatically populate in the Dialog List Screen value field.
- If a Dialog List Screen already exists, skip the previous two steps and on the List Dialog Properties, select the Dialog List Screen using the dropdown.
- Also on the List Dialog Properties screen, in the Child Components > Buttons field, click Add and select Use Selected Item Action. Click Add, and then click Save in the designer window.
- Before exiting design mode, select the Dialog List Screen ID of the screen you just created from the dropdown menu. In the example above, the screen ID is Dialog List Screen for Contacts.
- Configure the Child Components > Headers section of the Dialog List Screen Properties. Click Add under the value field to set up the attributes that will display in the Find Similar Search tab for the results list. The Help Text is editable and will display at the top of the results list.
- Click Save and Close design mode to return to normal Web UI mode.
Using Find Similar on an Add Reference Action
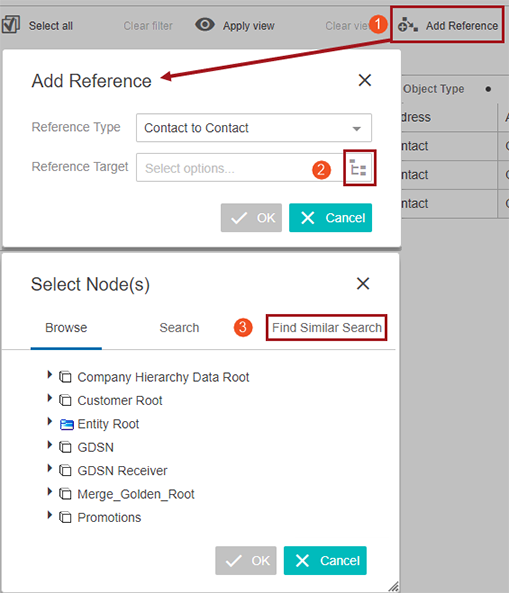
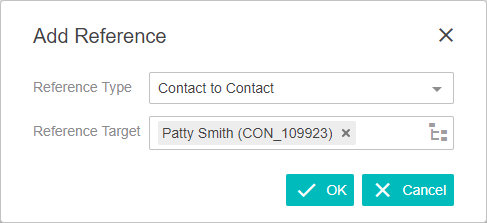
This is an example of a configured Find Similar Search tab. While using a Multi-Reference Editor component, the end user clicked 'Add reference' and then clicked the node picker icon on the 'Add reference' dialog that appeared. The Find Similar Search tab is displayed in the 'Select Node(s)' dialog. The end user enters data into the configured attribute fields and clicks OK. The algorithm runs in the background and the configured Dialog List Screen displays. Remember that this is not a standard search and results are based on the matching algorithm running in the background.
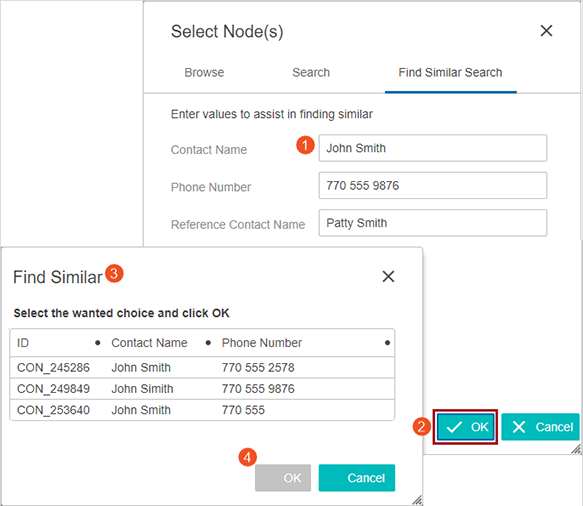
Important: As stated previously in this topic, the key to Find Similar functionality is the matching setup that the customer creates and uses for duplicate handling. This is important because the attributes being searched must be part of the list of attributes that Match Codes are generated for. If not, the search will not work as expected.
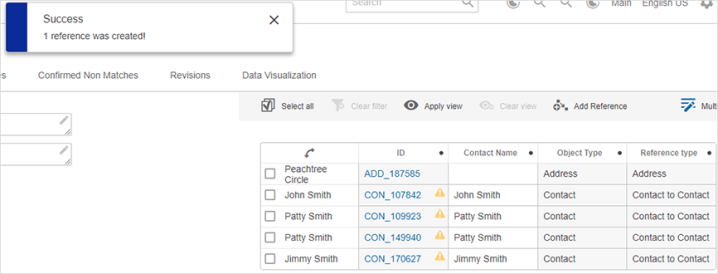
A maximum of fifty (50) objects are shown at one time on the results list. If the end user finds a reference on the results list that they want to use, they click in the row they want. When that selection is made, the OK button will be available. The end users clicks OK and now that reference is saved. If the user does not find a result to use, they can click cancel and create a new reference using the Create or Create from Template functions (both described previously in this topic).
Note: Find Similar functionality is also available when working with company data hierarchies via the Hierarchy Representations component (found in Main (Screen) Properties). For more information on the setup, which is similar to Add Reference, refer to the Optional Configurations for the Hierarchy Representation Component topic.