A matching algorithm allows a user to define:
- The match criteria, which is what qualifies objects as duplicates.
- The match action, which is what the system should do with such duplicates.
Matching algorithms are used in Match and Merge and Match and Link solutions.
Tools available for tuning and monitoring the results of the matching algorithm are defined in the topic Match Tuning.
Note: A matching algorithm definition can be exported as comments and submitted to an external source control system for comparison purposes. For details, refer to the Configuration Management documentation.
Create a Matching Algorithm
Use the following steps to create a matching algorithm:
-
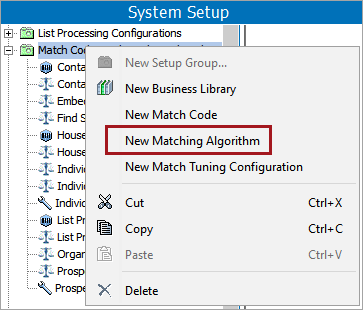
In System Setup, right-click the node configured to house matching algorithms and select New Matching Algorithm.
-
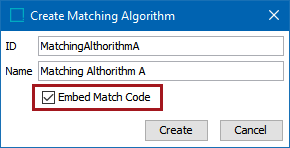
In the Create Matching Algorithm dialog, define an ID and Name for the matching algorithm.
-
Check the Embed Match Codes checkbox so the match codes are embedded in the algorithm. This is the recommended method.
-
If the Embed Match Codes checkbox is not checked (legacy functionality), you must manually create a match code and link it to the matching algorithm. For more information, refer to the topic Match Codes.
-
-
Click Create to display the Matching Algorithm object.
Initially, the Configuration Validation Status flipper shows a red exclamation mark. That indicator changes as the required elements are provided and configured correctly.
Configure a Matching Algorithm
Use the following steps to configure a matching algorithm:
-
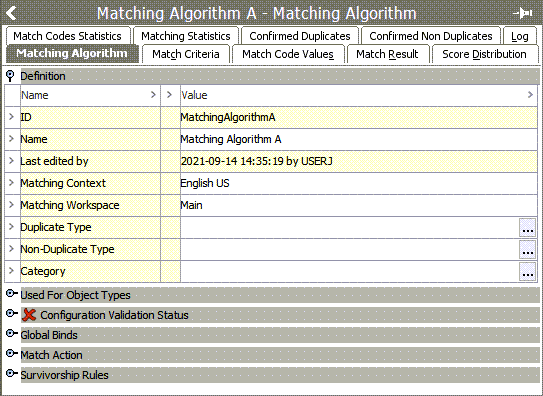
Open the matching algorithm and on the Matching Algorithm tab, in the Definition flipper:
-
For the Matching Context parameter, specify the context to run the matching algorithm. By default, the current context is set.
-
For the Matching Workspace parameter, specify the workspace to run the matching algorithm. By default, the Main workspace is selected.
-
For the Duplicate Type parameter, click the ellipsis button (
 ). In the 'Select a Duplicate Reference Type' dialog, select the appropriate reference type as defined in the component model. For more information, refer to the topic Configuring Matching Component Model.
 Note: The Duplicate Reference Types must be multivalued, None inheritance, no dimension dependencies, and not externally maintained.
-
For the Non-Duplicate Type parameter, click the ellipsis button (
). In the 'Select a Duplicate Reference Type' dialog, select the appropriate reference type as defined in the component model. For more information, refer to the topic Configuring Matching Component Model. Note: The Non-Duplicate Reference Types must be multivalued, None inheritance, no dimension dependencies, and not externally maintained. In Match and Link solutions, a valid 'Confirmed Justification Attribute' can be made valid on the reference type.
-
For the Category parameter, click the ellipsis button (
). In the 'Select Category' dialog that displays, select a parent node the matching algorithm will function under. If selected, the matching algorithm will only work under that node.Important: The match code category uses the default parent ID of the IIEP and/or matching algorithm. It does not depend on the parent ID of the individual entities in the incoming request / IIEP file. If the incoming record parent ID attempts to store the entity outside the match code category, STEP reports an error and adds the source record to the error file.
-
-
In the Used for Object Types flipper, click the Add Object Type link and select the object types to be considered by this algorithm.
-
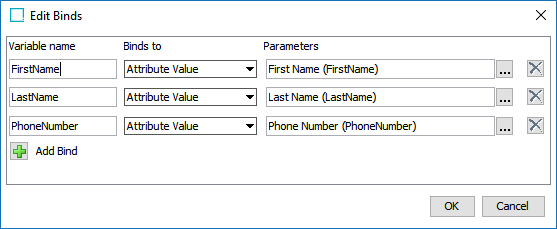
In the Global Binds flipper, while the Legacy Global Binds functionality can potentially improve the performance, the Match Criteria Data Elements functionality is preferred.
-
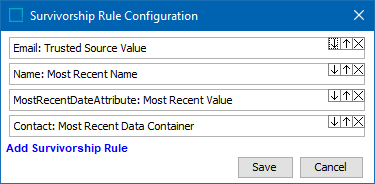
In the Survivorship Rules flipper, configure as defined in the topic Configuring Survivorship Rules.
-
On the Match Criteria tab, configure the elements as defined in the topic Match Criteria.
-
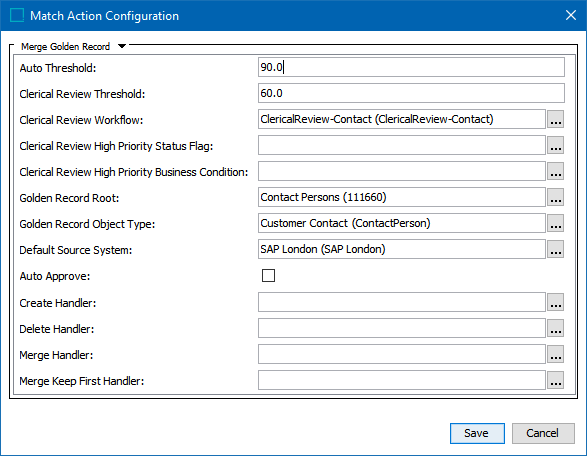
Return to the Matching Algorithm tab, and in the Match Action flipper, set up the match action as defined in the topic Match Actions.
-
On the Matching Algorithm tab, verify your matching algorithm configuration status and take any necessary action.
-
A red exclamation mark displays when the configuration is invalid. Open the flipper to view the errors that must be addressed. Correct any errors shown before running the matching algorithm.

-
A yellow checkmark indicates warnings that should be addressed.

-
A green checkmark indicates the matching algorithm has a valid configuration.

-
Delete a Matching Algorithm
To delete a matching algorithm, follow the below steps:
-
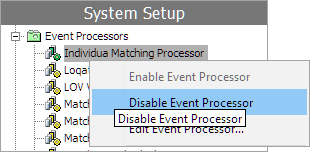
In System Setup, navigate to the event processor tied to the matching algorithm. Right-click on the event processor and select 'Disable Event Processor.'
-
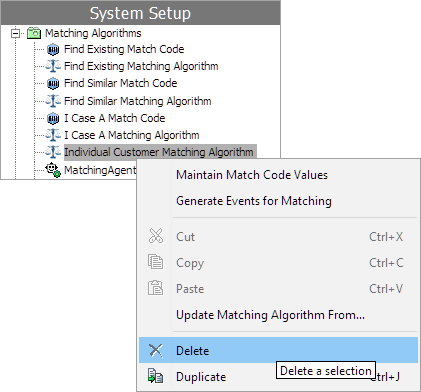
Navigate to the matching algorithm you wish to delete. Right-click on the algorithm and select 'Delete.'
Note: If you attempt to delete a matching algorithm with existing tasks in a workflow, an error appears stating, 'Cannot delete match algorithm with existing workflow tasks.' If you receive this error, finish your workflow tasks and try again. If your Task List contains more tasks than can be completed manually, use a bulk update to remove all items from the workflow, as defined in the topic Remove Objects from Workflows in the Workflows documentation.