This topic provides a detailed description of how to go into a STEP-exported Excel or XML translation file and add the translated values directly to the file. The files referenced in this documentation are generated through the structured translation process (Excel or XML), or the Manual Excel Translation Export (Excel). This process is different from manual translation in that the work is being done to an exported file rather than directly in STEP. To review the steps required to generate a translation export file through the structured translation process, refer to the Starting a Structured Translation topic.
When the translation export has been generated (through either the structured translations process or the Manual Excel Translation Export), the background process will stop at 50 percent complete.
![]()
The Progress bar showing at 50 percent means the export portion of the translation task is complete, but the translation task itself is paused until the updated file, with all of the translated values added, is imported. The export generates a zip file that contains the data, in either an Excel or XML format, to be translated. Typically, this file is sent on to a translation vendor that does the translation work. In some instances, particularly when there are very few objects that require translation, it may make sense to translate directly within the exported file rather than sending it to a third party.
At the bottom of the background process is a row called Exported translation files. To the right of that is a disk icon ( ). Clicking the icon will allow the user to access the export file.
Translating in an Excel File
The Excel file features a color-coded cell format that quickly alerts the user to each element's status. Below is a sample of what a user might find in an exported Excel file:
There are only four cell-shading colors a user may encounter in an Excel export file:
The only cells where the user should take action are those that are color-coded green.
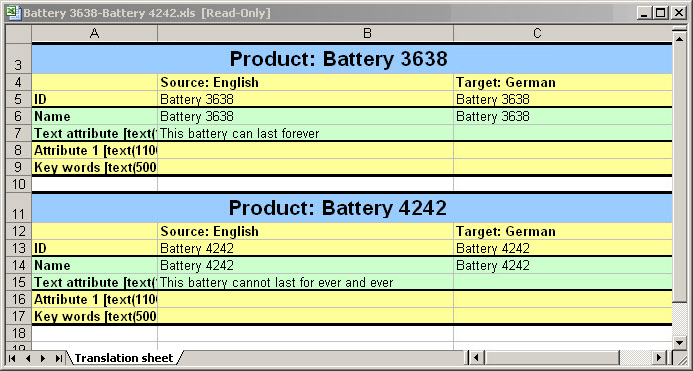
To translate directly in the Excel export file, click into the green-colored cell in the target language column, and insert the translated value of the corresponding value appearing in the source language column. Below is an example of how this will look when completed for one product and one target language:
![]()
When translated values have been added for all of the blank green-colored cells in the target language columns, the user should save the file, remembering to retain the Excel file extension. The file name can be whatever the user prefers; STEP keys on the ID information inside the Excel, so the file name has no impact on the translation process. The file is now ready to be imported.
For more information on importing Excel translation files, consult the Importing Translation Excel Files topic.
Translating in an XML File
If the user has elected to export an XML file through the structured translation process, the zip file is accessible via the disk icon () at the bottom of the background process.
The zipped XML translation export file contains the files in the following table.
| File | Description |
|---|---|
|
preview.css |
Contains style preview information. |
|
preview.xsl |
Contains style sheet information for displaying translatable content. |
|
preview.tags |
Contains tag information. |
|
translation.xml |
Contains data to be translated. You can translate directly in the XML file. All fields that can be translated are tagged <TranslatableText>. |
Note: Since viewing preview files is not supported in Google Chrome and Firefox (a blank page is displayed), this feature is automatically disabled. To enable the automatic generation of these preview files, contact Stibo Systems.
The file where the manual translation work will be done is in the translation.xml file.
To translate directly in the XML export file, the user replaces the source language content that appears between the <TranslatableText> tags in the XML file. In the screenshot below, you will find yellow-highlighted text appearing between two red-boxed <TranslatableText> tags. The text highlighted in yellow is what the user would replace with the translated value.
![]()
When translated values have replaced all relevant content tagged with <TranslatableText>, the user should save the file, remembering to retain the XML file extension. As with the Excel file, the file name can be whatever the user prefers; STEP keys on the ID information inside the XML, so the file name has no impact on the translation process. The file is now ready to be imported.
For more information on importing XML translation files, consult the Importing Translation XML Files topic.