In support situations it is often relevant to be able to review exactly what the user experiencing the issue is observing, including data and error messages. Web UI user impersonation enables a privileged user to act as another user, but using their own password so that the impersonated user's password is not revealed. When impersonating someone, all privileges, views, and access are exactly matched to the user being impersonated.
Specific privileges have been created to support impersonation:
- Setup action Maintain Impersonation indicates that the user may maintain the impersonation privileges of others. Users with maintain impersonation privileges can assign the Impersonate User privilege to other groups, including specifying the target group that can be impersonated.
- User action Impersonate User enables any user with this privilege assigned to be able to impersonate the selected user group identified in the privilege setup.
Once those actions are set up in an action set, they can be applied to designated user groups. Refer to the Action Sets section of the System Setup documentation for setting up and maintaining action sets here.
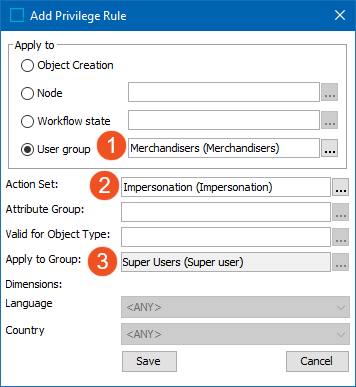
In System Setup, go to Users & Groups and click on the group that can impersonate. On the Privilege Rules tab in the editor, click 'Add Privilege" under User Privileges and fill in the dialog as follows. Refer to the Privilege Rules topic in the System Setup documentation for additional information here.
- Target (group being impersonated)
- Action set with Impersonate User privilege
- Source (group that can impersonate)
Note: Impersonation can only be used in Web UI.
Any user with the Impersonate User privilege can impersonate any user in the target user group for which the privilege is configured. Impersonate functionality is added to the Web UI via the following components:
- Select User To Impersonate is an option within the Global Navigation Panel > User Settings
- Impersonate User Widget can be inserted in the Homepage
The impersonation components are only visible if the user is a member of a user group with impersonation rights for another group. For demonstration of the first two methods, refer to the User Impersonation topic in the Using Web UI section of the Web User Interfaces documentation here.
The impersonator impersonates another user by selecting the user in one of the user impersonation components. The Web UI will then start on the homepage, and the impersonator can now act as the impersonated. The impersonator can continue switching between impersonated users and return to act as the impersonator user as needed.
Impersonation edits are indicated as performed by the authenticated user (impersonator) instead of the previous way of doing it, which was to log transactions by the impersonated user. While Web UI impersonation is intended to be used for troubleshooting purposes, changes to existing data may be made in accordance with the impersonated user's privileges. Therefore, the new way of logging user actions presents an accurate audit history, allowing for differentiation of user activity in log files and in other areas in Web UI (and workbench) that track revision history and user actions. For the sake of data governance it is logged in the system log, the impersonator user log, and the impersonated user log when an impersonator starts or stops impersonation.
Note: For impersonation in older (unsupported) versions of STEP (pre-10.1), the logs, revision histories, etc., will continue to reflect the previous way of tracking impersonation users, which is that all actions made by the impersonator are logged as actions taken by the user being impersonated. Hence, consistency between old and new should not be expected.
If you want to revert to the old way of tracking impersonation, the Impersonation.RunAsImpersonatedUser=true must be added to the sharedconfig.properties file. The impersonation functionality will switch to the impersonated user instead of a system-generated impersonation user. Warning: All actions taken during impersonation will be performed and logged as the actual impersonated user, which will impact auditability when identifying data changes.
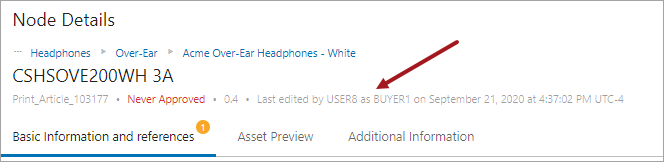
Whenever a user starts impersonating another user, a user with the name <'Impersonator User ID> as <Target User ID>' and the ID, which will begin with the 'STIBO.I' prefix, will be created. The audit trail will then indicate that it is this new user revising objects or making other changes. These special user types are hidden from all browse, search, and assignment interfaces and will not count against the licensed number of users. The Admin Portal's user activity report fills this void in visibility and is shown in the first image below (as well as some other examples).
Admin Portal > User Activity Report:

Node Details > Summary Cards:
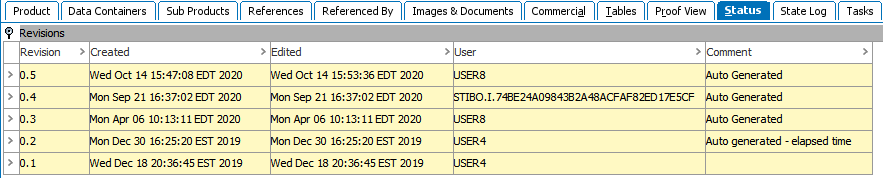
Multi Revision Screen:

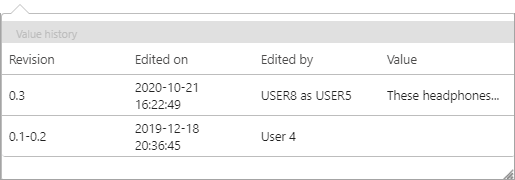
Revision History:
Important: Workbench audit history shows user IDs, so only the STIBO.I user is displayed when looking at revision history in the workbench. The STIBO.I prefix indicates that the change was made under impersonation, and prompt you or other users to view the Admin Portal User Activity Report to uncover exactly who made the change.
For more information on setting up components to access impersonation in Web UI, refer to the following topics:
- Homepage Widgets (refer to the Impersonate User Widget section) here
- Global Navigation Panel (refer to the Main Properties section) here
For information on accessing and using impersonation, refer to the following:
- User Impersonation (refer to the Using Web UI documentation) here