This section describes the various options available under System Setup > Users & Groups > DTP Settings.
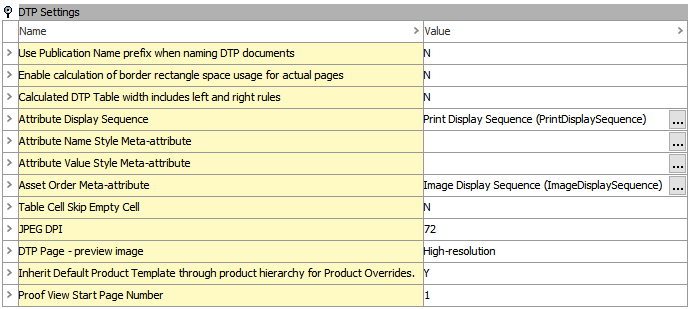
Use Publication Name Prefix when Naming DTP Documents
When a user creates an InDesign page (DTP document) in InDesign from a Flatplanner planned page spread (by right-clicking on the planned page in the STEP Publication view panel and choosing 'Create document from plan'), the default file name of the mounted document is the page number (for example, 1.indd). By setting 'Use Publication Name prefix when naming DTP documents' to 'Y', the publication name will be added as a prefix to that document file name. For example, if the publication name in STEP is 'Bath Catalog Fall Collection,' the mounted document will be called ''Bath Catalog Fall Collection_1.indd'
Note: If there are spaces or any invalid or 'questionable' characters in the publication name (for example, ™), they will be removed.
Enable Calculation of Border Rectangle Space Usage for Actual Pages
When viewing actual pages in STEP, the space usage for mounted product and classification objects can be viewed on the Page data tab. The system setting 'Enable calculation of border rectangle space usage for actual pages' tells the system whether to calculate the space that is taken up by each individual mounted element (product, classification, or image object) on the page, or if the white space surrounding these elements should also be calculated.
For more information, refer to the Space Usage in STEP topic in the Publisher (Adobe InDesign Integration) documentation here.
Calculated DTP Table Width Includes Left and Right Rules
This option tells STEP to make an adjustment to correct an anomaly in InDesign tables when vertical rules are placed on the left and right side of a table. InDesign does not normally include the width of a left or right vertical rule in the overall width of a table. Instead, it effectively over-sets the table's width. Setting 'Calculated DTP Table width includes left and right rules' to 'Y' will readjust the left and right vertical rules so they are within the overall table width.
To further explain, when 'Fit calculated Table Width to Frame Width' is checked in the STEP Preferences menu in InDesign, Print Publisher will fit the mounted table to the width of the frame on the product template that contains the table tag. If 'Calculated DTP Table width includes left and right rules' is set to 'N,' the table will be slightly wider than the frame because the rule lines are not 'fit' inside the boundaries of the frame. When set to 'N', the table width will exactly match the frame width, as the side rules will be fit inside the frame.
Attribute Display Sequence
The 'Attribute Display Sequence' setting under DTP Settings is different than the 'Default Attribute to use as Display Sequence Attribute' setting under Product Information Manager Default settings. Whereas 'Default Attribute to use as Display Sequence' is used to sort the order of attributes as they display in the STEP Workbench (for example, on the 'Product' tab of a product object), the 'Attribute Display Sequence' setting controls the order of mounted attribute values from an attribute group on mounted InDesign pages.
On product templates, a tag to mount values from an entire attribute group can be placed into a frame (as opposed to the more common practice of placing single attributes at a time into frames), as pictured below.

When an object is mounted onto an InDesign page using a product template containing this type of tag, the values from all attributes within this group are mounted. The 'Attribute Display Sequence' attribute will determine what order the attributes mount on the page. By default, these values would display in the order in which they reside under the attribute group (which is typically in alphabetical order).
For more information, refer to the Mounting Multi-Valued Attributes and Attribute Groups section of the Publisher (Adobe InDesign Integration) documentation
Attribute Name Style Meta-attribute and Attribute Value Style Meta-attribute
The description attributes used for the 'Attribute Name Style Meta-attribute' and 'Attribute Value Style Meta-attribute' settings are used to call out paragraph styles in InDesign that are applied to the name and values of attributes, respectively, when mounted as part of an attribute group.
For more information, refer to the Mounting Multi-Valued Attributes and Attribute Groups section of the Publisher (Adobe InDesign Integration) documentation
Asset Order Meta-attribute
This feature enables a sequence order to be set on assets (usually images) when products are mounted to InDesign pages. This sequence is set by the use of a metadata attribute that is valid on the link between products and image reference types. If there are multiple references from a product to various images using the same reference type (for example, 'Product Images'), and the product template calls out the Product Images, then all these images mount to the page. However, without this feature, the order that they mount would be in the same order as they are displayed in the workbench—by their alphabetically sorted name. By creating a metadata attribute and placing it on the link between the product and asset (reference type = Product Images in this case), then the user may establish a numeric order to the images. If this system setting specifies this metadata attribute, then the images will mount to the InDesign page in the order specified by this 'sequence' attribute.
For more information, refer to the Sequencing Images in InDesign section of the Publisher (Adobe InDesign Integration) documentation
Table Cell Skip Empty Cell
Setting 'Table Cell Skip Empty Cell' to 'Y' solves an issue for customers using the 'Repeated Rule' transformation in tables in such a way that it conflicts with the way in which the system treats rules in tables. The issue concerns how the system decides to choose a rule width if one cell does not have a horizontal rule on the bottom, in effect, and the adjacent cell below it has a horizontal rule, in effect, on the top. In almost all circumstances, this setting should be set to 'N.'
JPEG DPI
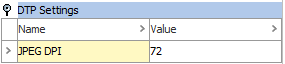
This setting affects the regular product proof view (as accessed from the Proof View tab in the workbench and through the Proof View component in the Web UI) and the Flatplanner when a plan preview is requested. It also affects the resolution of the thumbnail image that STEP creates when you upload a document to a publication. Any change to this value is not put into effect until the InDesign sidecar (InDesign server) is restarted.
For performance purposes, care should be taken not to enter a value that is too high, e.g., 300 dpi. A proof view of 150 dpi maximum should be sufficient for most purposes.
When mounted documents are uploaded to the publication structure in STEP, a new document thumbnail is created and saved within the document based on the new resolution specified. All existing thumbnails on 'old' documents will still show the 'preview' in the former resolution. Note that in the regular product proof view, the zoom factors will no longer match. For example, 100% will really show as larger than true 100% on-screen if a resolution higher than 72 dpi has been entered.
For more information on Proof Views, refer to the Print Proof View section of the Publisher (Adobe InDesign Integration) documentation here.
DTP Page - Preview Image

Images that are mounted onto InDesign pages are represented on the page by low-resolution images. These low-resolution images are linked to the original high-resolution images, and InDesign will know where the original images are stored as long as the image links are not broken.
The 'DTP Page - preview image' setting is used to control whether the low-resolution or high-resolution images will be embedded in Flatplanner page previews, which are fetched from the STEP Workbench and generated by the InDesign Server (IDS). This setting is intended to improve the time taken to render page previews. If the setting is changed, the IDS must be restarted before the new setting takes effect.
The 'DTP Page - preview image' options and their behavior are as follows:
- None: No preview of DTP page. Not recommended.
- Low-resolution: Tells the InDesign server to build the page preview with the low-resolution images embedded in the InDesign document.
- High-resolution: Tells the InDesign server to build the page preview from the actual high-res images. This is the recommended setting.
If a Flatplanner page does not have an abnormally high number of images, e.g., less than 80, then there is not a noticeable difference in the time that it takes to render the preview, making the setting of high-resolution appropriate.
Note: The 'DTP Page - preview image' setting and the immediately preceding setting of 'JPEG DPI' are unrelated.
Inherit Default Product Template Through Product Hierarchy for Product Overrides
This setting is to maintain backward compatibility with prior versions of STEP.
In releases prior to 6.0, any product that was placed into a product override would inherit the default product template placed on that override. The default in 6.0 and up is not to inherit from the override but from the originating (or 'natural') parent.
This is the only type of inheritance that is done from a product node 'downwards' to the product overrides below it.
Proof View Start Page Number
This setting allows for Proof Views and the PDFs created from Proof Views to begin on either page 1 (a right-hand page) or page 2 (a left-hand page). A starting page of '2' is the default.
A selection of '1' is useful, for example, when producing documents for PDF output, such as datasheets, that may not be produced in a 2-page spread format and should start page numbering at 1.
For more information on Proof Views, refer to the Print Proof View section of the Publisher (Adobe InDesign Integration) documentation here.