Follow the steps below to run the configuration wizard to first create and then update the Elasticsearch Configuration setup for a faceted search experience. Steps for deleting an Elasticsearch Configuration and an Elasticsearch event processor are also listed below.
For general information, refer to the Elasticsearch Setup topic. For illustrations of searching results using the faceted Search Screen, refer to the Search Screen Search Result Examples topic.
Note: Elasticsearch can display product, entity, classification, and/or asset data only, based on configuration.
Important: Ideally, the configuration should include only the data necessary to allow users to easily scope and shape the desired search results. Excessive data in Elasticsearch can negatively impact the response time of searches on the faceted Search Screen. Carefully consider the attributes and references to configure initially and expand the configuration as you determine additional information is required.
Prerequisites
A business condition can be selected to restrict the contexts being published to Elasticsearch. When creating the business condition, set the Valid Object Types parameter for the object types being published to the Elasticsearch database. The business condition must return 'true' for contexts to be published and return 'false' for contexts that should be rejected. The business condition can be selected in the Elasticsearch Configuration.
In the following example, these contexts return 'true' and are published:
-
The context ID is ‘defaultcontext’. This line will ensure that any object that has been deleted, approved, and is in the recycling bin, will be picked up by the search processor and removed from the search index.
-
ID of 'EN' and object IDs that end with the number 1
-
ID of 'DK' and object IDs that end with the number 2
All other context-object combinations which return 'false' are rejected during publishing.

Creating and Editing an Elasticsearch Configuration
Use the following steps to create the required Elasticsearch configuration.
Note: The 'Revert to' a previous revision option on the Status tab of an Elasticsearch Configuration Type object is not allowed. Manual configuration is required to restore previous settings.
Important: You cannot create more Elasticsearch configurations if three or more are already present.
-
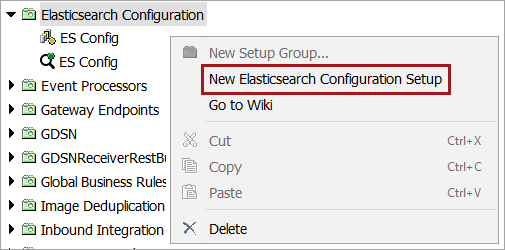
To create a new Elasticsearch Configuration or update an existing one, navigate to System Setup on the workbench and find the Elasticsearch Configuration node.
-
To create: Right-click the Elasticsearch Configuration node and select the New Elasticsearch Configuration Setup option.
-
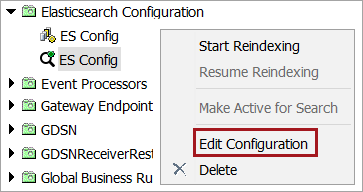
To update: Click the Elasticsearch Configuration you would like to update. Right-click and select the Edit Configuration option.
-
-
On the Elasticsearch Configuration wizard 'Initial configuration' step:
-
Add an ID and move to the next parameter to duplicate the ID in the 'Name' and 'Index Prefix' parameters.
Note: Using duplicated text for these parameters eliminates confusion when identifying the index associated with this configuration. For example, 'ESConfig' is the text for all parameters in the image below.
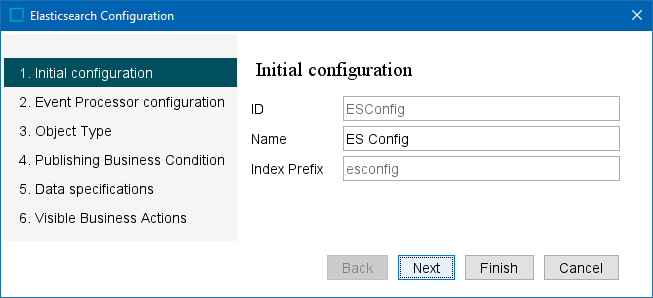
When editing the configuration, only the 'Name' can be modified. Changing the Index Prefix can cause issues with the indices syncing.
-
Click the Next button.
-
-
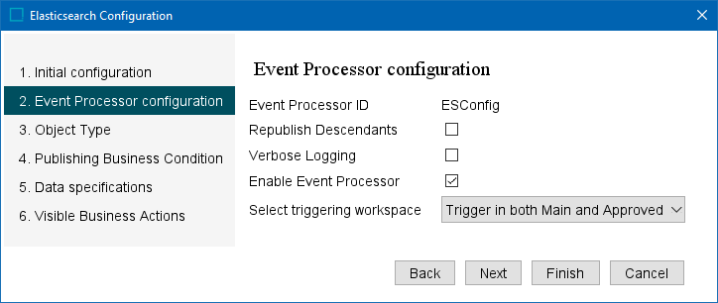
On the 'Event Processor configuration' step:
-
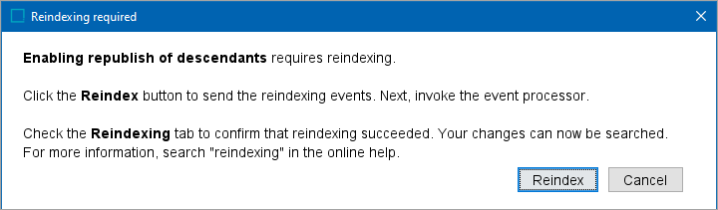
Republish Descendants - Check the box to include children of the selected nodes when reindexing. Any changes made to attribute values will reflect on their descendant attribute values. Updated values are reflected in the search results so long as both parent and descendant object types are included in the Elasticsearch data specification configuration, detailed below in step 5 of the wizard.
Note: When initially indexing or manually performing the reindex action, inherited values, references, and data containers are always included. However, if this setting is not enabled, once changes on a parent object have triggered a reindex event, the inherited values will not be updated in the index. For more information, refer to the Elasticsearch Indexer Processing Plugin Parameters and Triggers topic in the System Setup documentation.
If this setting is enabled after initial configuration, the user will be prompted to reindex after completing the configuration wizard.
Important: This option should be enabled only when necessary as it negatively impacts performance.
-
Verbose Logging - Check the box to include excessive logging for troubleshooting.
-
Enable Event Processor - Check the box to activate the event processor created by this wizard. Changing this parameter displays a confirmation dialog. Enabling the event process means publishing of events to Elasticsearch begins immediately upon clicking the wizard Finish button. Disabling the event processor means the Elasticsearch data may not match the STEP data, making search results unreliable.
-
Select triggering workspace - Select the workspace(s) to update the Elasticsearch database.
-
The 'Triggering in Main only' creates an event when a change is made in the Main (maintenance) workspace, prior to approval.
-
The 'Triggering in Approved only' creates events when an action causes an update to the Approved workspace, generally as a result of approving an object.
-
The 'Triggering in both Main and Approved' option results in events both before and after approval.
Note: To activate a change to the Triggering Workspace parameter, you must invoke the event processor with at least one event on the queue.
-
-
Click the Next button.
-
-
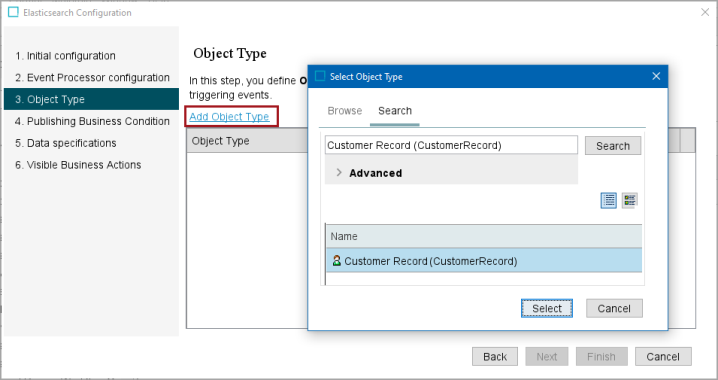
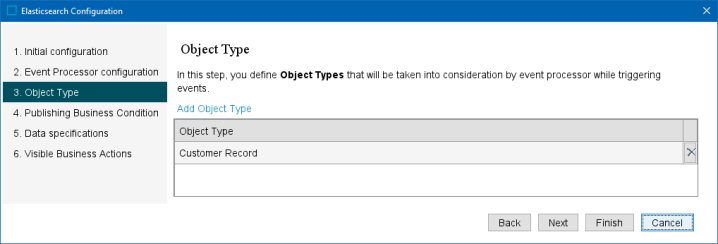
On the 'Object Type' step:
-
Click the Add Object Type link and select the objects that should trigger the event processor and be available for searching in Elasticsearch via the Web UI Search Screen. Object types selected are displayed as values within the Search Screen's object type facet.
Note: Selected object types are added both to the Event Triggering Definitions of the event processor and to the Elasticsearch configuration.
-
Click the Select button to add the selections to the Object Type list.
-
Click the Next button.
-
-
-
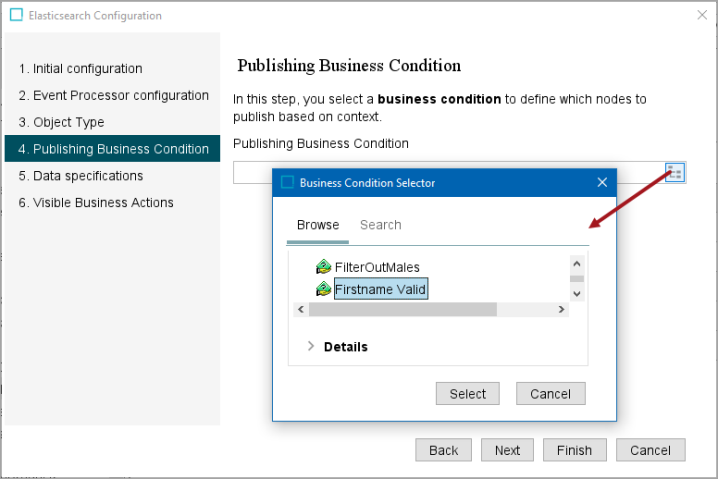
On the 'Publishing Business Condition' step:
-
Click the ellipsis button (
 ) to open the Business Condition Selector and choose the business condition that restricts contexts being published to Elasticsearch. The number of nodes published and rejected based on the business condition are reported in the indexing background process execution report. Refer to the Prerequisites section for a sample business condition.
 -
Click the Select button.
-
Click the Next button.
-
-
On the 'Data specifications' step:
Note: Hover over a column heading for a definition. Hover over a Data Specification row to view the ID used in the JSON document.
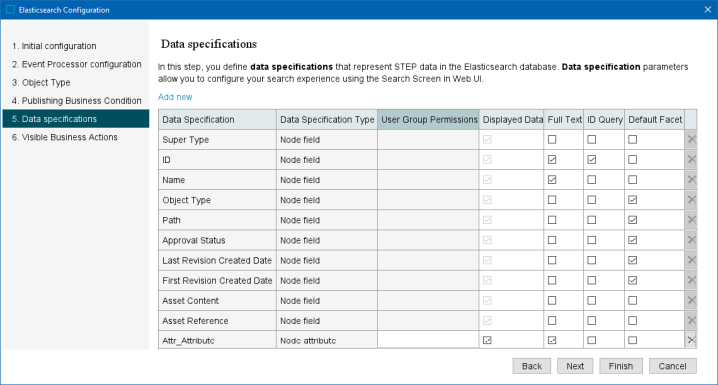
Important: Exceeding the data specifications limit displays an error. Reduce the number of selections to continue with the configuration.
-
Node fields are default items and cannot be deleted, as indicated by the gray background for the 'User Group Permissions' column and the disabled delete button (
 ). User group permissions cannot be set for these default data specifications.
-
Click the Add new link to modify the data specifications required for the Elasticsearch database and to set the data on the faceted Search Screen for full text searches, ID searches, and the default facets. Manually added items can also be manually deleted using the enabled delete button (
 ).
).
Important: When adding node attributes, removing node attributes, or changing the 'Full Text' setting, you must reindex the Elasticsearch database.
-
-
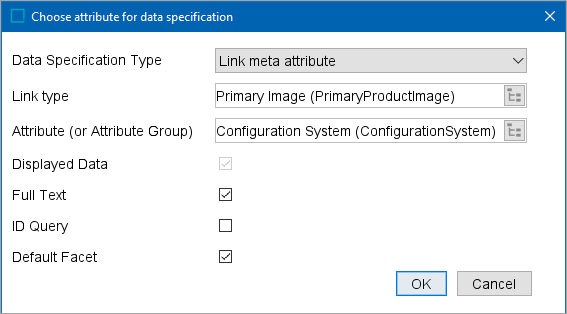
After clicking the Add new link, on the 'Choose attribute for data specification' dialog, use the following options to complete the Elasticsearch configuration.
Note: Unless mentioned in the 'Data Specification Type' section below, the selected attributes are added as Event Triggering Definitions in the event processor that is automatically created by this wizard.
-
Data Specification Type - Select one of the following options from the dropdown:
-
Node field - Default elements (not included in the dropdown, automatically displayed in the wizard) on the object being searched. Default elements cannot be added or deleted, nor can permissions be set, but the search functions can be changed. ID and Name are used in Full Text searches, ID is used for ID searches, and the object type, path, approval status, and revision information items are set as default facets. An event triggering definition is automatically added to the event processor.
-
Node attribute - Attribute on objects being searched. An attribute event triggering definition is automatically added to the event processor.
-
Link meta attribute - Meta attribute on an object linked to the object being searched. An attribute trigger and a reference type event trigger are added automatically. However, to track changes on the referenced attribute, add an object type event triggering definition manually, as defined in the Triggering for Referenced Data section of the Elasticsearch Indexer Processing Plugin Parameters and Triggers topic.
While you can designate one attribute for both incoming (References) and outgoing (Referenced By) references, it is recommended to use separate attributes for each of these types of references. Separate attributes result in a cleaner setup and display of data.
-
Link source attribute - Attribute on the source object linked to the object being searched. An attribute trigger and a reference type event trigger are added automatically. However, to track changes on the referenced attribute, add an object type event triggering definition manually, as defined in the Triggering for Referenced Data section of the Elasticsearch Indexer Processing Plugin Parameters and Triggers topic.
-
Link target attribute - Attribute on the target object linked to the object being searched. An attribute trigger and a reference type event trigger are added automatically. However, to track changes on the referenced attribute, add an object type event triggering definition manually, as defined in the Triggering for Referenced Data section of the Elasticsearch Indexer Processing Plugin Parameters and Triggers topic.
-
Child attribute - Attribute on objects that are children to those being searched. An attribute event trigger is added automatically. However, to track changes on the child attribute, add an object type event triggering definition manually, as defined in the Triggering for Referenced Data section of the Elasticsearch Indexer Processing Plugin Parameters and Triggers topic.
-
Data container attribute - Attribute that belongs to a data container on the objects being searched. The data container type must be specified. A data container attribute triggering definition is automatically added to the event processor.
-
Data container reference attribute - Attribute referenced by a data container attribute on the objects being searched. The data container type and link type must be specified. A data container attribute trigger and a reference type event trigger are added automatically. However, to track changes on the referenced attribute, add an object type event triggering definition manually, as defined in the Triggering for Referenced Data section of the Elasticsearch Indexer Processing Plugin Parameters and Triggers topic.
-
-
Link type - This parameter only displays for link data specification types. Type a reference or link name or click the ellipsis button (
) to open the 'Choose link type' dialog. Browse or search for a link type and click the Select button. -
Attribute (or Attribute Group) - Type an attribute or group name or click the ellipsis button (
) to open the 'Choose attribute for data specification' dialog. Browse or search for an attribute or attribute group and click the Select button. Note: Adding a group updates the data specifications list with the individual attributes in the group. Each attribute can be set for the appropriate search types defined below.
If you created attributes specifically for use in Elasticsearch, refer to the Attribute ID Considerations section below in this topic.
-
User Group Permissions - This option determines which group(s) can view the data as an available facet. Permissions do not apply to full text search fields, which means that data and facets are not visible for users without permission, but results can include this data if the search complies with any text searchable field. If necessary, limit availability to the data specification in the Search Screen based on user group.
-
Select the data specification field to be modified (the cell turns blue), right-click, and select the Edit option.
-
On the User Group Selection dialog, select the groups that require access to the data specification in the Search Screen and click the Select button.
Important: If no User Group Permissions are set, all users of the Web UI Search Screen can use the data specification as defined in the Elasticsearch Configuration.
Note: Privileges set in an Elasticsearch configuration only impact facets.
-
-
Displayed Data - Check the box to have the data specification visible in the Search Screen as a facet and in the result set to be used for sorting and filtering for all users with permissions to view it. When checked, this setting is counted towards the limit of publishable fields and may count for more than one depending on the data type. Checks in other columns impact the Displayed Data setting, as defined in this section.
Note: The number of attributes that can be indexed as 'Displayed Data' is limited to 450, therefore attribute values that are often used to identify objects (such as manufacturer or country of origin) should take priority. Additionally, attribute values important for data enrichment tasks should be included.
-
Full Text - Check the box to include the data specification value in full text searches. Full Text selections do not impact the limit of publishable fields. While available for any data specification type, full text is recommended for text-based attributes; LOV attributes are better represented as a default facet.
-
ID Query - Check the box to include the data specification value in ID searches. When ID Query is checked, the Displayed Data is also automatically checked for the data specification and impacts the limit of publishable fields. While available for any data specification type, ID Query is recommended only for attributes that hold values used as identification of an object. For example, a GTIN attribute or manufacturer ID might be appropriate; an LOV attribute would not typically be used as an ID query.
-
Default Facet - Check the box to include the data specification as a default static facet for filtering. When Default Facet is checked, the Displayed Data is also automatically checked for the data specification and impacts the limit of publishable fields. While available for any data specification type, default facet is recommended for attributes with values that are useful for narrowing down search results. For example, values for sizes or colors could be valuable as a default facet; long text values are not typical for default facets.
Note: This option must be enabled for the selected facet to appear as a filter on the Instrument search screen.
-
Click the OK button on the dialog.
Important: Facets will not display on the search screen if the character limit of their attribute value exceeds 256 characters.
For more information, refer to the Elasticsearch Data Specification Type Examplestopic.
-
-
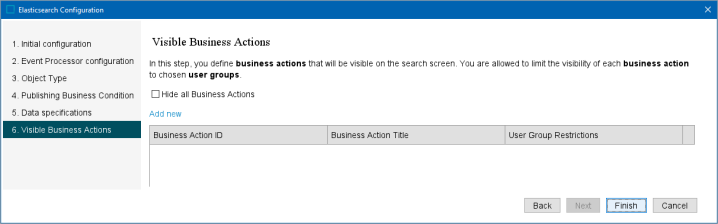
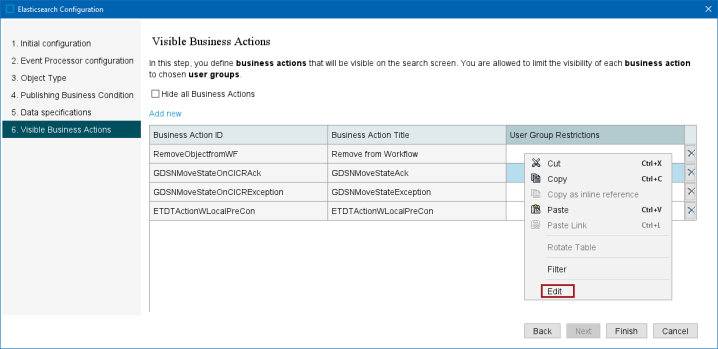
On the 'Visible Business Actions' step:
-
Hide all Business Actions - Check to prevent users from viewing any business actions when clicking the Action button on the Web UI Search screen. This allows an override for any business actions configured on this step. The 'Add To Basket' option on the Actions menu is not impacted by this setting.
-
Click the Add new link to select the business actions that are viewable from the 'Actions' dropdown on the Web UI Search screen.
-
Select the desired business actions from the 'Select Object Type' dialog (shown below) and click the Select button.
Note: If no business actions are configured on the Visible Business Actions step, all business actions are visible to users. A business action is enabled to run if it is valid for the selected items and the user is privileged to run it.

-
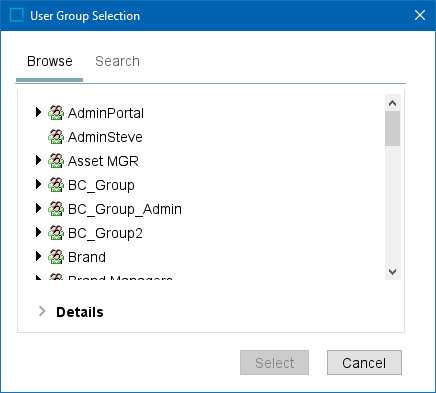
To specify which user groups can view and execute specific business actions (and restrict access to those business actions for other user groups),
-
Select the desired user group(s) and click the Select button.
For more information regarding the Actions dropdown option on the Search screen, refer to the Search Screen Actions topic.
-
-
-
Complete the wizard:
-
Click the Cancel button to exit without saving any changes.
-
Click the Finish button to apply the changes made.
Note: The 'Revert to' a previous revision option on the Status tab of an Elasticsearch Configuration Type object is not allowed. Manual configuration is required to restore previous settings.
The first configuration created is automatically activated. Additional configurations must be activated manually and will automatically deactivate previous configurations. To activate a configuration, right-click on configuration and select 'Make Active for Search'.
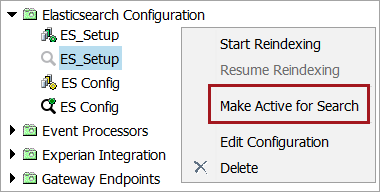
Icon Description 
Active - Only one Elasticsearch configuration can be active at a time.

Inactive - Activating an Elasticsearch configuration automatically disables the previously active configuration.
-
Note: Saving edits to or replacing an existing Elasticsearch configuration causes the Elasticsearch database to no longer be in sync with STEP data, requiring the data to be reindexed. For more information, refer to the Elasticsearch Index Publishing topic.
Next, complete the steps to publish STEP data to the Elasticsearch database as defined in the Elasticsearch Index Publishing topic.
Important: The number of fields that can be published is limited based on the Elasticsearch.TotalFieldLimit property (default 1,000).
Attribute ID Considerations
Take the following information into consideration when creating attribute IDs for attributes that are used for Elasticsearch searches. Refer to the Search Screen topic for information about this functionality.
IDs cannot start and/or end with a period / dot (i.e., '.').
The following words are currently forbidden to be used as part of the ID:
- simpleValue
- lowerCaseValue
- unitId
- numeric
- dateTime
Examples of forbidden attribute IDs:
- [forbidden word], e.g., 'numeric'
- abc.[forbidden word], e.g., 'abc.numeric'
- abc.[forbidden word].abc, e.g., 'abc.numeric.abc'
- end with a dot, e.g., 'abc.'
- start with a dot, e.g., '.abc'
- dot or dots by itself / themselves, e.g., '.', '....'
- etc.
For faceted search, mappings cannot be made for these in Elasticsearch, and the attributes cannot be shown as facets.
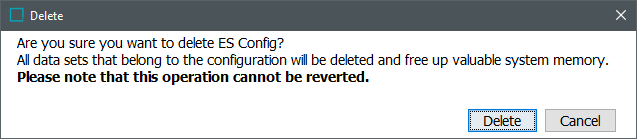
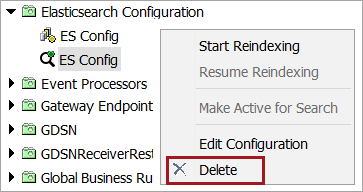
Deleting an Elasticsearch Configuration
Deleting an Elasticsearch configuration will remove both the Elasticsearch configuration and the Elasticsearch event processor.
Use the following steps to remove an Elasticsearch configuration:
-
In System Setup, select the Elasticsearch configuration, right-click and click the Delete and Purge option.
-
Click the Delete button to confirm the delete action, and then, click the Close button for the 'Delete report' dialog.