One advantage of using STEP to automate page building in InDesign is the ability to automatically update the contents of previously built pages without having to rebuild them from scratch.
When pages are built (mounted) using Print Publisher (or an associated component such as Print AutoPage or Print Flatplanner), content from STEP is placed onto the page. The placed content accurately reflects how the content existed in STEP at that moment in time. If changes are made later to the corresponding content in STEP (for example, attributes values or referenced images), the pages become out of sync with the latest content.
When this content mismatch occurs, there are several options available within InDesign and STEP Workbench for updating page contents. This topic describes how to use the update options available in STEP Workbench. Methods for updating pages from within InDesign are explained in the Updating Documents From InDesign topic here.
Additionally, this topic only describes update methods that apply across all Print Publisher licenses. For more information on how to update pages using Print AutoPage or Print Flatplanner, refer to the following topics:
- Updating Documents in AutoPage in the Print AutoPage documentation
- Updating Documents in Flatplanner in the Print Flatplanner documentation (here)
Prerequisites
Two important prerequisites must be met before actual pages can be updated from the workbench:
- The pages must be saved into a publication in STEP
- You must have an Adobe InDesign server (IDS server) set up and integrated with your STEP application server. The IDS server is what enables STEP to run bulk updates on the pages without requiring you to open the pages from an InDesign client. Contact Stibo Systems for assistance if you do not have an InDesign server.
Methods for Updating Documents from the STEP Workbench
Mounted (actual) pages saved back to STEP can be updated from the workbench by the following methods for users of any Print Publisher license: Update and Bulk Update. Both methods work in a near-identical fashion, but Update is the simplest. As such, Update is the method detailed in this topic.
Note: The methods are near-identical because the same dialog detailed in the next section of this topic can be accessed from the Bulk Update wizard. For information on Bulk Update operations for STEP publication documents, refer to Publishing: Check Publication Document for Needs Update Operation in the Getting Started documentation
Using the 'Update' Feature to Update Documents
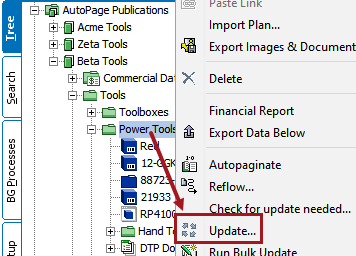
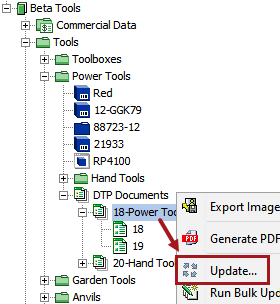
- Navigate to the relevant publication, section, or DTP document object in the Tree, then right-click and choose Update....
The first screenshot below shows the Update option accessed from a section. The second screenshot shows the option accessed from a DTP document.
- The 'Update contents of document(s)' dialog displays.
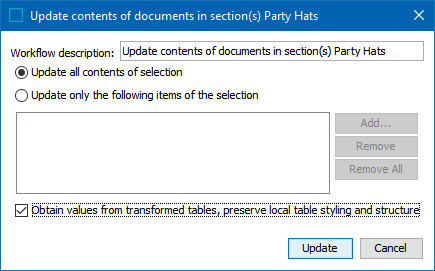
- To update all contents on the pages without narrowing your selections (for example, to update all attributes, all image references, and all tables at once), select Update all contents of selection.
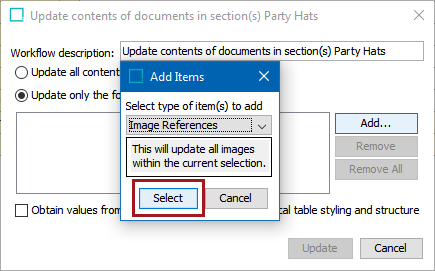
- To narrow your selections and choose specific content areas to update, choose Update only the following items of the selection, then click Add. The Add Items dialog displays.
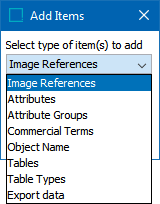
- Eight options are available from the Select type of item(s) to add dropdown. Click 'Select' (pictured in the below screenshot) to add the item types to the 'Update contents' dialog. The chosen options apply to all pages in the selected publication / section / DTP document.
The options and their functionality are as follows:
- Image References: Updates all images. No additional options are available to narrow the selection down to specific image reference types.
- Attributes: This option allows you to choose specific attributes whose values should be updated. Only individual attributes can be chosen, not attribute groups. However, attributes may be multi-selected by holding Shift or Ctrl when making your selections.
- Attribute Groups: Updates all attributes on all pages. No additional options are available to narrow the selection down to specific attribute groups.
- Commercial Terms: Updates all values of the selected commercial terms lists.
- Object Name: Updates the STEP names of all product objects, classification objects, attributes, and publication section objects.
- Tables: Updates the values contained within all STEP tables.
- Table Types: Updates the values contained within all STEP tables of the selected table types.
- Export data: Updates values within indexes built using AutoPage.
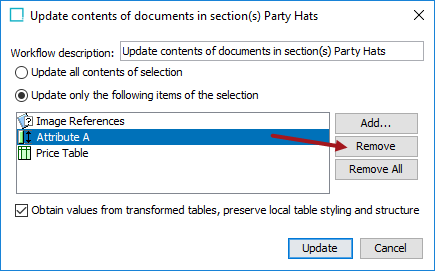
- In addition to the dropdown options, a checkbox titled Obtain values from transformed tables, preserve local table styling and structure is available on the 'Update contents' dialog. This box is relevant for updates in which STEP tables are updated, which is when 'Update all contents of selection' is chosen or when 'Update only the following items of the selection' is chosen and either the 'Tables' or 'Table Types' option is selected from the 'Add items' dropdown.
This box is checked by default. If left checked, only the values within the tables will update and the tables themselves will not be remounted. If the box is unchecked, not only will the values be updated, but the tables will remount and all local formatting, cell shading from table transformations, and so forth will be lost. In other words, unchecking the box causes a 'force update' on the tables.
- Once your selections have been made, click Update to start the update process. If you would like to remove any of your selections before updating, highlight them in the dialog window and click Remove (options may be multi-selected by holding Shift or Ctrl).
- A background process is started that calls the InDesign server. The InDesign server then does the actual page update. When completed, the InDesign server saves a new version of the paginated pages to STEP.