This topic describes how to approve an object in the workbench. When an object is approved, it moves to the Approved workspace.
Data Ownership
The concept of data ownership is very important in relation to approvals. For an object to be fully approved, all data that the object owns must also be approved. When data changes, the object that owns that data is considered 'modified' and can potentially become 'unapproved.'
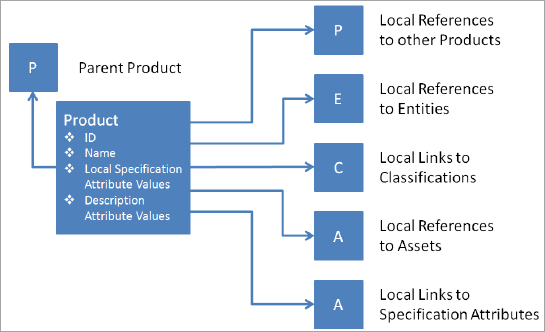
The figure below shows data owned by a product object (the largest box).
-
A product owns its parent link (also true for classifications, entities, and assets).
-
The product owns local values, but not inherited specification attribute values. Thus, when these are modified at an ancestor level, this will not affect the product’s approval status. Also, the object's local values (that is, assigned at the product level), will be approved.
-
The product owns all local references and links for which it is the source. When a reference or link is modified, it is the source that is changed while the target is unaffected. Attribute values on the reference or link are also owned by the source object.
Approving an Object
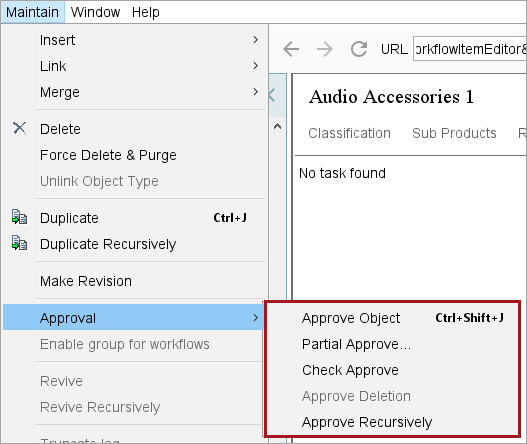
To approve an object, right-click on the object and select one of the available approval options.
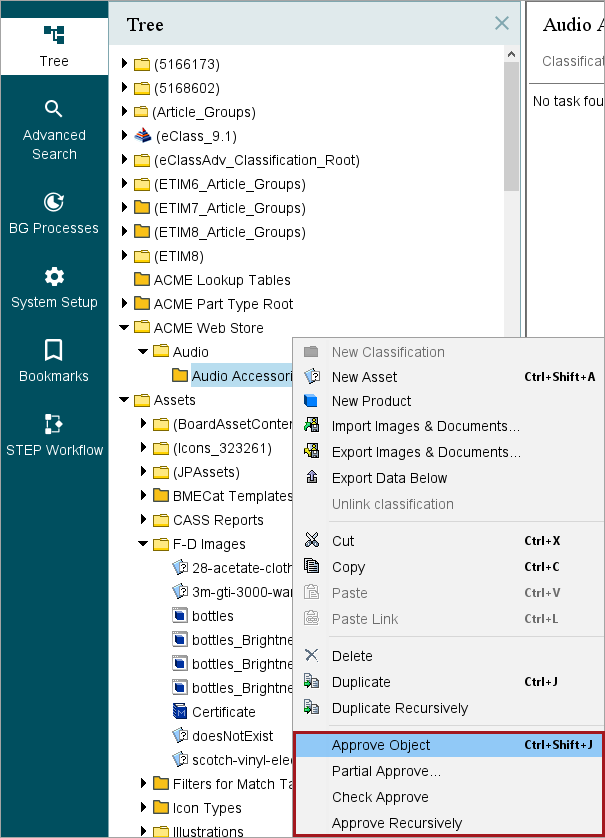
You can also use the options on the Maintain menu.
Note: If 'approval' is a task within a workflow, then objects can alternately be approved from the task view. Refer to Working with Tasks in Workflows in the Workflows documentation.
Approve Objects is available when the Main workspace is selected.
Approving objects is available for:
-
Classifications
-
Products
-
Images & Documents
-
Entities (set up to be workspace revisable)
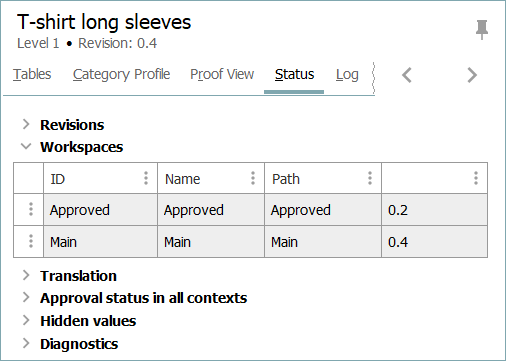
The status of an object in the various workspaces can be viewed in the Status tab in the Workspaces section of the relevant editor.
Once object editing is complete, and the object is ready for publishing, approving the object copies the current object values into the Approved workspace.
Conditions to approve an object
-
Objects must be approved from the Main workspace.
-
An object cannot be approved if parent objects are not yet approved (approving must be done from the top down in the hierarchy).
-
A reference or link cannot be approved if the target does not exist in the Approved Workspace, i.e., if a product or classification is referenced with another product, asset, or classification, then the referenced product, asset, or classification needs to be approved first before the actual product or classification is approved.
-
If attributes, references, links are mandatory, objects cannot be approved if there are no values or targets.
-
Externally maintained attributes, references or links are not under revision control. Values and references will automatically be reflected in the Approved Workspace and modifying the data will not affect object’s approval status.
-
The user must have sufficient approve privileges.
-
To easily check differences in the Main and Approved Workspaces, select Partial Approve, as discussed in the Partially Approving an Object section below.
-
When approving, the object's revision number changes automatically.
-
An entire hierarchy can be approved using the Approve Recursively option. For more information, refer to the Approve Recursively section below.
Partially Approving an Object
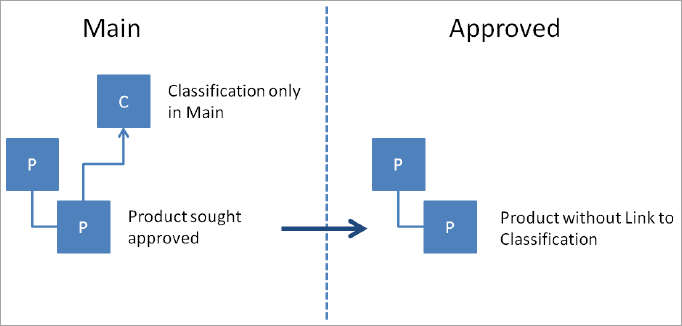
It is possible to approve an object that has a reference or link to another object that does not exist in the Approved Workspace. In this instance, the object will become 'partially approved,' meaning that the object and all data that can be approved will be approved. However, the reference or link will not be approved. If the target for the reference or link is later approved, the source will need to be approved again for the reference or link to be updated in the Approved Workspace.
Partial approvals can also be performed deliberately - both manually and programmatically. Specific attributes, references, links, and the object name can be selected for approval. The attributes, references, links, and names are sometimes referred to as 'part objects.' These part objects cannot exist in the Approved Workspace without the object to which they belong. Thus, when the first part object is approved, the object will need to be present in the Approved Workspace.
Usage
Partial approval of selected elements of the object is particularly helpful in situations where certain elements of the object need to be available for usage (in the Approved Workspace) before the rest of the object or its elements can be approved.
For example, consider that there are two users who perform changes for a product and then approve the product. If the product is completely approved, then it can be difficult to identify which user performed specific changes. In this case, using the Partial Approve will allow the user to approve only their own changes and leave the rest of the changes to be approved by the other user who made those changes.
Approving partially
-
In the Tree, select the object to partially approve.
-
Right-click the selected object and click Partial Approve. Alternatively, from the Maintain menu, click Approval, and click Partial Approve.
-
On the Partial Approve dialog, select the checkboxes for the element(s) to be approved.
-
Click the Approve Selected button.
Note: The attribute groups displayed to a user in the Partial Approve dialog are controlled by privilege rules. For more information, refer to the Privilege Rules topic in the System Setup documentation.When an attribute is linked to multiple attribute groups that a user has privileges to, the attribute will display to the user in all of these attribute groups.
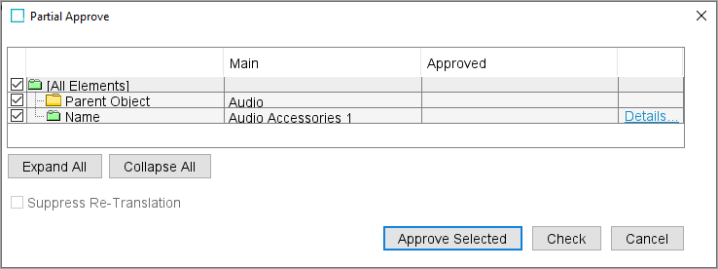
Partial Approve Compare View Dialog
The dialog shows which elements of the selected object have been changed since the last approval of the object.
Besides name, parent object, and default DTP Template, the type of elements listed are attributes, references, and tables. For each element the values in Main and Approved Workspaces are listed.
For detailed information about the value for an element, click the Details…link to display a detailed view of the element showing the values for the Main and Approved Workspace:

In the above example, the value for the attribute has changed. Values only present in Main Workspace are marked with a green background color. Values only present in Approve Workspace are marked with a red background color.
Note: The detailed view differs slightly depending on the element type selected.
All elements are selected by default. To deselect all elements, click the checkbox next to the All Elements node.
You can select the element(s) to approve by clicking the check boxes next to each element. You can also select a whole element group, i.e., attributes by clicking the checkbox next to the element group.
To expand an element group click the + sign next to the element group. To collapse the element group, click the - sign next to the element group. To expand all elements in the dialog, click the Expand All button. To collapse all elements in the dialog, click the Collapse All button. To check if the selected elements can be successfully approved, click the Check button to display an approve report that summarizes the results.
Clicking the Approve Selected button will approve the selected elements of the object and the Approve status of the object will change accordingly. Privilege rules apply to Partial Approve as discussed in the Action Sets topic.
This functionality is also available in the Web UI. For more information on this feature, refer to the Partial Approval in Web UI topic in the Web User Interfaces documentation.
Suppress Re-translation
Typically, approval of a translated product in a source language causes the Translation status of the product to be set to 'Re-translation needed'. In the Partial Approval dialog, this behavior can be suppressed by clicking the Suppress Re-translation checkbox. All existing translation relations with status 'Up to Date' will retain that status. This is useful when only minor changes are approved and no re-translation is needed. For more information, refer to the Translations documentation.
Note: To get a list of language variations of the object that potentially will be affected by the approval, hover the cursor on the 'Suppress Re-translation' label.
Check Approve
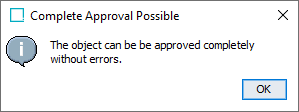
Consider a product that has multiple attributes linked and has mandatory values and references which needs to be approved after the changes. The 'Check Approve' option easily confirms if the product can be approved completely with a detailed report.
To determine if you are allowed to completely approve an object, run 'Check Approve' as follows:
-
In the Tree, click the object to be approved. The editor shows the object contents in Main and Approved Workspaces.
-
Right-click on the object and select the Check Approve option. Alternatively, on the Maintain menu, click Approval, and click Check Approve.
-
If you only have changed attribute values for which you have the Approve privileges, the 'Complete Approval Possible' dialog box displays.
-
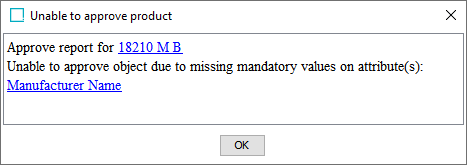
If the product cannot be approved (for example, due to mandatory values or references being empty), the dialog provides details, as shown below:
Note: If you changed attribute values for which you do not have the Approve privileges the approval options are unavailable.
-
Approve Recursively
Approving objects recursively searches for unapproved objects linked to (or below) a selected hierarchy node, and approves these objects, copying them from the Main Workspace to the Approved Workspace. This is useful and time saving, for example, when multiple images have been imported and checked and should all be approved, compared to reviewing and approving each object individually.
Approving Recursively is available for:
-
Classifications
-
Products
-
Images & Documents
-
Entities (setup to be workspace revisable)
The status of an object in the various workspaces can be displayed using the Workspace View Mode of the relevant editor.
To recursively approve:
-
Select the Main Workspace.
-
In the Tree, select the hierarchy containing the objects to be approved.
-
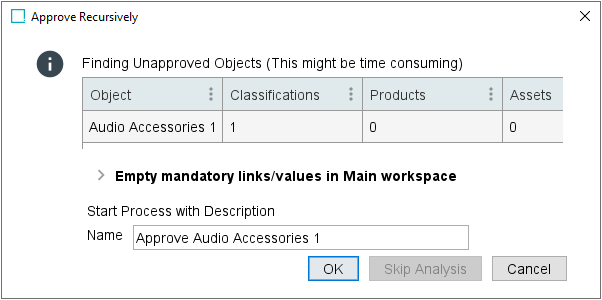
Right-click the hierarchy object and click Approve Recursively. Alternatively, on the Maintain menu, click Approval, then click Approve Recursively. A dialog displays the name of the selected hierarchy node, a count of the objects within the hierarchy, and other information.
Note: Approve Recursively automatically performs a search for unapproved Objects. Click the Skip Analysis button if desired.
-
Optionally, type a name for the process.
-
Click the OK button to start the approve process and display a dialog with information.
-
Click Go to process button to open the Process view showing details of the process and a report of approved objects. The hierarchy displays an Approved status to indicate that it is copied into the Approved Workspace.
Approval Feedback
Depending on Approve privileges, the following warnings and dialogs may be displayed after clicking Approve Object or Partial Approve.
For more information about user privileges, refer to the User Actions and Error Descriptions topic in the System Setup documentation.
Approve Object Feedback
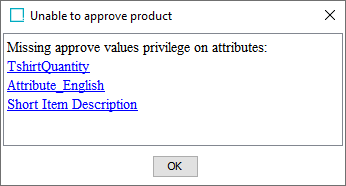
If you have modified attribute values for which you do have Approve Privileges and at the same time you have modified attribute values for which you do not have Approve Privileges, an 'Unable to approve' object dialog displays.
If you have modified attributes values and do not have Approve Privileges, then the 'Approve' option is disabled in the right-click menu.
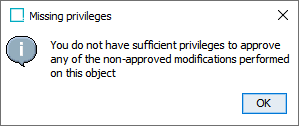
If you have modified attributes values for which you do not have Approve Privileges, a 'Missing privileges' dialog displays.
Partial Approve Feedback
If you have modified attribute values for which you do have Approve Privileges, and at the same time you have modified attribute values for which you do not have Approve Privileges, a Partial Approve dialog box displays.
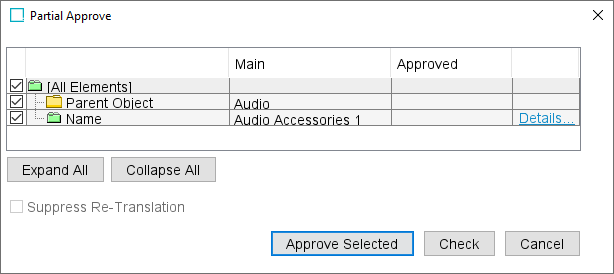
In the example above, the user can approve all attribute values in 'Audio Accessories 1' and 'Audio'. Only attributes that the user has permissions for are displayed.
Approve Recursively feedback
After running Approve Recursively for a hierarchy node, review the feedback in the Background Processes tab.
-
On the BG Processes tab, click Approve Recursively, open the Active or Ended Processes node, and click the relevant process.
-
In the Background Process tab, open the Execution Report.
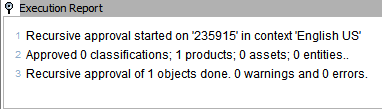
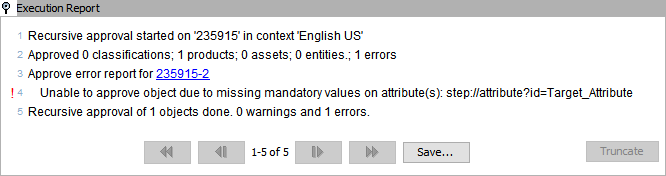
If the process or approval was successful, the report shows 0 errors and 0 warnings. Details are provided if errors were found.
The following example shows a missing mandatory attribute value error, which caused the object to not be approved.
Approve Recursively dialog
The following information is included on this dialog:
-
Finding Unapproved Objects: Analyze the hierarchy and provide the count of the products, classifications, assets, or entities which are currently in unapproved status.
-
Empty mandatory links / values in Main workspace: Display details about mandatory values, links, or references that are missing for the products, classifications, assets, and entities.
-
Start Process with Description: Enter a name for the background process. While this option is not mandatory, it is recommended to easily identify the process during review.
-
Skip Analysis: When the number of child products is large, the analysis of unapproved or missing mandatory values and references can be time consuming. Click this button to stop the analysis and skip the report, but proceed with the approving recursively background process.
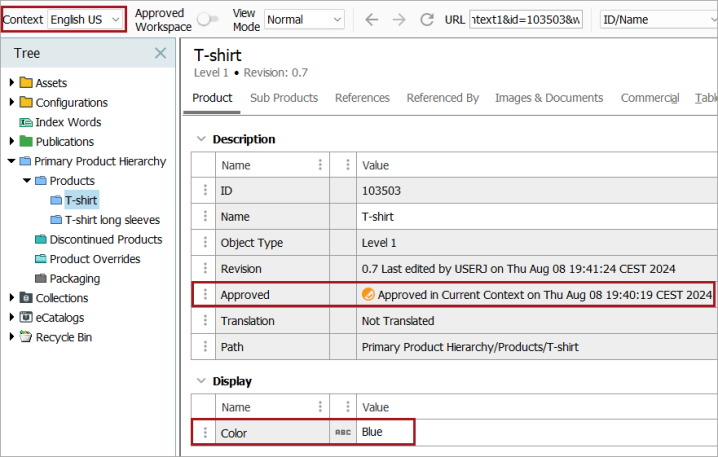
Context Dependent Approvals
Object approval happens in the current context and only applies to data visible in that context.
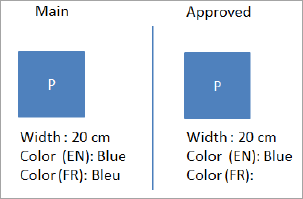
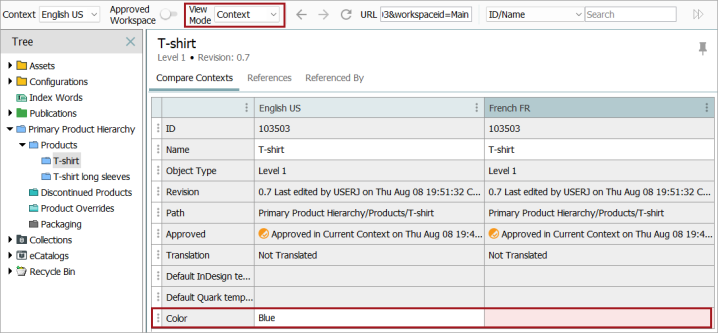
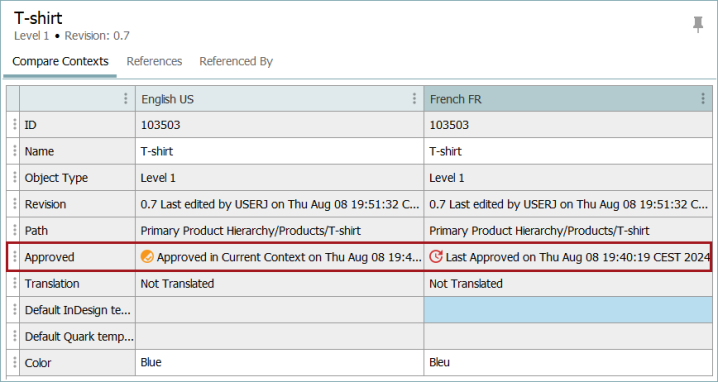
To illustrate this concept, refer to the figure below in which object 'P' has values for the attributes Color and Width in the Main workspace. While Width is not dimension dependent, Color is dimension dependent and has different values in two contexts: 'Blue' in the English context and 'Bleu' in the French context. If the object is approved in the English context, only the data visible in the English context is reflected in the Approved Workspace. Because of this separated approval, the object must also be approved in the French context to be completely approved, indicated by a green checkmark in the Approved parameter. Until all contexts are approved, the object in the English context has the status 'Approved in Current Context on [date + time]', indicated by a yellow checkmark, and the object in the French context has the status of 'Last Approved on [date + time]', indicated by a red clock.
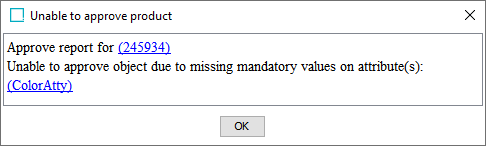
If Color is set as a mandatory attribute in the French context but is left empty, then an empty mandatory attribute warning will display when attempting to approve the object in the French context.
All mandatory attributes will be checked upon approval to notify is any are empty in the context in which the object is being approved. For example, in the first of the images shown below, the value added for the mandatory attribute 'Color' in the English context is 'Blue'. The object can be approved in this context without any issue. The approval icon is for the current context only, so in this example, the English context displays the partial approval icon.
When the View Mode is changed from Normal to Context, the empty mandatory attribute alert is shown in the French context.
When changes are made to both contexts, the approval icons are updated to show 'Approved in Current Context' and 'Last Approved'.
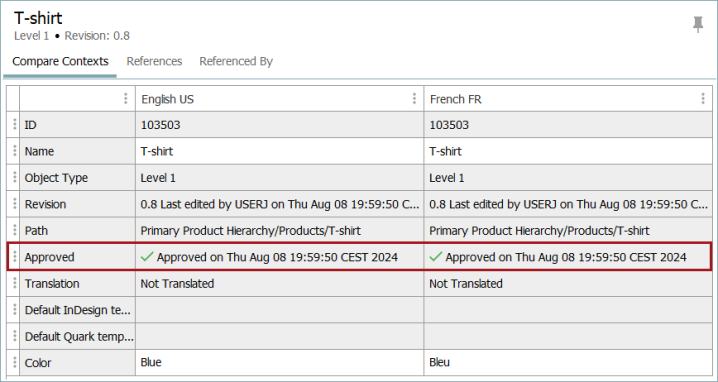
When the object is approved in both contexts, the object is fully approved, displaying a green checkmark for both contexts.
If a change is made in one context, for example, changing the Color attribute value in the French context but leaving the value for the Color attribute in the English as is, the object regains full approval once the object is approved again in the French context.
-