Attribute values can be imported as metadata for all reference types or link types.
The mapping instructions are the same for both the Import Manager tool and the IIEP tool. For details about starting an import, refer to Creating a Data Import or Creating an Inbound Integration Endpoint.
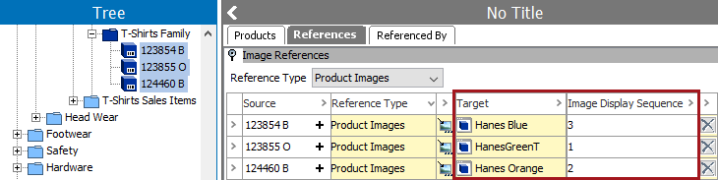
For example, viewing the References tab on the selected products shows the 'Image Display Sequence' metadata attribute on the 'Product Images' reference type.
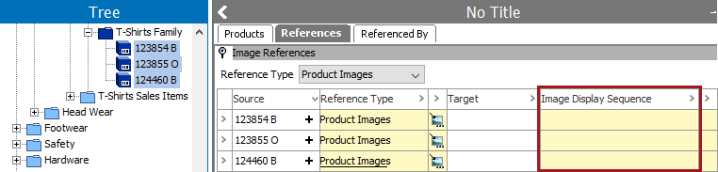
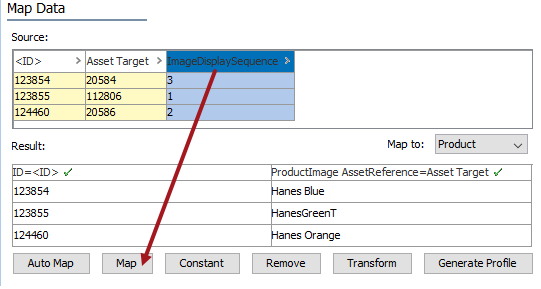
To import metadata attribute values into the 'Image Display Sequence' metadata attribute, an input file must contain columns holding the metadata attribute values, the Product IDs, and the referenced target asset IDs.
Map Reference Metadata
- Map the source ID or key column using the Auto Map button, or manually. For more information, refer to the ID or Key - Map Inbound topic.
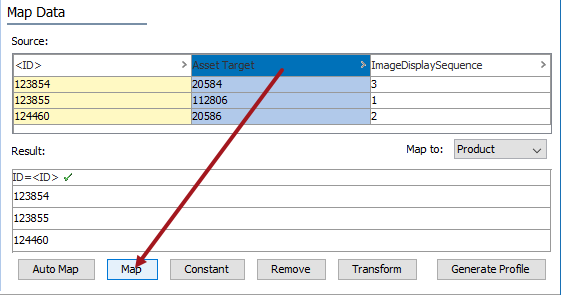
Columns that include Predefined Header Text can be automatically mapped as defined in the Inbound Map Data - Auto Map topic. For the sample below, this includes the <ID> column.
- In the Source section, select the target column of data and click the Map button.
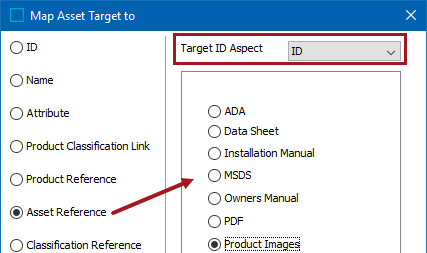
- In the 'Map ... to' dialog (below), select the Asset Reference radio button, and then select the reference type.
Only existing reference types are listed. You cannot specify or create new reference types during the import.
- For the Target ID Aspect parameter:
- Select ID when the inbound file includes the ID for the target.
- Select the Key from the dropdown when the inbound file includes a key for the target.
- Click OK and the Result panel displays the selection of reference asset target. A validated data column is marked with a green check mark as shown below.
- In the Source section, select the metadata attribute column of data and click the Map button.
- In the 'Map ... to' window, select the Reference Meta-Data radio button to display the additional parameters.
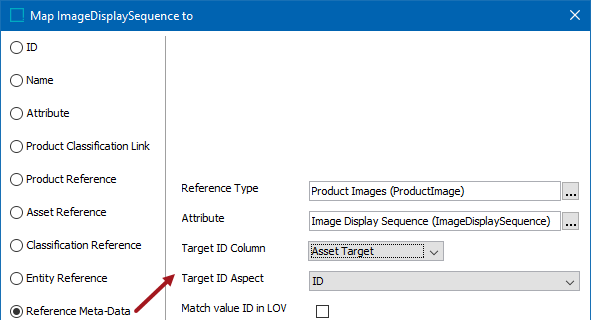
- Complete the additional parameters as follows:
- For Reference Type, select the type of reference that should receive the metadata values. In this example, the asset reference type 'Product Images' is selected.
- For Attribute, select the attribute that should receive the metadata values. In this example, the attribute ‘Image Display Sequence’ is selected.
- For Target ID Column, from the dropdown, select the column in the import file that includes the ID of the reference target. In this example, the 'Asset Target' column in the input file is selected.
- For Target ID Aspect, from the dropdown, select ID when the inbound file includes the ID for the target; select the Key when the inbound file includes a key for the target.
- For Match value ID in LOV, if the metadata attribute holds an LOV with value IDs, the import file can also hold the value IDs. If checked, the ID of the LOV must be included in the inbound file; if unchecked, the LOV ID is not required.
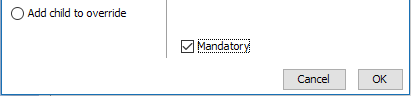
- Check the Mandatory option appropriately:
- If checked, imported objects must have an attribute value in the file. If an attribute value does not exist for an object, the object is skipped and not imported.
- If unchecked, all objects are imported regardless if an attribute value is specified or not.
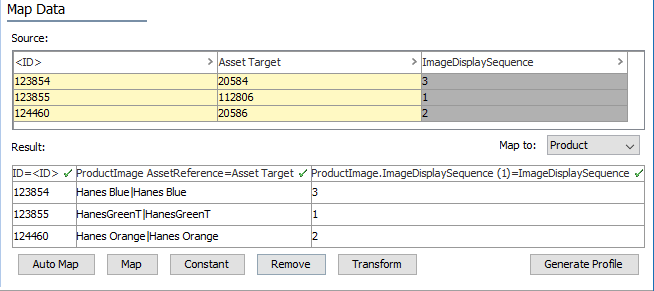
- Click OK and the Result panel displays your selection of reference target. A validated data column is marked with a green check mark as shown below.
- Complete any additional mapping.
- Initiate the import.
Results
In the Tree, selecting the updated products and displaying the 'Product Images' reference type shows the new referenced objects as well as the metadata on the reference.