A product in the inbound file can be linked to one or more classifications in STEP using the valid product-to-classification link types.
Prerequisites
The inbound file must include:
- The ID or Key of the product.
- The ID or Key of the classification.
-
A separate field for each classification ID when linking the same product to multiple classifications.
Although an Excel file is shown in the examples, any inbound format is allowed.

The mapping instructions are the same for both the Import Manager tool and the IIEP tool. For details about starting an import, refer to Creating a Data Import or Creating an Inbound Integration Endpoint.
Note: Replacing a single Product Classification link during import requires the use of the ReplacementRules tag in STEPXML. Replacement during import is not available for other formats. Refer to the ReplacementRules Tag in STEPXML topic in the Data Exchange documentation.
Map Product Classification
- Below the Source section, use the Map to dropdown to select the Product object super type.
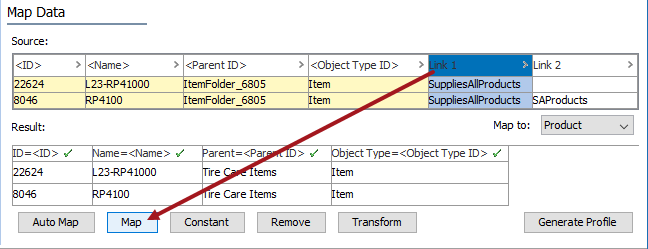
- Map the ID or key column using the Auto Map button, or manually. For more information, refer to the ID or Key - Map Inbound topic.
Columns that include Predefined Header Text can be automatically mapped as defined in the Inbound Map Data - Auto Map topic. For this sample file, this includes the <ID>, <Name>, <Object Type ID>, and <Parent ID> columns.
- In the Source section, select the classification ID column of data and click the Map button.

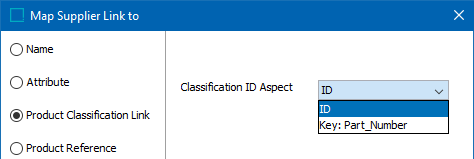
- In the ‘Map ... to’ dialog, select the Product Classification Link radio button.
For the Classification ID Aspect dropdown, select:
- ID if the file includes the object ID
- Key if the file includes a unique key. Only activated keys are displayed.

Note: Each classification object type can have only one product-to-classification link type assigned. STEP identifies the classification by the ID or key and applies the single valid link type available for the mapped product.
- Check the Mandatory option appropriately:
- If checked, imported objects must have an attribute value in the file. If an attribute value does not exist for an object, the object is skipped and not imported.
- If unchecked, all objects are imported regardless if an attribute value is specified or not.

- Map additional product-to-classification links if necessary.
- Click OK and the Result panel displays your selection of column and attribute. A validated data column is marked with a green check mark as shown below.

Note: Although the data is not displayed in the Results panel for links after the first one, it is imported as demonstrated in the example below.
- Complete the mapping and initiate the import.
Example
Prior to import, the products show no product-to-classification links in the editor.

After a successful import, new links are displayed on the product's References tab.
