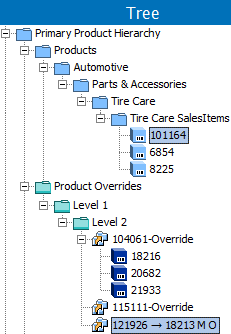
A product override folder can include products from various 'standard' (non-override) product families. Similarly, a product override leaf object (child to override) can live under a different product folder (override or standard) than the folder in which its corresponding standard object resides.
A single import file can include multiple products added as a child to a single Product Override or to multiple Product Overrides. For this example, two 'salesitem' product objects are added as children to two separate Product Override objects.
The mapping instructions are the same for both the Import Manager tool and the IIEP tool. For details about starting an import, refer to Creating a Data Import or Creating an Inbound Integration Endpoint.
Prerequisites
The required steps include:
- Setting up the Product Override object type in System Setup. Refer to the Product-Override Object Types and Commercial Object Types topic in the System Setup documentation.
- Verifying the import file before starting the import as defined in the Verify Import File section below.
- Mapping 'Add child to override' as defined in the Map Add Child to Override section below. To add a child during creation of an initial product override, refer to the Product Overrides topic in the Getting Started documentation.
Verify Import File
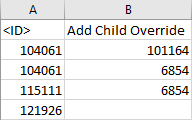
To ensure that the object is imported successfully and correctly, before starting the import, open the import file and ensure that the following fields exist:
- ID: The ID of the parent that the child product override will live under.
- Add Child to Override: The ID of the product in STEP that will get an override version of itself as a child to a parent override.
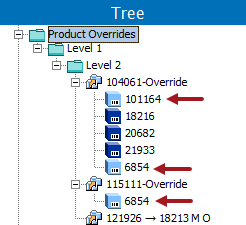
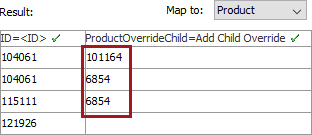
This example shows an Excel import file (although any inbound format can be used). The file adds two objects as children for one product override (ID 104061), and one of those objects is also added as a child on another product override (ID 115111). Any additional data on the final row in this file will be applied to the product override (ID 121926) based on the setting of the Mandatory parameter as defined below.
Once System Setup is configured, an object can be imported as a child to a product override using Import Manager or Inbound Integration Endpoint.
- Use Auto Map to map the ID, or map it manually. For more information, refer to ID or Key - Map Inbound.
- In the Source section, first select the Add Child Override column and then click the Map button to display the 'Map ... to' dialog. The label of the field is used as the title of this dialog.
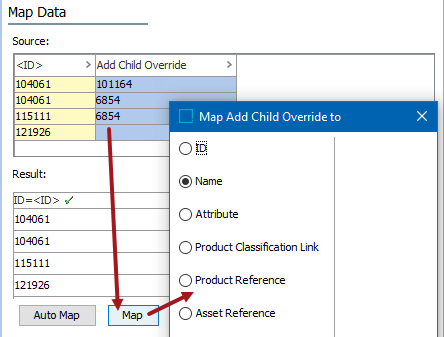
- On the Map ... to dialog, select the Add child to override radio button.
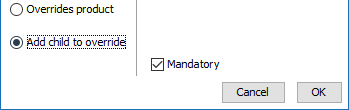
- Check the Mandatory option appropriately:
- If checked, imported objects must have an Add Child Override value in the file. If an Add Child Override value does not exist for an object, the object is skipped and not imported.
- If unchecked, all objects are imported regardless if an Add Child Override value is specified or not.
- Click OK and the Result panel displays your Add Child Override values. A validated data column is marked with a green check mark as shown below.
- Complete the mapping and initiate the import.
Result
When import is successful, the objects display under the designated Product Override parent in Tree, as indicated by the arrows in the following image. The last object was not modified since mandatory was checked and no ID was included for the Add Child Override field in the import file.