When you add a transformation, you typically need to specify parameters for the transformation to work. The following layout transformations are available and are defined in the sections below:
![]()
Prerequisites
The instructions in the following subsections assume that you have already added the specified transformations to your table by following the instructions in the Add a Transformation to a Table or Table Type subsection of the Table Transformations topic here.
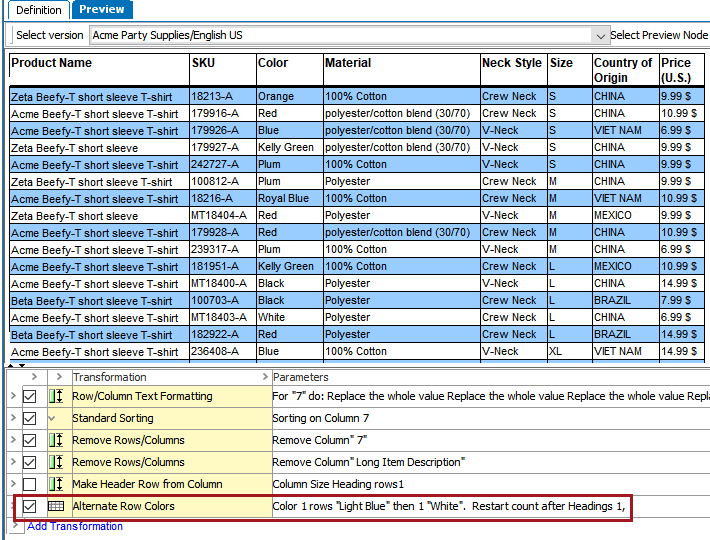
Alternate Row Colors
The Alternate Row Colors transformation alternates the background shading of rows at a specified frequency; for example, every other row, every two rows, etc.
Example
In this example, every other row is shaded Light Blue.
Steps
- After adding the transformation, under Parameters, click the ellipsis button (
 ). The Alternate Row Colors dialog displays.
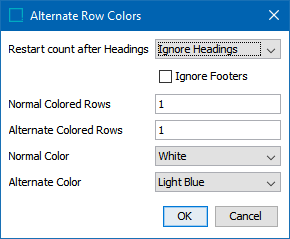
- In the Restart count after Headings list, select either Ignore Headings, 1, or 2. Selecting 'Ignore Headings' will actually include headings in the row shading. For example, if the Normal Color is blue and the Alternate Color is white, then the header row will be shaded blue if 'Ignore Headings' is selected.
Selecting 1 will cause the row shading to start with the normal row(s) that appear directly below Heading (1) rows. Selecting 2 will cause the row shading to start with the normal row(s) that appear directly beneath Sub Heading (2) rows.
Check Ignore Footers to prevent row colors from being applied to Footer rows.
- In the Normal Colored Rows field, enter the number of rows to shade in the Normal Color before shading rows with the Alternate Color.
- In the Alternate Colored Rows field, enter the number of rows to shade in Alternate Color before shading rows with the Normal Color again.
In the table example shown at the beginning of this topic, 1 has been selected for both the Normal and Alternate options.
- In the Normal Color list, select the relevant color.
- In the Alternate Color list, select the relevant color.
- Click OK.
Note: For a more complex level of control over the appearance of alternate-colored rows in lengthy, split tables with multiple repeated headers, the Alternating row colors settings available in the Header Repeating Pagination Plugin may be a better option than using the Alternate Colored Rows transformation. For more information, refer to the Header Repeating Pagination Plugin topic
Repeated Rule
The Repeated Rule transformation inserts a specified line style based on table rules; for example, a rule line of a certain width is added at a specified frequency.
Example
In the below example, a 2 pt rule line is added every two rows.
Steps
- After adding the transformation, under Parameters, click the ellipsis button (). The Repeated Rule dialog displays.
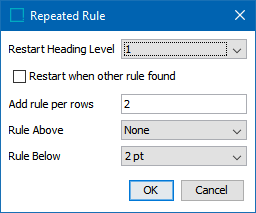
- From the Restart Heading Level list, choose either None, 1, or 2. The default setting is None, meaning that no line style is inserted at the heading level. When you select 1 or 2, the line style is applied again after each header row of the specified level number.
- Check Restart when other rule found to reset the count when another line style is found in the table.
- In the Add rule per rows field, enter a relevant number of rows to put in a line style.
- From the Rule Above list, select the relevant line style to be used as the top border of the row.
- From the Rule Below list, select the relevant line style to be used as the bottom border of the row.
- Click OK.
Rule When Different
The Rule When Different transformation will automatically inserts a rule style when column contents are changed.
Example
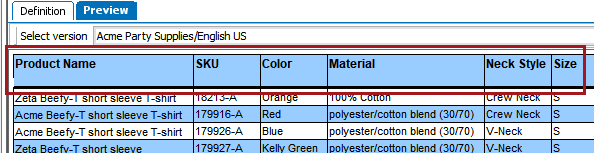
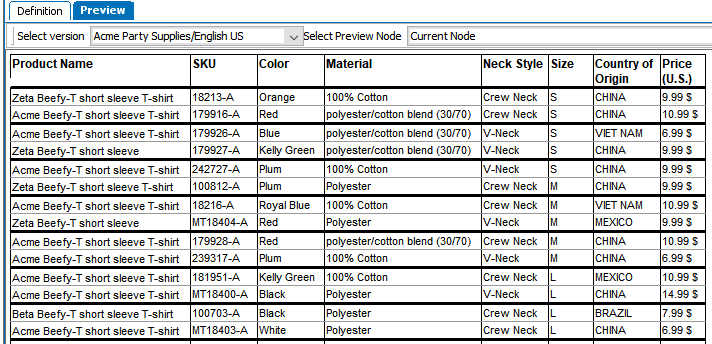
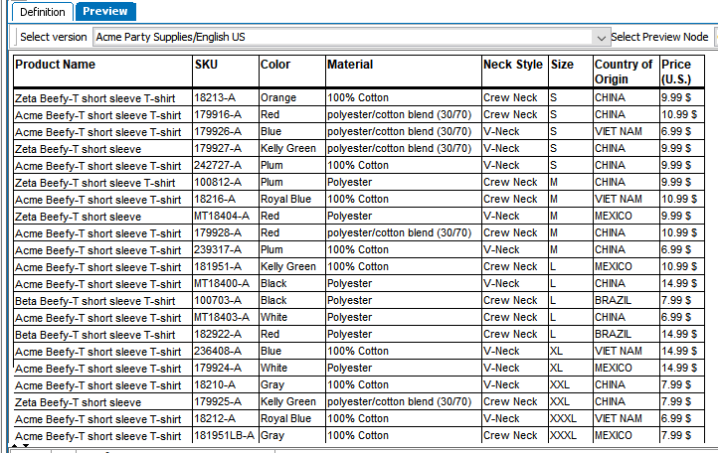
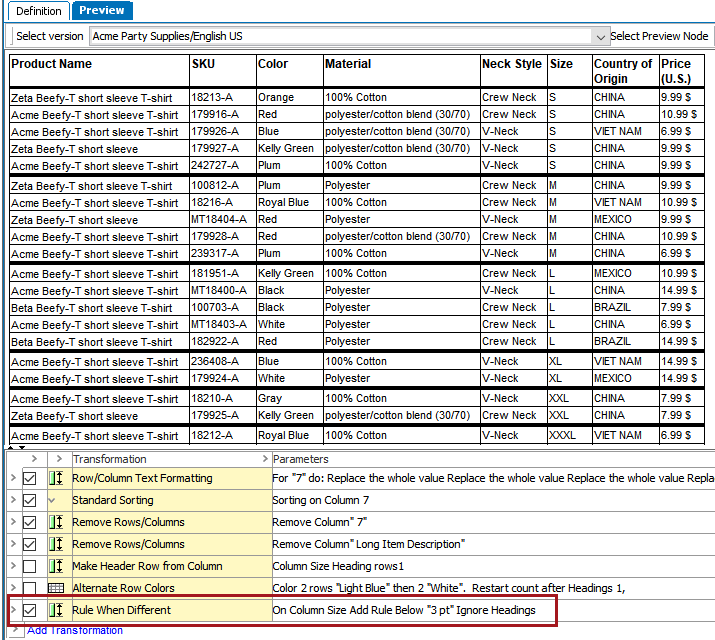
In this example, a 3 pt rule line is added every time a value in the Size column changes, so a 3 pt rule surrounds all size S rows, all size M rows, etc. This is how the table looks before the transformation:
After the transformation:
Steps
- After adding the transformation, under Parameters, click the ellipsis button (). The Rule When Different dialog displays.
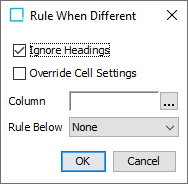
- Select Ignore Headings if you do not want the transformation to consider contents in Heading columns types.
- Select Override Cell Settings to have the applied rule override any existing rule settings on affected cells. This setting ensures that a horizontal rule will be applied across all columns of a row when the 'Rule When Different' transformation is applied after a Pivot Transformation.
- In the Column field, click the ellipsis button () to display the Select Column dialog.
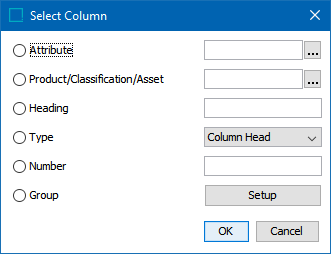
- Select Attribute to apply the transformation to the column that contains the specified attribute. Click the ellipsis button () to search or browse for the relevant attribute.
- Select Product/Classification/Asset to apply the transformation to the column that contains the specified object. Click the ellipsis button () to search or browse for the relevant object.
- Select Heading to identify the column by typing the header text of the relevant column.
- Select Type to choose a specific column type from the dropdown list.
- Select Number to identify the column by entering the sequence number of the relevant column. For example, to apply the transformation the second column, type 2.
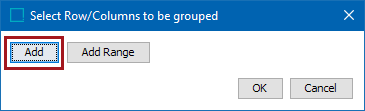
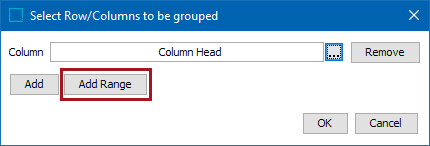
- Select Group to apply the transformation to a group or columns and/or a range of columns, then click the Setup button.
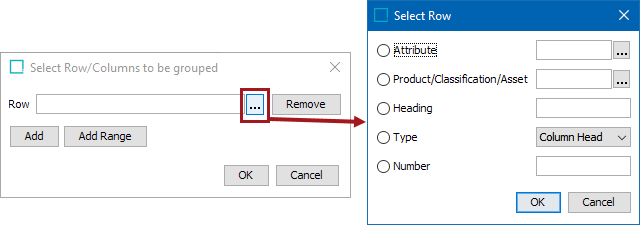
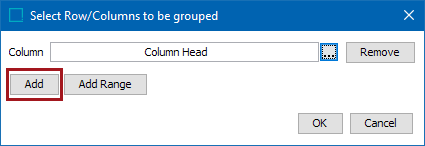
- Click Add in the Select Row/Columns to be grouped dialog to add columns to the group individually.
- After clicking Add, an Undefined field displays. Click the ellipsis button () to launch another Select Column dialog. This is identical to the previous 'Select Column' dialog, except without the Group option.
- Click Add again to repeat the previous steps and add more columns to the group. Click OK.
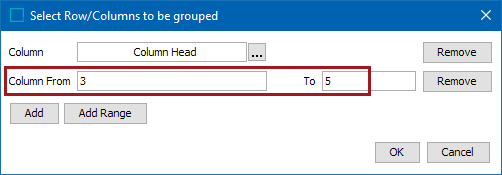
- To add a Range of columns to the group, click Add Range.
- Enter the starting and ending column numbers in the Column From and To fields. Click OK. To enter a range that will contain the remainder of the table if columns are added later, enter a larger number in the 'To' field such as 5999. Note that these fields can only contain integer values.
- From the Rule Below list, click the relevant Line Style to be used as the bottom border of the row.
- Click OK.