When mapping data, not every Source object in the system will have an existing Target object to run the Mapper Configuration on. If the Target object does not exist, the Mapper should be able to create a Target object and place the Target object in the right hierarchy (referred to as Target object hierarchy). To automate the process of creating the Target object (and its hierarchy), the user has to configure on how the Target object hierarchy is to be automatically created when the Mapper Configuration setup entity is executed.
When the term 'Target object hierarchy' is mentioned in this topic, it is to be noted that the hierarchy could be in its simplest form that consists of just the Target object itself, or it can be a complex hierarchy that includes multi-level folders narrowing down to house the Target object.
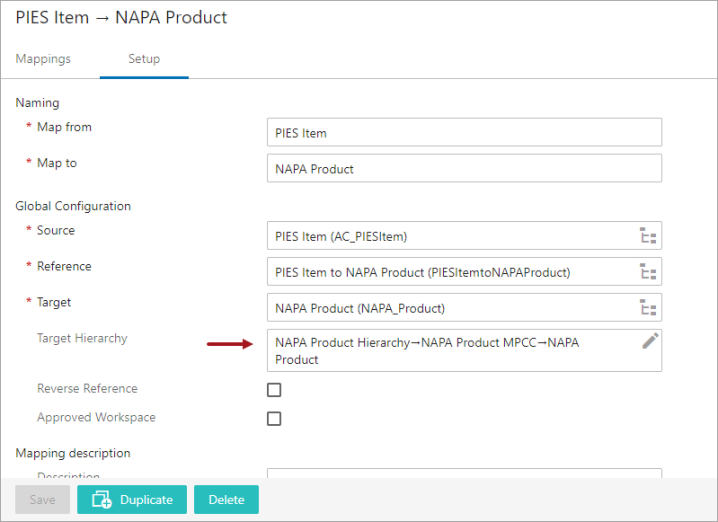
When clicking the Edit icon (![]() ) that is displayed to the right of the Target Hierarchy parameter (available on the Setup tab of the Onboarding Mappings Details Screen), the Target Hierarchy Editor dialog appears. This dialog allows the user to define an automatic creation of the Target object, parent to the Target object, and if required, a whole new hierarchy where the Target object should be created below. For more information on configuring the Setup tab of the Onboarding Mappings Details Screen, refer to the Configuring Mapper Configuration Setup Entity topic of the Data Onboarding documentation here.
) that is displayed to the right of the Target Hierarchy parameter (available on the Setup tab of the Onboarding Mappings Details Screen), the Target Hierarchy Editor dialog appears. This dialog allows the user to define an automatic creation of the Target object, parent to the Target object, and if required, a whole new hierarchy where the Target object should be created below. For more information on configuring the Setup tab of the Onboarding Mappings Details Screen, refer to the Configuring Mapper Configuration Setup Entity topic of the Data Onboarding documentation here.
Configuring the Target Hierarchy parameter is only necessary if the parent node of the Target object does not exist.
For example, if application records are to be created in the Target Hierarchy and the part that the applications belong to already exists in the Target Hierarchy, and the relationship between the source part and target part have already been established, then nothing needs to be defined in the Target Hierarchy parameter.
But if the part (parent node) for the applications do not exist, then users can use the Target Hierarchy parameter to configure the hierarchy that the Target object should be created below by defining the root node and its parent object types. Once the root node and parent object types have been defined, then the OK button will be enabled and the parent objects will get created along with the applications when the mapping configuration is executed.
The Target Hierarchy parameter has been designed to check for an existing Target object hierarchy in the system, and a new hierarchy is created only if there are no similar hierarchy available in the system. The system would place the Target object in the suitable hierarchy if the similar hierarchy is already existing in the system. This ensures that there is no duplicate hierarchy created. The way the name and ID structure of the newly created object is to be populated can be well defined in the Target Hierarchy Editor dialog.
Note: The Target Hierarchy parameter is designed to check for existing Target objects within the system to ensure that duplicate objects are not created. If existing objects are encountered, then they will be skipped and only new objects will get created.
Prerequisites
Before configuring the Target Hierarchy Editor dialog, the Source, Reference, and the Target parameters that are available within the Setup tab of the Onboarding Mappings Details screen have to be correctly populated.
Configuring the Target Hierarchy Editor Dialog
To configure the Target Hierarchy Editor dialog, follow these steps:
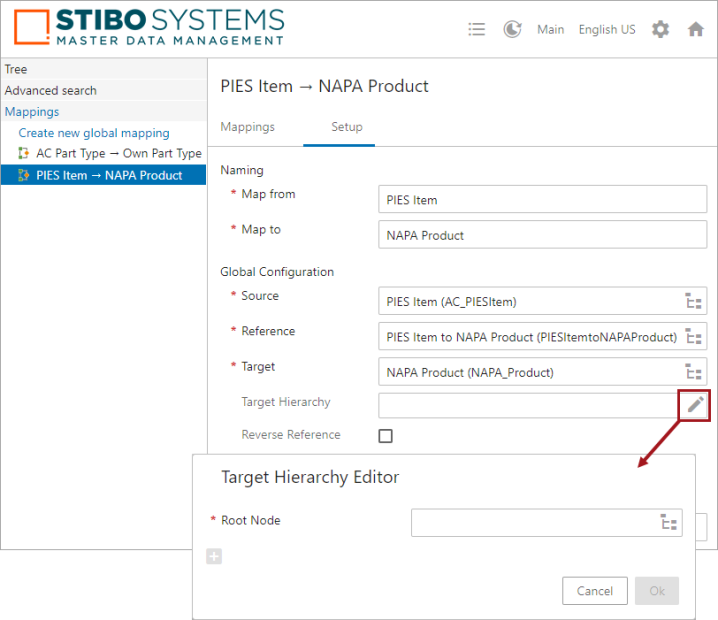
- Click on the Edit icon (
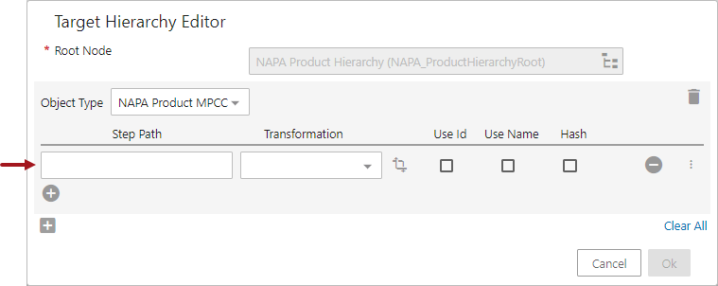
 ) on the Target Hierarchy parameter to open the Target Hierarchy Editor Dialog (as shown in the picture above).
 - In the Target Hierarchy Editor dialog, click on the Node Picker icon available next to the Root Node parameter to select the root node object. This selected object will be considered as the first level of the Target object hierarchy (root node) where the Target object should be created somewhere down below.
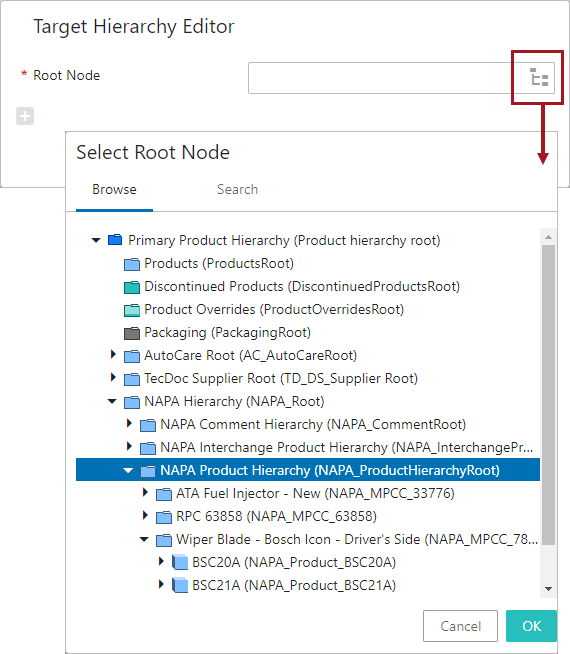
Note: Only the parent node of the node holding the object type defined in the 'Target' parameter will be valid to be selected.
In this example below, the NAPA Product Hierarchy is selected to be the root node where the new Target object should be created below.
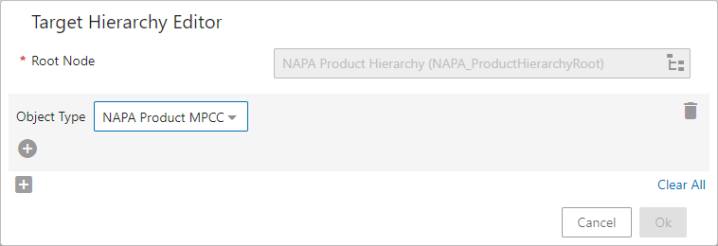
Once selected, the root node will be displayed within the Root Node parameter, and the 'Add Object Type' icon (![]() ) along with the 'Clear All' link gets activated within the dialog. The 'Clear All' link will clear all of the values that are populated within the Target Hierarchy Editor dialog.
) along with the 'Clear All' link gets activated within the dialog. The 'Clear All' link will clear all of the values that are populated within the Target Hierarchy Editor dialog.

- Click the 'Add Object Type' icon (
 ) to further narrow down the process of defining the Target object hierarchy. This provides an option to select the object type using the dropdown next to the Object Type field. Only the object types that are valid under the root node object type (defined above) are available as options within the dropdown.
In the screenshot below, the NAPA Product MPCC object type is selected.
- By default, the ID of the new objects that are created using the above mentioned object type will have the system generated STEP ID. However, to create an object with a user specific ID and Name, click the 'Add' icon (
 ). This provides an option for the user to define a criteria for the ID and Name of the new object that gets created on this level of the hierarchy.
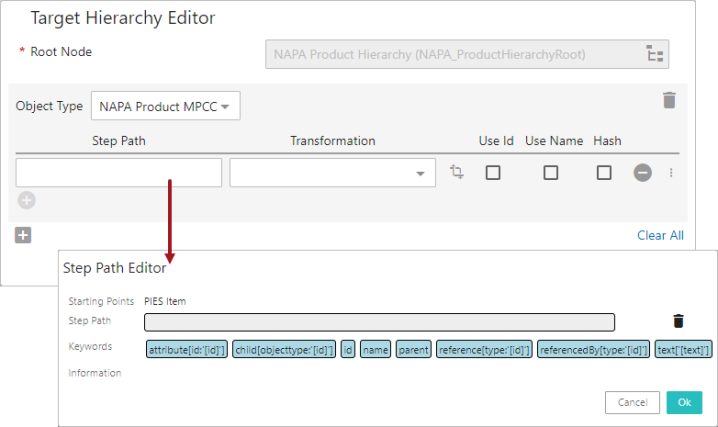
- Click on the STEP Path field to open the Step Path Editor dialog that the user can use to define which information (ID, Name, attribute values, or references) from the Source object needs to be retrieved. The user also has the option to select specific data points from the Source object, or any of its related objects by selecting a combination of the elements available in the Keywords field and thereby creating a STEP Validation path. For more information on defining the Source STEP Path, refer to the Mapping Validation Path Functionality topic within this guide here.
The retrieved information can be used to populate the ID or Name field of the newly created object by selecting the 'Use Id' or 'Use Name' checkbox respectively. Select the 'Hash' checkbox if the STEP Path value should be included in the hash value of the object's ID to calculate the object's uniqueness. The ID is allowed to have a maximum of 40 characters with the free text and hash value combined.
If necessary, use the dropdown in the Transformation column to review the list of available attribute transformations in the system that can be applied while defining the ID and Name of the new object that gets created on this level of the hierarchy. Also, users can click on the 'Select and modify transformation' icon ( ) to create a new or to edit an existing attribute transformation. For more information on creating or editing an attribute transformation via the Target Hierarchy Editor window, refer to the Attribute Transformation in Mapper Configuration Setup Entity topic within this guide here.
If required, click the three-dotted icon (![]() ) that is available in the right of the criteria to display the rearranging dialog. The user can select the Top, Up, Down, or Bottom button to rearrange the criteria accordingly.
) that is available in the right of the criteria to display the rearranging dialog. The user can select the Top, Up, Down, or Bottom button to rearrange the criteria accordingly.
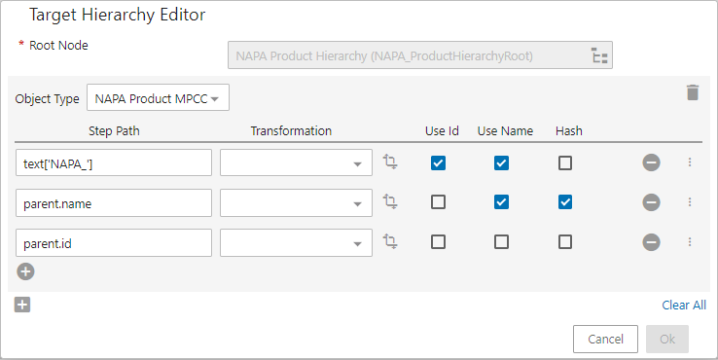
For this example, it is considered that the Name and ID values from the parent (PIES PCdb Part Terminology) of the Source object will be used in the Name and ID field of the new object (NAPA Product MPCC). Also, it is considered that the new objects will have a prefix value 'NAPA_'. To achieve this considerations the following setup is used.
- The text['[text]'] element is used to add 'NAPA_' as the prefix.
- The parent and the name elements are used to follow parent of the Source object and retrieve Name value from the parent of the Source object.
- Similarly, The parent and the id elements are used to follow parent of the Source object and retrieve ID value from the parent of the Source object.
- The 'Use ID,' 'Use Name,' and 'Hash' checkboxes are selected accordingly to use in the Name and the ID of the new object being created, as shown below.
- Similarly, add and define all of the objects that fall in the Target object hierarchy until the last object i.e., the Target object itself is defined. The OK button will be enabled when the Target object is defined.
For this example, it is considered that the values of the Part Number attribute and ID from the Source object (PIES Item) will be used in the Name and ID field of the Target object (NAPA Product). Also, it is considered that the newly created Target objects will have a prefix value 'NAPA_'. To achieve this considerations the following setup is used.
- The text['[text]'] element is used to add 'NAPA_' as the prefix.
- The attribute[id:'[id]'] element is used to follow the Source object and retrieve the value of the attribute Part Number from the Source object.
- Similarly, The id element is used to follow the Source object and retrieve ID value from the Source object.
- The 'Use ID,' 'Use Name,' and 'Hash' checkboxes are selected accordingly to use in the Name and the ID of the Target object being created, as shown below.
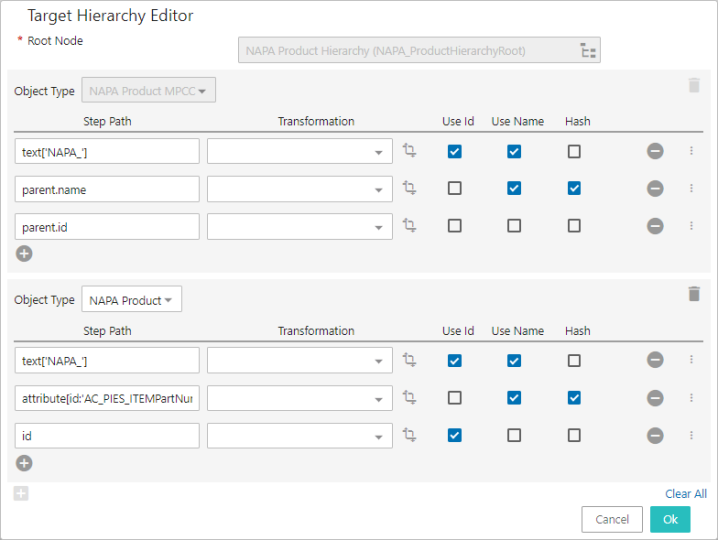
- Click OK to close the Target Hierarchy Editor dialog. All the objects in the Target object hierarchy with a direction arrow pointing from Target root node to Target object will be displayed in the Target Hierarchy parameter.