The Mapper Configuration is a STEP setup object. It is stored as a STEP setup entity with object type 'MapperConfiguration.' Each Mapper Configuration holds the definition of what the mapper should do.
Important: Creation of the Mapper Configuration setup entity can be done in both the workbench and Web UI, but further configurations can only be done in Web UI and not in the workbench.
Setup entity definitions can be exported as comments and submitted to an external source control system for comparison purposes. For details, refer to the Configuration Management documentation.
Prerequisites
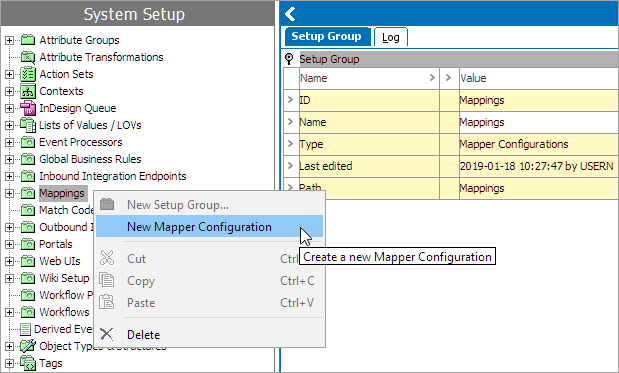
A setup group must be created to hold the Mapper Configurations. This is a one-time setup in the system. For more information about creating a setup group, refer to the Data Onboarding Automation Solution Initial Setup topic within this section here.
Since basic concepts for working with the designer are not covered in this section, a user configuring the Mapper Configuration setup entity within a Web UI is expected to be familiar with the Web UI Designer. In addition, the user must have appropriate privileges to access the designer. For more information, refer to the Designer Access topic within the Web User Interfaces section of the STEP Online Help here.
Creating Mapper Configuration Setup Entity in STEP Workbench
- To create the Mapper Configuration setup entity, select the Mappings setup group root node, right-click and select New Mapper Configuration.
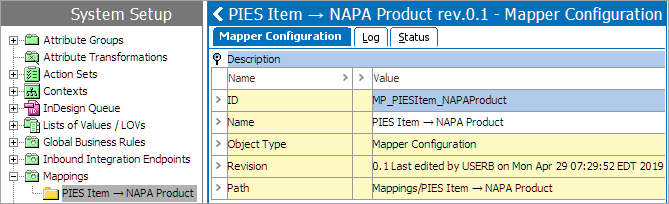
- In the dialog that appears, type in a suitable ID and Name, and then click 'Create.' In the screenshot below, a Mapper Configuration named 'PIES Item → NAPA Product' is created under setup group called 'Mappings.'
Creating Mapper Configuration Setup Entity in Web UI
- From the Web UI homepage, select the 'Mappings Navigator' component from the Global Navigation Panel.
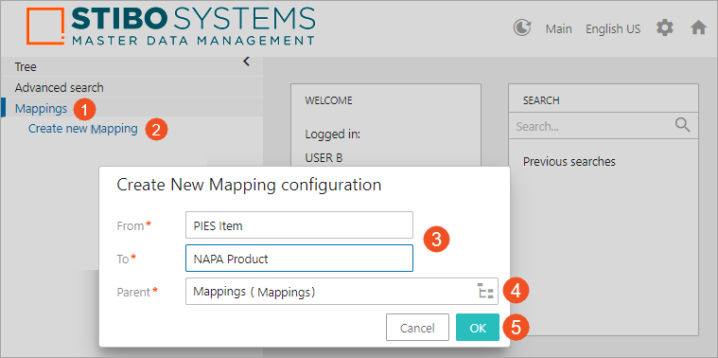
- Click on the 'Create new Mapping' link, and the 'Create New Mapping configuration' dialog displays.
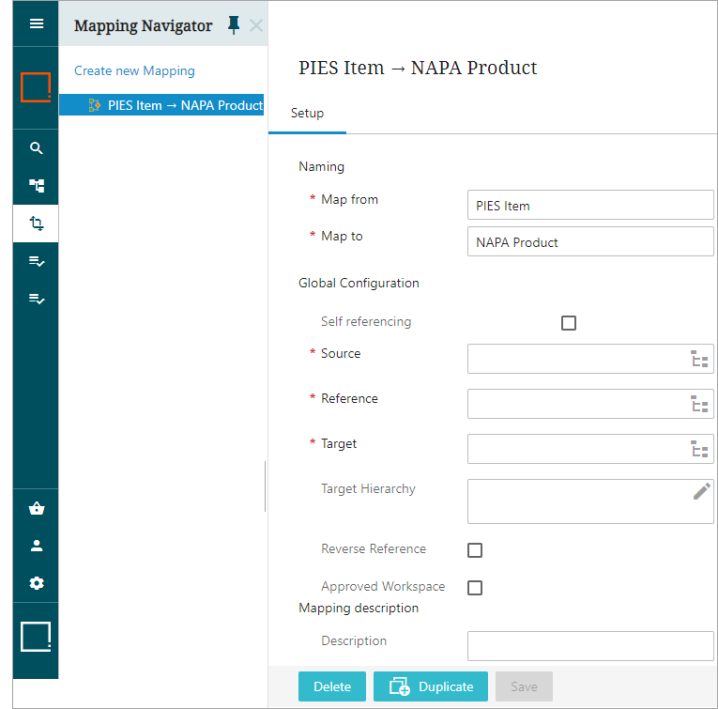
- Type in a suitable name in the 'From' and 'To' fields. Usually, these fields are defined by an identifiable name of the source and target object types. In the example above, 'from' and 'to' fields are populated with values 'PIES Item' and 'NAPA Product' respectively.
- Select the parent node (Setup Group) under which the newly created mapper configuration will reside.
- Click OK and the new mapper configuration named 'PIES Item → NAPA Product' is created under setup group 'Mappings' in the Global Navigation Panel (as shown below). Also in the image below, a Unicode arrow → is created between the Source and the Target names demonstrating the direction of the intended mapping.
Important: If the Mapper Configuration is deleted in Web UI, then it will get moved to the Recycle Bin folder in System Setup. If the user tries to create a new mapping with the same text string in the 'from' and 'to' field, then the user will get the Unexpected error. If users want to reuse the same text string in the 'from' and 'to' field when creating a new mapping, then either purge the deleted Mapper Configuration setup entity from the Recycle Bin, or create a Mapper Configuration with some different text. Click OK then go back and change it to be what the user requires.
Configuring Mapper Configuration Setup Entity in Web UI
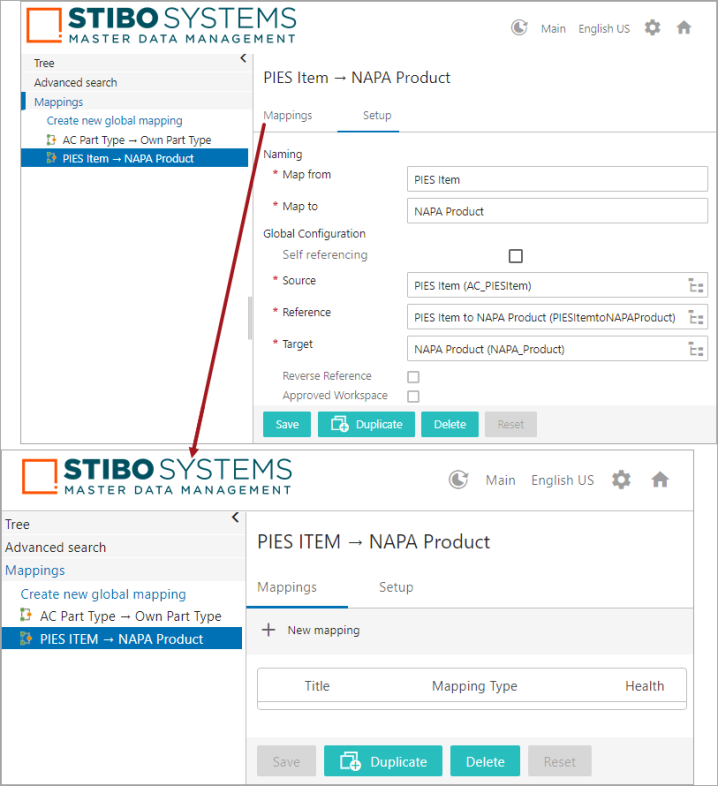
A newly created Mapper Configuration setup entity must first have the Naming and Global Configuration parameters defined and saved in the Setup tab before the Mappings tab will appear for the user to define mapping rules. This is achieved in the Onboarding Mappings Details Screen for the Mapper Configuration.
When a new Mapper Configuration is first created and selected in Web UI, the Setup tab will be empty (as shown below).

- Populate the available parameters as explained below.
Map from: By default, this mandatory parameter is prepopulated with the value defined while creating the Mapper Configuration in Web UI. However, this field is blank if the Mapper Configuration is created in the workbench and needs to be populated with an identifiable name of the source object type (this can be any string that the user wants to enter, e.g., PIES Item). Optionally, if a different name is desired, edit the name to be something more suitable.
Map to: By default, this mandatory parameter is prepopulated with the value defined while creating the Mapper Configuration in Web UI. However, this field is blank if the Mapper Configuration is created in the workbench and needs to be populated with an identifiable name of the target object type (this can be any string that the user wants to enter, e.g., NAPA Product). Optionally, if a different name is desired, edit the name to be something more suitable.
Self referencing: By default, this remains unchecked. Selecting this checkbox allows users to onboard (move / copy) data within the object, thereby allowing users to execute onboarding that is defined as a self reference mapping. Selecting this checkbox makes the source and target to be the same object. Users only get to determine the source object within the Source parameter, and the Reference, Target, Target Hierarchy, and Reverse Reference parameters will be grayed out upon selecting this parameter.
Source: By default, this mandatory parameter is blank. Start typing in the empty field to enter the source object type, or click the node picker to browse or search for the object type which defines the source object in the system. This parameter defines the source object type of where it is being mapped from (this must be an existing object in STEP, e.g., AC_PIESItem).
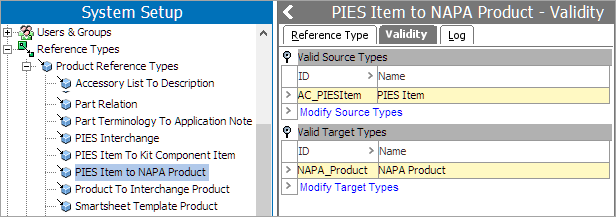
Reference: By default, this required parameter is blank. Start typing in the empty field to enter the reference type, or click the node picker to browse or search for the Reference Type in system, so that STEP can follow this reference type and will establish the link between the Source object and the Target object. This Reference Type should contain the object types defined in the Source and Target parameters as Valid Source Types and Valid Target Types respectively in the system.
Target: By default, this mandatory parameter is blank. Start typing in the empty field to enter the target object type, or click the node picker to browse or search for the target object type in STEP. This parameter defines the target object type of where it is being mapped to (this must be an existing object in STEP, e.g., NAPA_Product).
Target Hierarchy: By default, this optional parameter is blank. This parameter lets the user define an automatic creation of the Target object, parent to the Target object, and if required, a whole new hierarchy where the Target object should be created below. Click the Edit icon (![]() ) available within the right of the field to open the Target Hierarchy Editor dialog. The way the name and ID structure of the newly created object is to be populated is defined within this dialog. The Target Hierarchy parameter checks for an existing object in the system, and a new object is created only if there are no similar object available in the system. The system will place the Target object in the suitable existing object if the object is already existing in the system. If not, it will create the parent object or a whole new hierarchy as defined in the Target Hierarchy Editor dialog. This ensures that there is no duplicate object created. For more information about Target Hierarchy Editor dialog, refer to the Target Hierarchy Editor Dialog topic within this section here.
) available within the right of the field to open the Target Hierarchy Editor dialog. The way the name and ID structure of the newly created object is to be populated is defined within this dialog. The Target Hierarchy parameter checks for an existing object in the system, and a new object is created only if there are no similar object available in the system. The system will place the Target object in the suitable existing object if the object is already existing in the system. If not, it will create the parent object or a whole new hierarchy as defined in the Target Hierarchy Editor dialog. This ensures that there is no duplicate object created. For more information about Target Hierarchy Editor dialog, refer to the Target Hierarchy Editor Dialog topic within this section here.
Reverse Reference: By default, this optional parameter is unchecked. Selecting this field will work the other way of the reference type defined in the Reference parameter above by using the 'Referenced By' tab to find the target. For example, if a mapper configuration with mapping defined from PIES Item to NAPA Product, checking this parameter will reverse the mapping definition, i.e., the mapping shall be defined to happen from NAPA Product to PIES Item.
Approved Workspace: By default, this optional parameter is unchecked. Selecting this field will take all values from the Approved workspace from the Source object and create them in the Main workspace on the Target. For example, if a mapper configuration with mapping defined from PIES Item to NAPA Product, checking this parameter will select all values present only in the Approved workspace of the PIES Item object and create them in the Main workspace on the NAPA Product.
-
Click Save, and a new Mappings tab next to the Setup tab gets created to add and configure newer mapping plugins.