The Application Coverage Report can display missing and/or existing application data in an Excel spreadsheet (XLSX file type). The results displayed within an Application Coverage Report are based on the search criteria selected within an Application Manager screen. Since the Application Coverage Report is built to work with the Application Manager's intelligent search interface, it is extremely configurable, and provides users on-demand flexibility to choose the report criteria that best meets their needs.
Before an Application Coverage Report can be run, the desired search criteria must be entered into the Application Manager Search Panel, either manually or by selecting from the list of saved searches. Once criteria have been selected, clicking the 'Report' button allows users to export the Application Coverage Report.
Within an Application Coverage Report, each application and/or missing application will display as its own row. Missing application rows are prepopulated with the condition(s) that are currently missing coverage. Because the missing coverage is visible within the Application Manager results table, it becomes easy for the user to applicate the part by entering the part number necessary for the vehicle and its conditions.
Prerequisites
Before attempting to understand how the Application Coverage Report is used, it is recommended to first become familiar with the Application Manager Overview and Using Application Manager Intelligent Search Interface (here) topics within this guide.
Application Coverage Report Results
The Web UI designer can be used to easily add and/or remove the display of columns within the Application Manager results table. Within an Application Coverage Report, when the following column headings are configured within the Application Manager results table, they will display within the Application Coverage Report:
- Application Assembly Value
- Application Competitor or OE Part Numbers
- Application Condition Header - Group
- Application Condition Header - Individual
- Application Part Type Value
- Application Part Type Title Header
- Application Part Value
- Application Set Assembly
- Application Set Part
Along with the columns configured to display within the results table, several ID columns (that may not display within the results table) will display to the right of their respective Name columns within the report. Below is an example of the attribute and/or classification references that will display an ID column:
- NAPA_ApplicationToEngine
- AC_ACESApplicationToEngineBase
- AC_ACESApplicationToTransmissionBase
- LOVs using an ID (i.e., NAPA_BodyStyleLOV, NAPA_EngineDesignatorLOV)
- Application Part Type Title Header
- Application Set Assembly
- Application Set Part
Additionally, attributes that are both valid for the search criteria provided, and configured within the 'Application Condition Header - Group' component, will display within the Application Coverage Report. For ease of use, each valid attribute name is listed within a column header of the report. For more information on the Application Condition Header - Group' component, refer to the Application Condition Headers topic (here) within this guide.
Important: Only options that contain a value will be exported. When an option is exported, its name will display as a column heading. Even when the following options are added to the Node List Properties Headers, they will not be exported because they are not handled: Application comments (AC Comment), ACES Application Qualifiers, Comments, NAPA Notes, and Application Asset References.
Running an Application Coverage Report
Users can choose to export existing applications and/or missing applications by selecting one of the following options in the dropdown to the left of the Report button:
- Existing Applications Only
- Existing and Missing Applications
- Missing Applications Only
When the 'Existing and Missing Applications' or 'Missing Applications Only' options are selected, STEP performs specific actions known as missing application coverage functionality. For more information about missing applications, refer to the Missing Application Coverage Functionality topic within this guide (here).
After at least one criterion has been added to a search box, the Report button will enable. Once enabled, the Report button can be clicked before or after clicking the Search button. In other words, users are not required to use the Search button prior to the Report button. In fact, for searches that are time consuming or vague, it is recommended to use the Report button instead of the Search.
Once the Report button is clicked, a background process is initiated, and a notification displays informing users of the linked background process ID, and that the process has started. In the example below, the background process notification displays with the ID link displayed as 'BGP_101869.'

Within the notification, clicking the 'X' will close the dialog, whereas clicking the ID link will close the dialog and display the Background Process Details (as shown below).
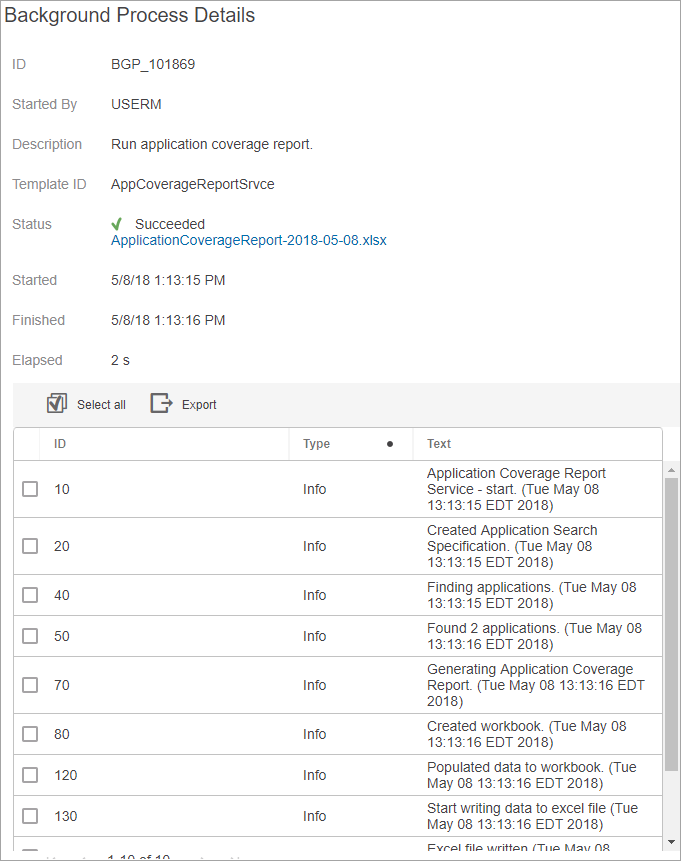
Once the Background Process Details screen Status parameter displays as 'Succeeded,' the download link for the Application Coverage Report will display. In the example above, the link displays as 'ApplicationCoverageReport-2018-05-08.xlsx.'
Users can easily track the progress of the report in the 'Recent background processes' side panel. In the example below, the 'Run application coverage report' link displays within the 'Finished Processes' of the side panel.

From within the notification of the Background Process side panel, users can click the background process link (Run application coverage report), and the Background Process Details screen will display. Users can also click the 'Download' link to download the .XLSX Application Coverage Report. For more information on the 'Recent background processes' side panel, refer to the Recent Background Processes Side Panel topic (here) within STEP Online Help.
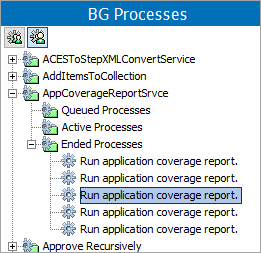
Additionally, the report can be downloaded from the workbench. To download the report from the workbench, go to the BG Processes tab > AppCoverageReprtSrvce > Ended Processes. Locate the desired process and click the save icon in the lower right corner of the workbench.
In the example below, the third of six background processes for the Application Coverage reports is selected.
Adding the Application Coverage Report to a Background Processes Screen
Optionally, the progress of a download for the Application Coverage Report can be configured to display within a Background Processes Screen. When configured, users can navigate to a Background Processes screen to view the following: TemplateID, ID, Started By, Progress, Start Date (and time), Finish Date (and time), Results download (as shown below).

From this table, users can optionally click on the BGP ID and the Background Process Details screen will display, or click the Results download to download the report.
Below are the steps to add the Application Coverage Report to a Background Processes Screen.
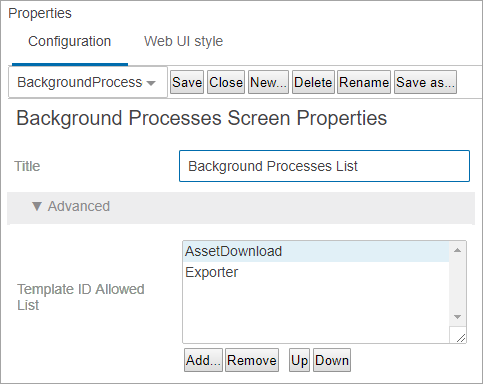
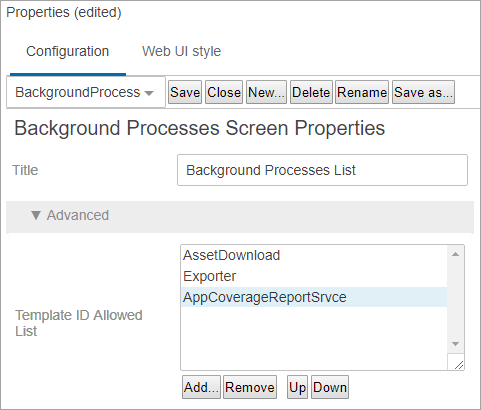
- Within a Web UI, go to a Background Processes Screen, access the Designer, and the Background Processes Screen Properties will display as shown below.
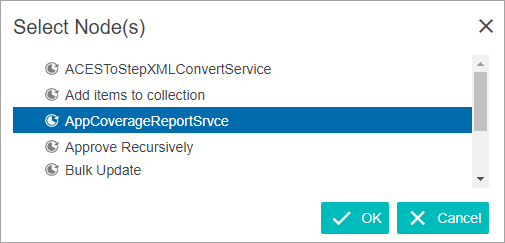
- Click the Add button below the 'Template ID Allowed List' parameter, and the Select Nodes list will display.
- Select the AppCoverageReportSrvce node, as shown below.
- Click the OK button, the dialog will close, and the 'Template ID Allowed List' parameter will display with the newly added AppCoverageReportSrvce (as shown below).
- Click the Save and Close buttons on the Designer.
For more information about the Background Process List Screen, refer to the Background Process List Screen topic (here) within STEP Online Help.